May 29th, 2015
This post (the first I have made for a long time, due to using Evernote instead) is about “A Lens-Changing Protocol for DP & AC”, where, in the Film Industry, DP = “Director of Photography” and AC = “Assistant Camera” (Camera Assistant). The word “protocol” refers to the fact that they have to interact, following an established etiquette … or protocol…
WolfCrow‘s regular email-newsletter drew my attention to a presentation by the legendary Freddie Wong: RocketJump: How to Be a Success on YouTube & Beyond. In that presentation, he mentioned a free online “Film School”. So I went to his RocketJump website and found my way to the school’s main Youtube page to the specific YT page for a course: Pro Tip: How to (Properly) Change a Lens, which also has its own follow-up forum thread with good points, in particular those by “KahlevN”.
Having absorbed all I could from all those sources, I evolved a “Business Process” workflow diagram via the yEd app, using its BPMN graphical convention. I had never even seen that before, let alone used it, but proceeded regardless (with my best guesswork) to produce the following, based solely on the aforementioned course and comments:
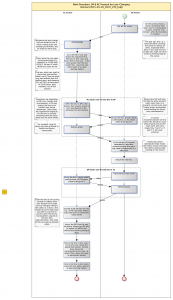
Is it helpful? Could a schematic like this benefit the design, analysis or explanation of such a practical workflow? I can imagine something like it being used for training/reminding and for demonstrating to independent assessors that a company has a “quality process” is in existence, defined in a formal-looking manner (you could call that “Theatre of Quality”).
Or is there a BPMN expert out there who’s sensibilities are offended by any incorrectness in my use of precisely defined graphical syntax or semantics? Or is there a better or more appropriate notation for diagramming workflows like this?
Any helpful comments gratefully received…
Posted in Uncategorized | No Comments »
August 3rd, 2014
As per http://forum.blackmagicdesign.com/search.php?keywords=serial&terms=all&author=&fid%5B%5D=3&sc=1&sf=all&sr=posts&sk=t&sd=d&st=0&ch=300&t=0&submit=Search
- Q: When u buy resolve with the bmcc does it have its own serial number or does it share the cameras serial number?
- A: The serial number is on the dongle, it’s engraved on the metal part of the usb dongle. It’s small and hard to see.
Posted in DaVinci Resolve | No Comments »
June 17th, 2014
What to do when you succeed in ordering one…
Steps:
- Initially you pre-order them under your existing package
- If one is successful then it becomes Registered in your name.
- This is communicated by email
- Also it is displayed as Registered under the tab [My Pre-Orders] of the [Domain Overview] of (any of) your package.
- However, it is added to your account as a new package, not under your existing package.
- To see it, go to your initial login-page
- → Page Title: “Welcome to the 1&1 Control Panel for your xyz package”
- On top blue banner-bar, towards right, drop-down menu under [My xyz Package]
- From that menu, select the (newly registered) domain name of interest.
- Shown within its own unique “Instant Domain Registration package.
- → Page Title: “Welcome to the 1&1 Control Panel for your Instant Domain Registration package”.
- Click on [Domain Centre]
- Click the domain name to edit the redirect or whatever.
Posted in website | No Comments »
May 16th, 2014
In Summary:
Purpose of FieldsKit ReInterlacer:
- Transforms progressive video (e.g. HDp25 frames/sec) into spatio-temporal interlaced video (e.g. SDi50 fields/sec). It achieves this by estimating the fields that would have been shot (had the original video itself been shot as interlaced) between each frame of the progressive video, via a process of motion estimation.
- Most NLEs do not use this “perfectionist” method, instead they at best simply combine (ghost-blur) successive frames, with no compensation for time/motion.
- On an interlaced display, such as an old analog TV or projector,
- The “NLE-simple” approach may lead to dynamic (changing e.g. moving) scenes and objects appearing flickery.
- The “perfectionist” approach will instead typically avoid such flicker.
Configuration of FieldsKit ReInterlacer:
- Field Order: [Lower First]
- Output Type: [= Create motion estimated fields]
- This is not the default (oddly). But it is the only proper way to get the expected “perfectionist” reinterlacing to happen!
- Source Layer: [Video 1]
Supplier’s website:
Read the rest of this entry »
Posted in Adobe, After Effects, artefacts, AviSynth, deinterlacing, DVD, DVD, Formats, interlacing, Motion, Premiere, Premiere, Twixtor | No Comments »
April 22nd, 2014
Windows 7’s “My Documents” library folder is by default mapped to the system drive, e.g. as [C:\Users\<username>\Documents]. However it is also possible to map it elsewhere, e.g. to another volume. A broadly equivalent situation exists in Mac OS. One might for example use this option to move the Documents library/folder to a thumb/flash drive when using several computers (one at a time) or to put it on a non-system drive, e.g. to free up space on the system drive, exclude it from system backups (thus freeing up both space and time) or to put it on something like a server, possibly on “The Cloud”.
I found the following explanation by accident, while attempting to find a way to prevent Adobe Media Encoder (AME) from storing its own “preview files” (sic), which are huge, in a sub-folder of “My Documents”, which itself on typical Windows systems is to be found on the System Drive. It seems that AME has no Preferences setting to store these preview files elsewhere, so a workaround is needed, e.g. to move the “My Documents” library folder itself to another volume.
- http://forums.adobe.com/message/6045027
- 6. Mark Mapes, 23-Jan-2014 10:17
- http://windows.microsoft.com/en-us/windows/redirect-folder-new-location#1TC=windows-7
- Windows 7:
- To redirect a folder to a new location
- Click the Start button Picture of the Start button, and then click your user name.
- Right-click the folder that you want to redirect, and then click Properties.
- Click the Location tab, and then click Move.
- Browse to the location where you want to redirect this folder. You can select another location on this computer, another drive attached to this computer, or another computer on the network. To find a network location, type two backslashes (\\) into the address bar followed by the name of the location where you want to redirect the folder (for example, \\mylaptop), and then press Enter.
- Click the folder where you want to store the files, click Select Folder, and then click OK.
- In the dialog that appears, click Yes to move all the files to the new location.
- Mac OS (Mavericks & previous):
- To restore a folder to its original location
- Click the Start button Picture of the Start button, and then click your user name.
- Right-click the folder that you previously redirected and want to restore to its original location, and then click Properties.
- Click the Location tab, click Restore Default, and then click OK.
- Click Yes to recreate the original folder, and then click Yes again to move all the files back to the original folder.
- https://discussions.apple.com/message/23510349#23510349
- (Ignore the initial links, which are merely about changing names, e.g. when migrating a laptop from one person to another)
- John Galt, 25-Oct-2013
- The procedure was unchanged in Mavericks from previous OS X versions.
- What I did was create a new User in System Preferences, after which I logged out and logged in to that new User.
- I performed basic configuration, created some documents, etc.
- After that I logged out, logged in under my usual account, and dragged that User’s folder to another volume.
- Then, I used Users & Groups “Advanced Options” to point to the new Home folder’s location.
- After that, I restarted the Mac using OS X Recovery to reset that user’s Home Folder Permissions and ACLs since permissions problems with the copied Home folder would otherwise result.
- After quitting OS X Recovery I was able to log in to the User account established on the USB flash drive, and was able to use it more or less the same way without any surprises. Safari, iTunes, iPhoto all worked, no problems.
- The original User account (home folder) remained on the boot volume, so I dragged it to the Trash. I verified that I could still log in to the account on the flash drive, confirming the one created on the boot volume was no longer required.
- Attempting to log in to the account with the flash drive disconnected resulted in an expected error (below) and obviously you wouldn’t want to do that while using the account.
- Reconnecting the flash drive restored the ability to log in as expected.
Posted in Adobe Media Encoder, file mgt, Mac, Windows, Windows 7 | No Comments »
April 15th, 2014
Today I received information from Adobe’s CC (Creative Cloud) control-panel that there was an update for Premiere (among other apps). Accompanying information states that it fixes some issues with audio and sub (nested) sequences. The latter is most reassuring. On the other hand I am mid-project(s) and don’t want to impede my current projects.
A good solution would be to do a system backup prior to updating Premiere. Could do that at end of the day, so as not to impede project.
On the other hand, it seems that Adobe supports (kind-of) a way to roll-back to a previous versions:
I have not tried this yet…
Posted in Adobe | No Comments »
April 8th, 2014
http://forums.creativecow.net/readpost/277/29561
- <<<
- The update to DaVinci Resolve 11 will be available in June for download from the Blackmagic Design web site free of charge for all current DaVinci Resolve customers.
- now it’s a fantastic full featured online editor
- DaVinci Resolve 11 also features a unique and powerful automatic color chart color balancing tool that works on all types of footage including video, RAW and even film. The new color match tool automatically gives a primary base grade by analyzing shots containing standard color chip charts even if they were shot in different lighting conditions with different exposure and color temperatures.
- >>>
Posted in Blackmagic, Color, DaVinci Resolve | No Comments »
April 4th, 2014
Following on from my previous post entitled: “SSD Format Details for BlackMagic Cinema Camera”:
Here is how to (re)format a volume as exFAT , whether or not it is already in that format, from Windows 7, via Command-Line (cmd):
- Windows Start:[cmd]
- format E: /q /fs:exfat
- The type of the file system is EXFAT. Enter current volume label for drive E: <your volume’s name>
- WARNING, ALL DATA ON NON-REMOVABLE DISK DRIVE E: WILL BE LOST! Proceed with Format (Y/N)? y
- QuickFormatting 457860M
- Format cannot run because the volume is in use by another process.
- Format may run if this volume is dismounted first. ALL OPENED HANDLES TO THIS VOLUME WOULD THEN BE INVALID.
- Would you like to force a dismount on this volume? (Y/N) y
- Volume dismounted. All opened handles to this volume are now invalid.
- Volume label (15 characters, ENTER for none)? <your volume’s name>
- Initializing the File Allocation Table (FAT)…
- Creating file system structures.
- Format complete. 447.1 GB total disk space. 447.1 GB are available.
- 131,072 bytes in each allocation unit. 3,662,754 allocation units available on disk.
- 32 bits in each FAT entry.
- Volume Serial Number is <your volume’s serial number>
Posted in Formats, SSD, storage, Windows, Windows 7 | No Comments »
March 22nd, 2014
Following on from http://blog.davidesp.com/archives/989 where basically I discovered that
- …you need not only GoPro Studio Premium (which gets you the CineformRAW codec) but also a little front-end utility (that you use instead of Studio Premium) called RAW4Pro. That utility gets you the correct colours and proper audio (‘Studio’ does not otherwise).
Using that solution, I obtained a 5.5 times reduction in file size, for a few-seconds test-clip where the color-chart was handheld against the landscape at the top of the hill. The file looked good in Resolve where I was able to grade it ok and of course could have used it to encode MOV-H264.
Equally the CineformRAW imported fine to Sony Vegas Pro 12, where I could grade it and export to MP4-H264 or whatever. Vegas did not recognize the original RAW (CinemaDNG) – I tried various ways, including Vegas’s Device Explorer, so CineformRAW is a useful workaround for this.
The CineformRAW generated by RAW4Pro in its [Fine] setting, according to its [?] button, produces 10-bit Log, which QuickTime player reports as as “Millions+”. I wonder, is there a way to get it to produce 12-bit?
I expect I will use CineformRAW to replace my existing RAW footage where I want to maintain full 2.5K resolution, gradeability but don’t have chromakey-level demands on resolution around edges etc. Not that I’ve yet tried such chromakeying, RAW or CineformRAW -based. As yet…
Posted in Cineform, GoPro, RAW, Sony Vegas | No Comments »
March 22nd, 2014
Suppose you have some RAW footage, in CinemaDNG format (a number-sequenced set of [.dng] files), for example shot on a Blackmagic Cinema Camera (BMCC). Compared to “visually lossless” say ProRes or DNxHD (let alone H264 etc.), CinemaDNG occupies an awful lot of disk space, primarily because it is mathematically lossless. The GoPro-CineformRAW encoding format offers significant reductions in file size (and hence data rate) at the cost of a practically negligible loss of visual information (and a purchase price). This codec can be purchased as part of the GoPro Studio Premium product. A comparison-grid of the various GoPro Studio products is here.
CineformRAW is an attractive compression-format, but unless care is applied to some very technical-level encoding options/settings, compatibility problems can arise when importing to DaVinci Resolve. The latter is in widespread use but is especially relevant to BMCC owners because it is supplied as free software with that camera. I experienced such problems myself: one version of Resolve (v.10.0) interpreted CineformRAW clips as green-tinted, while another (v.10.1) just gave black frames.
Happily, a simple solution existed: RAW4Pro, which is essentially a front-end to CineformRAW (and also to DNxHD, useful e.g. if you want HD proxies).
Summary:
- Install
- A product incorporating the GoPro-Cineform RAW codec.
- The RAW4Pro utility
- Essentially a front-end to generate CineformRAW and also to generate HD (e.g. as proxies) as DNxHD, in each case in either MOV or AVI container-formats.
- Run RAW4Pro
- Select (Browse-to) input-folder, output folder.
- Select:
- Sound: Audio-Merge
- Initially, extract audio from source file to a WAV file, then merge this audio in with the generated file. The WAV file remains, regardless.
- The alternative (if not enabled) is no audio in the generated file (and no WAV file).
- Processing: Convert-Only
- Quality: Fine
- Clicking the [?] button reveals that this creates 10-bit Log (colour-channel resolution).
- Video Format:
- Cineform RAW (encoding format)
- MOV (container format)
- LUT: NoneClick the [Process Clip] button.
- Result:
- A movie file with name prefixed by :R4P_” and suffixed by “_sound”, incorporating both video (10-bit Log) and audio tracks.
- An audio WAV file, similarly prefixed, generated as a “side effect”, may or may not be useful to you, can be deleted.
Read the rest of this entry »
Posted in Blackmagic, camera, Cineform, codec, Compressor, DaVinci Resolve, DNxHD, Encoding, Formats, GoPro, RAW, Uncategorized | No Comments »
March 20th, 2014
For SSDs for the BlackMagic Cinema Camera (BMCC), the following partition/format scheme works fine, and was found in more than one person’s own such SSDs. I think in each case they were formatted from Windows, hence the “NTFS”.
- Device:
- Partition Scheme Map: MBR (FDisk)
- Device Block Size: 128 Bytes
- User manual recommends 128 Bytes
- Default of Command [format <diskletter>: /q /fs:exfat] itself reports “131,072 bytes in each allocation unit”
- Default of [Windows7 > Windows Explorer]: [aFile >RtClk> Format…] is instead 512 Bytes, but I have not noticed any problem with that.
- Partition/Volume:
- Partition Type: NTFS
- Format: exFAT
How to reformat from Windows 7: http://blog.davidesp.com/archives/1000
Posted in Blackmagic, Formats, SSD | No Comments »
February 25th, 2014
Conclusions:
(Updated as of 2014-03-20)
- H264 supports chapter markers (in some form) in principle,
but Adobe Premiere is unable to utilise this (at least as of 2012, and I can’t see a way of doing it in February 2014).
- If the H264 is encoded into a QuickTime [.mov] wrapper/file (as opposed to a [.mp4] one), and that [.mov] file is played in a QuickTime player, then those chapter markers will appear in (the bottom-right corner) of that player.
- Apparently FCP (both 7 and X ) can also do this.
Read the rest of this entry »
Posted in FCP7, FCPX, Final Cut, H264, Premiere | No Comments »
February 25th, 2014
Given a simple 3-minute dramatic scene with footage from BMCC (as DNxHD 185 of HD 1920×1080 at 25fps) and a Windows-7 system:
From Adobe Premiere CC (latest version) I exported AAF. Then in AVid I imported that AAF. Result: Bin created, containing what appeared to be (from brief glance) all relevant Media and Sequence objects (now in Avid’s representation), but the Media objects were offline/unlinked and various “cryptic” popup error messages appeared from Avid.
I had naively assumed that the Media objects would have been AMA-linked to the source footage, which by the way included DNxHD recorded by BlackMagic Cinema Camera. However, not only were they not linked, but Avid’s Relink function failed to recognize them.
I had previously succeeded in exporting AAF from Avid to Adobe.
A forum post says Adobe can read Avid but not vice-versa – confirming my (limited) experience. One can only guess at which company is at fault here, but one poster blames Adobe. Regardless, I wasn’t impressed by Avid’s programmer-level “cryptic” error messages.
I tried Bin:[Select Clip > RightClick] but the [Relink to AMA File)s)] option was greyed-out. So I tried the next-best (RightClick) option, namely [Import]. The Import process took significant time, because (as I later confirmed) it was doing a transcode (to DNxHD 120) rather than a re-wrap. Surprising, given it was already DNxHD in the right format and better quality… And this import didn’t replace the right-clicked clip, it just added the import to the bin as an additional clip.
Not an urgent project, so I give up for now…
Read the rest of this entry »
Posted in AAF, Avid, Premiere, workflow | No Comments »
February 25th, 2014
I just wondered if this were possible, for a Mac at least, and the answer is (apparently) Yes!, for Windows as well as Mac, and via WiFi. That’s really useful, as I’m thinking of getting a new MacBook but their screens are currently only 15 inch and not DreamColor (as is my Windows laptop).
Connection via WiFi will be slow, but that shouldn’t be a barrier for things like static text or color grading (the latter is often based in practice around a succession of individual frames).
I’ll pause my enthusiasm to try it out until I have made a full system backup on my primary computer…
WebSearch Results:
- Google:[ipad2 external monitor]
- http://store.apple.com/us/question/answers/readonly/can-the-ipad-2-be-used-as-an-external-monitor/QD7HPAA477DYFFFTF
- simple answer – YES
- in depth answer
- the only way this can be done as far as i know is by using one of two apps. one is for windows, the other is for Mac. this is done through a common wifi connection. this means that there is a very bad lag when dragging windows and watching movies and probably all other tasks. so basically yes it can, but quite poorly.
- the only way that it could be done really well and smoothly is by using the HDMI connection to the computer. but i don’t think that it can be done yet. so when the IOS allows it (I HOPE) the ipad can be properly used as a secondary monitor.
- but if you cannot wait for that (thats only if it happens) then here are the two apps necessary for this process.
- for Mac – “Air display”.
- for windows – “MaxiVista” (note the letter “i”)
- both of these apps have sister software for your computer. the apps are kinda expensive at $9.99 for airdisplay and $12.99 for maxivista. they include instructions for the whole process.
- enjoy your second monitor 🙂
Posted in Apple, iPad, Mac, monitor, Windows | No Comments »
February 25th, 2014
An existing project, just a 3-minute multi-angle (single camera) dramatic scene, used to export without problems, but following just the addition of some audio clips (as “patches” on additional tracks), export stalled on “Reading XMP”.
Previously in this project, when it still exported ok, there was an audio glitch which only happened when a crossfade transition was applied to the beginning of an isolated audio clip (to make it fade-in). In this case the clip was for a short sound effect. The glitch sounded like a woodpecker. Removing the transition removed the “woodpecker”. The reason I attempted that was that I had encountered transition-triggered audio issues in the past (on other projects, Adobe versions and machines). It seems that Premiere gets confused/over-complicated over audio especially in the context of nested sequences. That is a real pain, because nested sequences are really useful and I structure most of my projects that way.
Adobe Premiere seems to have some vulnerabilities with respect to audio and/or nested sequences, and these vulnerabilities seem to have been around for years. Others have encountered similar or related issues, as listed below:
- Google:[“reading xmp”]
- http://forums.creativecow.net/thread/3/944566
- Unable to Export a very important project.. “Reading XMP”
- This has also happened to me but for a :60 spot. My workaround is just exporting right out of Premiere Pro and not going to AME. It worked fine for me.
Posted in Adobe Media Encoder, Premiere | No Comments »
February 18th, 2014
I took an Avid Media Composer (7.0.2) Sequence built from AMA-linked XDCAM-EX footage and transferred that Sequence via AAF to Adobe Premiere (CC 7.2.1)
It worked, even for my AMA-linked footage (Sony XDCAM EX / BPAV) – though it wasn’t as straightforward as I expected – due to “a known issue with AAF in Premiere Pro CC (7.2.1)”. It did succeed with Premiere CS6 (6.0.5), though even then some clunky wrangling was found necessary. Thereafter I opened an existing Premiere CC project and Imported the CS6 sequence successfully. Again I had to double-check the Sequence (this time in Premiere) matched the footage (clips).
Read the rest of this entry »
Posted in Avid, Premiere, Uncategorized | No Comments »
February 18th, 2014
Suppose you have timecoded footage etc. from an intermittent shoot of a long event. Perhaps there were also multiple cameras, but for whatever reason (e.g. huge outdoor site) there is no common audio with which to synchronize them. Wouldn’t it be nice if the NLE (or whatever) could auto-populate a Sequence with clips placed appropriately in (timecode-) time on it?
As noted in an earlier post, Adobe Premiere can’t do this, but Avid and Edius can. I already use Avid, so that will be my auto-arranging tool of choice.
In Avid (Media Composer 7.0.2):
- Set Project Settings for media type as per source footage
- Unlike Premiere, Avid doesn’t have such Sequence-specific settings.
- Import the footage
- I found it ok to use AMA – no need to Ingest to MXF etc.
- And yes, at the end of all this, it transferred (by AAF) from Avid to Premiere ok.
- Menu:[Windows > Workspaces > Source/Record Editing]
- To reinstate the Timeline – after it closed when I deleted the bad seq
- Bin:
- Sort the clips into order by Timecod
- Shouldn’t matter in principle but it did appear to in practice…
- Select all required clips
- Do [Bin > AutoSequence]
- A new sequence gets created, with the clips placed in time.
- The sequence gets auto-named as per the last clip in the selection.
- The sequence’s starting-timecode is auto-set to that of the earliest clip in timecode-time (among the selection)
- Tip:
- Timeline Zoom in/out = Ctrl-] / Ctrl-[ respectively.
I will post separately on how to Export from Avid and Import to Premiere via AAF (Advanced Authoring Format). It worked, even for my AMA-linked footage (Sony XDCAM EX / BPAV) – though it wasn’t as straightforward as I expected – due to “a known issue with AAF in Premiere Pro CC (7.2.1)“. It did succeed with Premiere CS6 (6.0.5), though even then some clunky wrangling was found necessary. Thereafter I opened an existing Premiere CC project and Imported the CS6 sequence successfully. Again I had to double-check the Sequence (this time in Premiere) matched the footage (clips).
Posted in Avid, Premiere, XDCAM EX | No Comments »
February 9th, 2014
Background
Adobe Premiere has a speech-to-text translator, as part of its content-analysis capability. At best it is 80% or so correct in its interpretations, though in my experience only 20-30% reliable. But to optimize its chances, one must select the (spoken) language appropriate to the media (content) being analyzed. But by default, only one language, US-English is available. So how do you get further options?
Summary:
- By default, the only language model (sic) installed is that for US-English.
- Optionally, one can download (free) Installers for other language modules.
- One can download the installer for International English language models (sic), from http://www.adobe.com/uk/products/premiere/extend.displayTab3.html
- These English-language models include: Australian, British, Canadian.
- Run the Installer
- Although intended for both CCand CS6, it only installs to [C:\Program Files (x86)\Common Files\Adobe\SpeechAnalysisModels\CS6]
- Manually copy content from [C:\Program Files (x86)\Common Files\Adobe\SpeechAnalysisModels\CS6]
to [C:\Program Files (x86)\Common Files\Adobe\SpeechAnalysisModels\4.0]
- Likewise, for Mac OS:
- Copy all content of [/Library/Application Support/Adobe/SpeechAnalysisModels/CS6
- to [/Library/Application Support/Adobe/SpeechAnalysisModels/4.0]
- Incidentally, it is possible to inject (eg via C++ code) a text script directly into XMP metadata
- See Details for a link and example code.
Read the rest of this entry »
Posted in Adobe, Adobe Media Encoder, Premiere, Premiere, Uncategorized | No Comments »
October 22nd, 2013
In principle, it is possible to auto-arrange multiple clips on a timeline according to their timecode, e.g. from a camera that was recording time-of-day timecode automatically.
For example, if so-arranged, a timeline might look something like this:
I haven’t used FCP7 all that much, but I have a faint recollection that it did this somehow – though some other people say not. Regardless, Avid does it, and also Edius reportedly does it, and these could be used as preprocessors in advance of Premiere, just to align the clips in tracks and time.
But (as far as I can tell) Premiere can’t do this, there are currently no add-ons for it to accomplish this conceptually simple task. Not even PluralEyes 3, that can only sync based on audio, which is impractical in some situations e.g. large scale industrial area with different sounds in every corner… People do it manually, e.g. by typing timecode into timeline and adding markers then placing each clip at its associated marker…
Whaaaat!!!
The nearest one can get, apparently, is to “pre-process” in an NLE that can arrange-by-timecode, such as Avid or Edius, then export an AAF for import to Premiere. Edius also (reportedly) auto assigns each camera to its own track(s).
Edius price:
- In the UK, I see for example that DVC have a crossgrade offer for (just under) £240 or (just under) £450 for standard purchase.
- If it works as expected, then the crossgrade would be worthwhile (in terms of time saved) even if only ever used as a preprocessor…
- And it’s worth checking out for general usability/productivity.
- A demo can be downloaded from http://www.grassvalley.com/products/edius_pro_7.
Worth a try-out, when I get time, via Avid and via Edius, also to see whether Edius could be more generally useful.
Read the rest of this entry »
Tags: timecode
Posted in AAF, Avid, Edius, Premiere, timecode | No Comments »
October 22nd, 2013
As I previously blogged, Premiere CC’s [Undo] does not undo media-replacement in Project pane. This was discussed on an Adobe Premiere forum thread. As part of that discussion, the “can’t please everyone” principle was apparent: one view was in favor of that Undo behaviour, another was against it.
Maybe-ideally, both viewpoints would be satisfied if, say, the History window would have a column of checkboxes for “Locked”, meaning all changes are recorded but [Undo] will skip over those having a check-mark (when they could also be greyed-out). The “Media Replace” action could have a default of “Locked”, so it behaves as at present, for those people who like it that way.
I wish such a change-lock feature existed in any case, e.g. if I have made a string of color corrections etc. to various clips on timeline and then afterwards realise there is some “obscure show-stopping issue most productively solved by undo-ing”. One could lock the simple color correction effects etc. prior to undoing as far back as necessary to fix the issue (such as some media link or interpretation or sync issue). I realise it is possible to achieve this by work-arounds, e.g. save to a Project copy then Import that copy and copy/paste attributes each effect across, or one could save Effect Presets and re-apply these after undoing. But such workaround would be cumbersome if there were a number of different effect tweaks on a variety of clips, and one would have to remember/note which clips these were (or else go through all clips). And then there are non-effect changes, like “ripple trim” cut-timing tweaks.
It would also be helpful if the History-window said more specific things than just “Apply Effect” (like which effect) and if the History-window automatically came to the fore when applying an Undo. Those things together would reduce the likelihood of unintended undo’s of any kind.
Posted in Premiere | No Comments »
October 22nd, 2013
I discovered by accident that, although one can do ProjectPane:[aClip >RtClk> Replace Footage…], a subsequent Undo will not un-replace (restore previous) footage. I raised this topic at http://forums.adobe.com/message/5778585, and subsequent discussions resulted in a confirmation that indeed this is Premiere’s normal behavior but that there is a reasonable work-around.
So what was the work-around?
- My footage happened to be XDCAM-EX, denying me the possibility of simply doing a further [Replace Footage…]. This is because the browser associated with [Replace Footage…] was only a File-Browser, not a Media Browser. Consequently it would list individual component files of the XDCAM-EX folder-structure, but not the single overall high-level sense of “Clip” represented by that structure.
- XDCAM-EX footage needs special treatment because it is file-structure based and spanned, broadly like AVCHD. To get such footage properly into Premiere, it is necessary to use the Media Browser, and not simply to drag in the [.mp4] “essence” files within that file-structure. It is ok to drag from Media Browser to Project pane, because that operation recognizes all relevant information in the file-structure, displaying it as a single clip at the highest level, possibly spanning over more than one [.mp4] file. The Media Browser hides such detail from the user.
- My next (unsuccessful) workaround-attempt did work but was clunky. This was to re-import the original footage via Media Browser, so it appeared in the Project pane, then select it, then go down to each relevant clip on the timeline and in each case do a [Replace with clip] using [From bin], i.e. the original footage in the Project pane. However, while any metadata (e.g. “Log Notes”) on the original item (prior to replacement) got transferred to the replacement footage, that metadata was not “inherited” by the fresh import of the same original footage, so it had to be copied across manually.
- The best work-around was explained (by Jim Simon, in a thread on the Adobe Premiere forum) as follows:
- In Project pane, do an offline-and-relink, e.g. via [aClip >RightClick> Make Offline] followed by [aClip >RightClick> Link Media…], which does give the option of using Media Browser.
- NB: When I initially tried that, the Locate Media Browser (a fresh instance of Media Browser, in a pop-up window) opened in File mode. However, by clicking that browser’s “eye” button, it was possible to select XDCAM-EX mode (among others). This behavior is unlike that of the main Media Browser, which selects the camera-specific mode automatically.
Posted in AVCHD, Premiere, XDCAM EX | No Comments »
October 18th, 2013
Summary:
- I expect my new Crucial M500 SSD will satisfy my multicamera HD video editing requirements far more than my old 7-disk RAID.
- In neither case should their bandwidths be the bottleneck for say one live (raw HD-SDI) HD channel or say 10 simultaneous ProRes files.
- In addition, the SSD should avoid the Disk-RAID’s issues over seek-time (latency). framentation, moving parts, noise, heating (unwelcome in summer) and power supply requirements.
- That’s the theory …it waits to be tested …when I get a time-break to backup everything then install and test it.
Detail:
Some video bandwidth requirements:
- Raw HD-SDI of 720p 25 frames/sec or 1080i 50 fields/sec: 188 MB/s == 1.5Gbps
- ProRes: approx 15 MB/s == 120 Mbps
- XDCAM-EX: VBR, around 4.4 MB/s == 35 Mbps
Sustained sequential (as video ought mostly to be) data read/write speed estimates:
- RAID of 7200 rpm disks:
- 7 x raid5 plus 1 hot-spare: around 600 MB/s == 4.8Gbps
- In my case, I get 400 MB/s == 3.2Gbps.
- That’s around two live HD channels or 25 ProRes HD files, though in practice one would expect the need for headroom-margin, hence say one live HD channel or 10 Prores files? Not bad.}
- SSD:
- For my Crucial M500 960GB Laptop-internal SSD:
- SeqRead: Over 375MB/s == 3Gbps
- SeqWrite: Over 500 MB/s == 4Gbps
- And no issues over seek-time (latency) or framentation or moving parts or noise or power supply.
- USB3
- 625 MB/s == 5Gbps
- 7200rpm disk > USB3: 110MB/s == 880 Mbps
- Local 7200 rpm drive:
- 40-100 MB/s == 320–800 Mbps, for most modern drive types.
- NAS: 100MB/s == 800 Mbps advertised, under 50 MB/s == 400 Mbps in practice.
- But there can also be latency issues.
- USB2:
- 60 MB/s ==”480 Mbps” in theory…
- …but in practice, as seen by user, is more like 38 MB/s == 300 Mbps.
Read the rest of this entry »
Tags: SSD
Posted in disk, NAS, RAID | No Comments »
October 18th, 2013
In summary:
There’s no magic option, each workstation needs a local storage volume with block-level data access (as opposed to simply file-level access) and formatted to a file system that is native (doesn’t require translation) to that workstation’s operating system. Migration and collaboration imply file copying/synchronization, which implies read-access to the “foreign” file-system. Mac OS can read NTFS, Winows can only read HFS+ via third-party add-on utilities. Furthermore, for speed and responsiveness appropriate to video editing, the local storage should ideally be RAID or SSD. In either case, it is possible to split the local storage (e.g. via partitioning) into more than one file-system. At least, that worked on the mutiple occasions I have taken that approach, and have not been aware of any issues.
In greater detail:
Consider the challenge of setting up a shared data storage volume (e.g. RAID array or SSD) for video editing, such that either Windows or Mac computers can connect to it, and a video project started on (and saved to) on one of those operating systems (OS) can be continued on the other (and vice versa).
My current solution is to split the drive into separate volumes, one for each OS. For example I have done this on RAIDs of various kinds and on an internal drive for Mac systems bootable to either Mac OS or (via Boot Camp) to Windows. In the case of RAIDs I was advised against this by my system supplier, but got the impression they were just being defensive, not knowing of any definite issues, and to my knowledge I did not experience any issues.
It is is not practical to have just one volume (necessarily in that case, one file-system format), because:
- Mac OS on its own is able to read NTFS but cannot write to it.
- This is a show-stopper. Some of the major video editing applications (e.g. NLEs), slightly disturbingly, may use (or for some functionality, even depend on) read/write access to source-files and the folders containing them.
- I initially, naively, imagined that video editing systems etc. would only ever read source media files, not write to them, or to the folders containing them. However that proved very naive indeed…
- In Apple/Mac’s (erstwhile) Final Cut Pro 7 I regularly used their (moving) image stabilization effect, SmoothCam. Its analysis phased was typically slow and heavy – not something one would wish to repeat. The result was a “sidecar” file of similar forename to the analyzed source file, but a different extension, placed in the same folder as the source file.
- I’m not certain, but got the feeling that maybe the source file (or folder) meta data, such as permissions or somekind of interpretation-change to media files in the quicktime ([.mov] mmedia format.
- Certainly, Adobe (on Windows and Mac) could adulterate both files (by appending XMP data – being an Adobe media metadata dialect in XML) and the folders they occurred in (depending on uder-configuration) in terms of sidecar-files.
- Sony Vegas also generates sidecar-files, e.g. for audio peaks.
- File system translation add-ons can add Windows read/write access to HFS+ (ordinarily it could not even read it) and add Mac OS write access to NTFS (ordinarily it could only read it), but not sufficiently transparent/seamless for big real-time data access as required for demanding video editing endeavours.
- File system translation add-ons (to operating systems) exist, such as MacDrive, to allow Windows to read/write Mac OS, or Tuxera NTFS, Paragon NTFS or Parallels for Mac to enable it to read/write NTFS, but these (reportedly, and in part of my experience) only really work well for standard “Office” type applications, not so well for heavy (big andd real-time) data applications such as video editing, where they can impede the data throughput. Doh!
- Some people have experienced obscure issues of application functionality, beyond data-movement speed issues.
- {Also, I am concerned over the (unknown/imagined/potential) risk that the “alien” operating system and/or its translation utility might alter the file system in some way that upsets its appearance to the “home” operating system.}
- FAT is universal but is a riskier option:
- FAT is un-journaled, hence risks loss not only of individual files but of whole volume (integrity).
- In video editing, corruption could be disastrous to a project, not only in terms of possible data-loss or time wasting and project delays on data recovery, but also in terms of “weird” effects during editing, such as poor responsiveness to commands, whose cause the user may not appreciate. or even an increased risk of unacceptable flaws in the final product.
- FAT32 is essentially obsolete, because its maximum file size is (1 bit under) 4GB.
- exFAT, a kind of “FAT64” is practical, and indeed a big successful corporate Mac-based production company once supplied me with many GB of footage on an exFAT-formatted external disk.
- The largest file I have so far stored there is 40GB. No problems.
- NAS (Network-Attached Storage) sounds at first an easy option, but in my experience they impede big real-time data throughput (as stated earlier for “file system tyranslation” add-ons). Double-Doh!
- Such devices only permit file-level access. Consequently, the client systems can e.g. create or retrieve folders and files, but cannot e.g. format the device or address it in terms of lower-level data structures.
- A likely explanation for the “impedement” of a NAS (to data responsiveness and throughput) is that such devices store in a local format (typically they run linux) that is invisible to the client, then translate to an appropriate protocol for each operating system accessing it. They normally incorporate a bunch of such protocols. As always, translation => overhead.
- Other options, such as SAN and iSCSI, instead of providing file-level access to the client systems, instead offer the lower level of data block access. Thus they appear to the client system as would any local storage device, and can be formatted as appropriate to the client system.
- One suggestion I saw was to use a Seagate GoFlex drive, which can be used (read/write) with both Mac and Windows. But the supplier’s FAQ (about that drive) indicates that it depends upon a translator utility for the Mac:
- If you would like to be able to “shuttle” data back and forth between a Mac and a PC, a special driver needs to be installed onto the Mac that allows it to access a Windows-formatted drive (i.e. NTFS). Time Machine will not work in this case, nor will Memeo Premium software for Mac. However, if you want your GoFlex solution to also work with TimeMachine, the drive will need to be reformatted to HFS+ journaled.
So I guess there is no “magic storage” option, my main work setup will have to remain based on separate volumes for each OS.
When transferring an editing project from one OS to another, the following actions will be necessary:
- Copy any absent or updated files across.
- e.g. via a file-synch utility such as Syncovery.
- Allow time etc. for possible file re-linking, re-indexing, re-preview generation, re-“SmoothCam” (or equivalent).
- This aspect is down to the editing application etc., as opposed to the operating or file systems themselves.
- Ensure any effects used in the edit are present on both systems.
- If so then these should presumably still work…
Read the rest of this entry »
Posted in Adobe, collaboration, disk, FCP7, FCPX, file mgt, Final Cut, Formats, Mac, MacDrive, NAS, Parallels, Premiere, RAID, util, video, Windows, Windows 7, workflow | No Comments »
October 18th, 2013
The md5 checksum algorithm is very old and nowadays regarded as “breakable”, to such an extent that it is not recommended for use in data transmission (through interfering environments) protocols. However it is handy, well-established. and hence warm/fuzzy…
On Mac OS, the ‘md5’ command is inbult to the OS:
- Compute an MD5 checksum:
- $ md5 test.mp4
- MD5 (test1.mp4) = f3ed1559874599d26fddc5802d65266e
- $ md5 *
- MD5 (test1.mp4) = f3ed1559874599d26fddc5802d65266e
- MD5 (test2.mp4) = b9bfa87a6a126911f2246c7a615bff27
- For help: [ man md5 ]
- To check a file against an expected checksum value:
- md5 -c CHECKSUM.MD5
- Where CHECKSUM.MD5 has (only) multiple entries (lines) as returned by MD5 command, e.g.:
- MD5 (test1.mp4) = f3ed1559874599d26fddc5802d65266e
- MD5 (test2.mp4) = b9bfa87a6a126911f2246c7a615bff27
- ???
On Windows 7:
- There is nothing inbuilt to the OS…
- Third-party applications are available:
- Probably best to use a non-Microsoft one, e.g. a linux-like one…
- There are also many user-friendly/convenience (GUI-based checksum applications, offering additional checksum varieties, beyond md5.
- http://support.microsoft.com/kb/841290
- The FCIV utility runs on Microsoft Windows 2000, Windows XP, and Windows Server 2003
- No mention of Windows 7 but that was after its time(2004) so maybe still worth a try?
- Download link:
- The Microsoft File Checksum Integrity Verifier (FCIV) utility is an unsupported command-line utility that computes MD5 or SHA1 cryptographic hashes for files. Microsoft does not provide support for this utility. Use this utility at your own risk. Microsoft Product Support Services (PSS) cannot answer questions about the File Checksum Integrity Verifier utility.
- Weird! Why would they maintain such a …discouraging… attitude?
- For help: [ fciv.exe /? ]
- Capabilities:
- Supports MD5 or SHA1 hash algorithms (The default is MD5.)
- Can output hash values to the console or store the hash value and file name in an XML file
- Can recursively generate hash values for all files in a directory and in all subdirectories (for example, fciv.exe c:\ -r)
- Supplies an exception list to specify files or directories to hash
- Can store hash values for a file with or without the full path of the file
- ?
Posted in checksum, Mac, Windows, Windows 7 | No Comments »
October 10th, 2013
Posted in GPU, graphic card | No Comments »
October 10th, 2013
Problem:
- Ideally, it should be possible to globally disable all effects, or maybe all those effects (in a list of all effects used anywhere in a project) that a user has marked as being “disableable” (e.g. the cpu-heaviest ones such as Neat Video, which either reduce responsiveness or else ( to avoid this) require rendering.
Solutions:
- Put all FX on an adjustment layer, that can itself be enabled/disabled.
- Duplicate sequence then select all clips and [theClips >RtClk> Remove Effects]
- Edit or process the project XML file to disable all effects (and conversely, eventually, to enable them).
- This one sounds the most promising, apart from need to make special allowance for effects that were initially disabled.
Read the rest of this entry »
Posted in Premiere | No Comments »
October 10th, 2013
Following-up from my earlier post, http://blog.davidesp.com/archives/910
Summary:
- In a nested sequence situation, I’m getting short audio repeats from a clip element just prior to a cut.
- Solution: for the nested sequence, do menu:[Sequence > Render Audio].
- That’s just the audio, not the clip/effects etc. It’s an extremely fast process.
Context:
- Premiere Pro CC, latest version at time of writing (7.0.1 (105), under Windows 7 (64-bit).
- Structure: I have a sync-sequence (multicam source sequence) consisting of XDCAM-EX (file structure broadly along the lines of AVCHD) and Z1 (plain m2t files). Derived from / dependent on that is a multicam edit sequence, where I cut between camera angles. Then that sequence is itself nested in a master sequence (showing selected extracts of the performance).
- For reference purposes: Multicam edit sequence consists (among other things) of a rock band’s “big finish” followed by some applause. I made a cut in the audio part (only) of the nested sequence clip, to enable the audio for the applause to be normalized independently of the band performance. To smooth the join I added a crossfade transition over the cut. Nicer in principle than using volume envelopes.
- When I play the original recording or the multicam sync-sequence or the multicam edit-sequence, all looks and sounds fine.
Problem:
- When the Master sequence is played back (in preview or an exported/encoded clip) I hear the big finish, then applause starts, then after 2 seconds the “big finish” is heard once again, but at lower audio level.
- This effect happens wherever I have used the same cut/normalize/crossfade technique in the (nested) multicam edit sequence. I have also encountered it in previous projects in Premiere CS6.
- If I delete the crossfade then the problem disappears… Doesn’t matter what type of audio crossfade is used.
Solution:
- Open (in timeline) the Cut-Sequence (where one cuts between various multicam angles etc)
- Menu:[Sequence > Render Audio]
Read the rest of this entry »
Posted in Premiere | No Comments »
October 10th, 2013
UpdateL
Context:
- I’m producing a video of a progressive rock band (Panic Room) playing at a party on-board a lightship…
- The video has been edited in Adobe Premiere, initially in version CS6 and then in CC7.0 (105), the latter via opening the CS6 project-file.
- The Premiere project structure is: [ Master_Sequence > Multicam_Sequence > Sync_Sequence > Raw_Footage (XDCAM-EX) ].
Problem:
- While previewing a complete draft of the video, that had been Exported from Premiere CC, I noticed a repeat, after 2 seconds, of the “big finish” of one of the band’s songs. The repeat is quieter than the “real” (wanted) one.
Investigations:
- The problem occurs when editing, but only at the Master_Sequence level. It does not occur at the Multicam_Sequence level.
- In the Multicam_Sequence, near to the problem part of the audio. is a Crossfade transition. If I delete that Crossfade (leaving the audio transition to be a plain Cut) then the problem (at Master_Sequence level) no longer occurs.
- The repeated element of audio is not that within the Crossfade transition, it is instead from a (short) clip (resulting from multicam editing) almost immediately preceding the transition.
- This is suggestive of a memory issue, such as cache (RAM or file) or buffer (presumably RAM).
- It feels to me like this is a bug in Premiere CC, broadly similar to something I once encountered (in a different project) in Premiere CS6.
- I often encounter bugs when I go “off-piste” as compared to most people’s editing procedure, presumably due to programmers/testers not having thought similarly “off-piste”.
- The only potentially (?) unusual thing I did in the edit of the Multicam Sequence was at certain places to cut just the audio track (via [C-Razor] tool, having selected only the audio part via [Alt-LeftClick].
- The reason I did that was to separate the end of a song from the following applause etc., which was much quieter, to allow Clip:[Audio Gain > Normalize] to be carried out separately on that applause. Then I added [Crossfade > Constant Power] in order to smooth the join to the applause.
- I used this approach rather than Volume envelope because:
- Audio Gain can increase gain by any amount, whereas Volume Envelope’s maximum gain appears to be 6dB.
- Possibly the 6dB limit might be configurable in Preferences (I just saw a setting suggestive of that but haven’t tried it),
- It is very convenient and less “messy” than fiddling about with Envelopes and Track Width etc.
- Experiments:
- As stated earlier, if I delete that [Crossfade > Constant Power] (leaving the audio transition to be a plain Cut) then the problem (at Master_Sequence level) no longer occurs.
- If I replace the crossfade with [Crossfade > Constant Gain] then it makes no difference (the problem remains).
- If I delete the multicam sequence element (audio & video) penultimately preceding the transition, i.e. the element containing the “big finish”, leaving a gap (black silence) then when I play the Master Sequence, the gap faithfully appears as expected but then the “repeat” (of the “big finish”) nevertheless happens.
- By “penultimately” I mean not the clip that is the left-hand part of the transition, but the clip before that (which is not therefore any part of the transition).
- If instead I delete only the audio part and then drag the previous audio (only) part forwards (in time) to fill the gap, then when I play Master Sequence, the “repeat” now comes from the end of what is now a different “previous clip” (the one that was prior to the one I just deleted).
- This tells us the repeat comes from whatever clip is penultimate to the Crossfade audio transition, it does not happen only for one clip in particular.
- …to be continued… (sadly)
WebSearch:
- e.g. Google:[adobe premiere audio repeating], [adobe forum]
- http://forums.adobe.com/community/premiere
- (nothing relevant found, and today {and next few days} was unable to sign-in, presumably due to Adobe web system maintenance)
- {BUT see my later post on this: http://blog.davidesp.com/archives/923}
- Solution that worked:
- Open the Cut-Sequence, i.e. the one where I cut between various multicam angles etc.
- Menu:[Sequence > Render Audio]
- This was extremely fast, almost instantaneous, worth doing on a regular basis in future…
- http://helpx.adobe.com/premiere-pro/kb/audio-video-glitches-avchd.html
- Covers a number of issues but not mine.
- Recommends sufficiently powerful CPU and in the case of spanned file-structure footage (like AVCHD or presumably XDCAM-EX), transcoding to a straight format like DNxHD or UT.
- http://forums.adobe.com/thread/1047591
- Strange audio problem in Premiere Pro CS6 (Aug 10, 2012)
- Problem: All material has been shot on the Sony FS 100 camera – imported into PP with the Media Browser. In one interview the last part of a clip has corrupted audio. At one point on the timeline the audio stops playing, and it sounds like a scratch on a vinyl record – two words repeating themselves to the end of the clip (See screenshot of timeline). The images are as they should.
- Sounds very similar to my problem.
- Solution: (Delete) everything within both the /Media Cache and /Media Cache Files folders…
- BUT when I tried that, in my case it made no difference…
- http://blog.flickharrison.com/2012/04/problem-solving-in-adobe-premiere-audio-glitches-and-sync/
- Problem-Solving in Adobe Premiere: Audio Glitches and Sync (Apr 7, 2012)
- Problem:
- I imported a few camera cards full of AVCAM / AVCHD footage from my HMC-150 and edited for a few days. Then I clicked on one imported clip and found that the audio was wrong. Glitches, skips, out of sync, weird things happening – all nice sounding, but not in the right places. I checked the original MTS files on my HD using VLC player. Sound was fine, everything was in sync.
- Solution:
- For each imported clip in .mts format, Premiere adds a file with the same name with .xmp as the extension in the same folder. Feeling bold, I quit Premiere then deleted all these the .xmp files for that card – though i didn’t empty my trash yet. I re-opened Premiere and double-clicked that file. It was dead silent, as clips often are when first imported to Premiere. It does some meta-data-ing… and then the sound was all back in proper order, problem solved.
- The XMP files had been re-produced in that folder, although this time, apparently, without glitches.
- {The poster of this solution appeared slightly concerned, at least initially, about the addition of [.xmp] (sidecar) files into the file-structure, as indeed I had reported e.g. at http://blog.davidesp.com/archives/901, but (like me) didn’t do anything about it, just bore the fact in mind}
- {Doubts:
- In my case, the file itself plays fine in Premiere, it’s only when nested that the problem arises, hence I doubt the same solution would fix my problem
}
- ??
Tags: bug
Posted in audio, Premiere | No Comments »
October 2nd, 2013
I have had similar problems in Adobe Premiere CS5.5, CS6, now also in CC… And on several types of machine. For example as I reported at http://blog.davidesp.com/archives/644
Response in timeline to mouse-clicking or play button is often several seconds, sometimes minutes.
It is difficult to imagine how this can be, on such a widely and professionally used NLE.
Top suggestions from websearch are to do either one of the following:
- Simply reboot the system (not just Premiere)
- Exit Premiere, exit CC (system tray), kill all Adobe processes (e.g. via Task Manager), restart CC, restart Premiere.
…But that made no significant difference in my experience…
Read the rest of this entry »
Posted in Premiere | No Comments »
September 13th, 2013
I highlighted in http://blog.davidesp.com/archives/598 (10 months ago) that Adobe Premiere etc. can adulterate media files, in terms of metadata and/or sidecar-files (depending on user-configurations of these applications. I indicated that, regardless of the reasonableness of at least some of these actions, this could potentially cause problems to other applications.
Validating that concern, I note a post (2012-06-12) by Matt Davis on Philip Bloom’s website, stating (my italics):
- …if sharing assets with FCPX and Adobe Premiere, Adobe ‘touches’ (resets the modification date) of each file without doing anything else to it, but also sprinkles sidecar files into directories of transcodable files for metadata, thus sending any returning FCPX activity into a tailspin, requiring a re-linking session. It’s oddities like these which haunt the implementation of FCPX in a wider system and make system managers wonder if FCPX is actually worth implementing in its current state.
That was over a year ago, and so the issue may or may not exist for the current version of FCPX.
As users, whether or not the actions of one application adhere to standards and another don’t, what we as users ultimately care about is workflow, which in this case translates to “does it connect up with my other tools/processes?”. So we have to maintain a “situational awareness” of potential interoperability pitfalls.
Incidentally, I recall that FCPX’s predecessor (in history at least, if not development-line) FCP7 could adulterate source directories with its own sidecar files, produced by its SmoothCam effect. Not knowing anything further for sure, I nevertheless wondered (at that time) what it might be doing “under the hood” of the QuickTime [.mov] wrapper.
Posted in After Effects, Apple, collaboration, FCP7, FCPX, file mgt, Final Cut, folder structures, Formats, Premiere, roundtrip, SmoothCam, video | No Comments »
September 6th, 2013
Summary:
When uploading to YouTube (or Vimeo or indeed most online video services), the uploaded video need not be in the format that will ultimately be served to the audience. Instead, it is essentially in an an archive role, and based on this archive, the services will (now and/or in the future) encode their own copies at various resolutions. The uploaded “archive” should therefore be of the best quality, and is not constrained to be in a format that plays well on most target devices.
YouTube defines two upload-formats: Standard (for typical enthusiast videos) and Enterprise (for serious matter such as movies or corporate productions). A 5-minute video in Standard format may be about 350 MB while in Enterprise format it may be around 2GB. So for practical purposes, Enterprise format requires an Enterprise internet-connection.
- Standard-Level Encoding:
- YouTube gave good results when the video was uploaded in H264 at 8 mean 16 max Mbps.
- I (currently) believe this is a good practical upload-format to use in most cases.
- It has given good results for general scenes (in the experience of others as well as myself).
- My maximum bitrate (16Mbps) exceeds Adobe’s YouTube 1080 preset, which defines 8Mbps mean=max.
- However it is way below YouTube’s official (and YouTube-expert-confirmed) advice of 50Mbps (mean=max) for Enterprise-class (productions and internet connections).
- I wonder whether such high bandwidth is only really of advantage to fast-changing scenes e.g. foamy sea-spray or to future derivation of 4K from it etc.
- It could presumably be regarded as a useful format for archiving in general, at least where no subsequent significant levels/color manipulation was intended.
- Poor results were obtained when uploaded (mistakenly) at 720p25 at 5 Mbps (mean=max), especially when played (from YouTube) at lower resolutions, when blocking was apparent.
- I am not too sure about Adobe Media Encoder’s YouTube 1080 preset, maybe it is slightly under-specified, the audio bitrate as well as the video bitrate.
- Enterprise-Level Encoding via custom settings in Adobe Media Encoder (version CC of August 2013)
- These are essentially “BluRay-like” / “Gold Standard” formats, from which YouTube’s servers can derive multiple present-day play-formats. Their use should also result in good-quality archive material from which, in future, to derive further (as yet uninvented or not-yet-popular) formats. To “stand the test of time”…
- Audio 320Kbps
- Video:
- Bitrate:
- 50 Mbps for 1080p (25 fps)
- 30 Mbps for 720p (25 and 50 fps?)
- Level:
- 4.2
- General H264 advice is use lowest Level that permits (includes as an option) your required bitrate.
- Level 4.2 additionally has a reasonable number (hence density) of macro-blocks.
- Mode
- Mode should be [High] (as opposed to [Baseline] or [Main] ).
- [High] implies CABAC encoding (which is computationally-intensive but gives superior-quality results) and two B-frames.
- These are both requirements for Enterprise-class YouTube uploads.
- We are essentially uploading an archive format as opposed to playable, so we don’t care how computationally intensive it is.
- Key Frames Distance
- Same thing as GOP size or length (I assume).
- YouTube’s official spec says it should be half the frame-rate…
- e.g. 12 in the case of 25 fps ?
- As opposed to a general rule of thumb (elsewhere) of three times the fps.
- e.g. 75 frames in the case of 25 fps or 150 frames for 50 fps.
- Various people report less smooth motion when shorter keyframe distances are used. But maybe that only applies to lower bitrates?
- B-Frames:
- This is the number of bi-directional (B) frames between I and P frames, e.g. a value of 3 would give: [IBBBPBBBPBBBPBBBP]
- The recommended number is 2 for YouTube-Enterprise context (as opposed to 3 in some other contexts).
Details:
I had shot two videos on my trusty Sony EX3 camera, one at 1080p25 the other at 720p50.
Reason? The first one was a standard live entertainment event, demanding some run&gun, hence I shot it at highest definition. However the other event was a sporting one, and 50 fps provides more potential for handling fast action in various ways (smoother action or slow motion). On this camera, 50fps was only possible in 720p, not 1080p (the camera can also record 1080i50 (fields/second), from which one can generate motion-estimated full-frame 1080p50, but that is extra work, not conducive to productivity, hence best avoided).
On my Adobe CC editing system, I completed the 720p50 video first, then encoded that to 720p25 (Adobe Premiere CC’s YouTube preset, of 5Mbps, mean=max) for checking and eventual upload to YouTube. A day or two later I completed the (longer) 1080p50 video, then similarly encoded that to 720p25 for smaller file and faster upload for the draft/check process.
Then came time to upload the 1080p25 video to YouTube, initially with distribution set to Private. It was late and I forgot to change the encoder setting to 1080. Mistakes can happen, that’s why it was initially made Private and why a test-play or two at various resolutions was in order. When played (from YouTube), not only did this reveal the reduced resolution, unexpectedly there was also some very obvious blocking on fast action, especially when the YouTube video was played at lower resolutions.
…Which of course illustrates the exact purpose of Quality-Checking is for, in the workflow…
Naturally the first thing to so was re-encode at 1080 (duh!). Adobe’s YouTube-preset for this used a VBR bitrate 8 Mbps (mean=max). Then also I also increased the maximum bitrate to 16. I hadn’t time for experimenting, so I just made a best-guess. Result: Success! Following upload of the result to YouTube, test-plays of this looked far better in all respects at the various play-resolutions.
So I did some further web-research … which led me down a (finite) “rabbit-hole” wherein I discovered the existence of two kinds of upload-format standards: Standard (a few Mbps) and Enterprise (BluRay-ish, tens of Mbps). Aghast at the latter, I did further web-searching, which confirmed it.
Read the rest of this entry »
Posted in Adobe Media Encoder, Formats, H264, Premiere, YouTube | No Comments »
August 24th, 2013
Adobe Application Manager gave error popup:
- “the remote server is not responding in a proper manner.”
The following explains the cause (in this instance) of what appears to be a very general catch-all error-message. It is a copy of my posting to an Adobe forum thread:
http://forums.adobe.com/thread/1076893
Yet another potential cause:
- Wrong (obsolete) Adobe Application Manager executed, of more than one present on the system. The latest one should be present in Windows 7’s QuickLaunch tray. Run it from there.
Cause of that situation: update from a state of over a year ago. I recently recovered a Windows 7 laptop back to over a year ago (from total system backup), due to partial disk failure and consequent corruption of operating system, and was in the process of updating everything. However in principle could the same thing have happened if it had been a laptop I simply hadn’t touched since then?
In that (historical) state, CS5.5 and CS6 were installed and there was an existing Adobe Application Manager (AAM) Shortcut from Desktop to [C:\Program Files (x86)\Common Files\Adobe\OOBE\PDApp\core\PDapp.exe]. Naively I ran that and (not surprisingly) it triggered a newer version of AAM to download. I let that happen, then (naively) I double-clicked the same shortcut (which I assumed now pointed at the just-now downloaded new AAM). That gave the infamous error:
- “the remote server is not responding in a proper manner.” (etc.)
Following a day of re-trying – as the remainder of that error message suggested, I checked the Soft-Firewall settings, where I noticed two instances of AAM (both fully enabled to network). Consequently I went into “Detective Mode”. Maybe there was more than one AAM on the system, or uninstalling and reinstalling AAM would help. But looking in Windows’ “Programs and Features” Control Panel, I could find no instances of AAM. So maybe AAM was not a “Program” in that sense but some kind of background “Service”, the thought of which led me to look at Windows’ QuickLaunch tray.
AAM was indeed present in the QuickLaunch tray so I ran that instead. It initially opened but then failed to progress, because the error popup from the previous (wrong) AAM was still open (buried under some other windows). However, once I closed that popup, the new (QuickLaunch) version of AAM progressed as expected, listing applications to be updated. YAY!
A rare situation perhaps, but with Adobe’s popularity, maybe even “rare” is too big a big number of users, especially if the occasional VIP/deadlined/embedded user/suer 😉 could be embarrassed/frustrated by this. Regardless of technical definition, it could be perceived by such a person as a “Cloud Glitch”. Thus…
Suggestions to Adobe:
- Make the new (QuickLaunch) version of AAM check for the presence of any obsolete ones and (prompt user to?) delete?
- Or if it’s actually the same program [PDapp.exe] but it must only be executed from the QuickLaunch tray then could it detect that “state of misuse” and give a more helpful error nessage?
- Would AAM benefit from more thorough development attention to its (direct or indirect) processes of error messaging? For example could it do simple diagnostics (broadly like ping) to check network connectivity and rule that in/out (and inform the user). Then maybe higher level protocol-tests (which might reveal that AAM version’s obsolescence or corruption)?
Posted in Adobe | No Comments »
August 23rd, 2013
While recovering and auditing a laptop I came across “Groove Folder Synchronization. I have vaguely come across its name before, but that’s all.
It’s apparently a dropbox-like thing (loosely-speaking), by Microsoft.
Read the rest of this entry »
Posted in collaboration, SharePoint, workflow | No Comments »
August 17th, 2013
I installed the new Adobe CC (which I had expected to be called “CS6.5” or “CS7”) suite of video production applications, primarily Premiere and After Effects.
However when I opened an existing project in Premiere, it gave error messages about missing effects, expected by that project. Ah yes, “that old chestnut…”.
Fix:
- From [C:\Program Files\Adobe\Common\Plug-ins\CS6\MediaCore]
- Copy missing files to [C:\Program Files\Adobe\Common\Plug-ins\7.0\MediaCore]
- (Incidentally, the FieldsKit3 plugin effect was already there)
Tried opening the project once more, and yes there were fewer error messages, but one remained: SpiceMASTER.
- Search for [SpiceMASTER] in [C:\Program Files\Adobe]
- Found in [Adobe Premiere Pro CS6\Plug-ins\en_US]
- Look in CC’s equivalent folder
- Note the files already there
- From CS6 folder, copy over the missing files.
Yes that seems to have worked: The project now opens with no error messages and the expected effects are now all present in the Effects list in Premiere.
Read the rest of this entry »
Posted in After Effects, Premiere | No Comments »
August 17th, 2013
Problem:
My trusty old 2009-vintage MacBook is still running the Snow Leopard edition of Mac OS, 10.6.8. I wondered whether I could upgrade it to Mountain Lion, direct or via intermediate versions, and also how to go about purchasing it, and at what cost.
Solution:
The answer appears simple:
- Yes, probably. Check this and make purchase directly from Mac OS itself, simply by going to Mac OS Menu:[AppleIcon > Software Update… ]
- Cost at time of writing is ???
Non-Problem:
I wonder whether FCP7 will still run on this new version of Mac OS, given that it has been end-of-life’d by Apple and in any case I never really liked it that much, especially with all its technical niggles, especially with regard to gamma level changes and quicktime versions that had to be “just right” (only discoverable in ad hoc manner by hunting through specialist forums). Read the rest of this entry »
Posted in Mac, MacBook Pro | No Comments »
August 12th, 2013
Lessons from creating a YouTube slide-show – which I did for the first time just now:
(Can’t recall exactly what I did, but it was approximately as follows)
To create a video from your own images via YouTube’s on-line timeline editor:
- Ensure you are logged-on to YouTube under intended account
- Upload (not dropdown) > Photo slideshow (Create)
- -> Select the photos for your slideshow: Upload photos
- Use [Advanced editor]
- (Now you should see a video editing timeline)
- Alter the image order, transitions, durations to suit
- For a background-free lower-third text overlay:
- Banner, set [Position]=[Bottom], [Text size]=[Small], [Opacity]=[0].
- Select the Thumbnail.
- Add text intro/comment.
- etc.
- SAVE
To specify the video as a response to one or more other videos:
- Ensure you are logged-on to YouTube under intended account
- Go to the target-video
- Post (initially as if you were making a text comment)
- Specify it as being a video-response
- Select which of your videos you want to be the response.
- SAVE
Posted in YouTube | No Comments »
August 12th, 2013
I found, downloaded and am currently evaluating Xplorer2, a much more functional alternative to Windows Explorer.
My initial impressions of it are extremely favourable…
Read the rest of this entry »
Posted in file mgt, Windows, Windows 7 | No Comments »
August 12th, 2013
Need a replacement for a failing drive in my MacBook:
My late-2009 MacBook Pro has been acting oddly, with corruptions, suggestive of a failing disk. I suspect this was caused by the machine coming out of Sleep while travelling by car…
Replace with what kind of drive?
I could simply replace with an identical make and model to the original, which is:
- According to W7 WindowsExplorer Properties:
- Printed on disk:
- Seagate Momentus 7200.4
- 500GB
- WWN: 5000C500380A2AC9
On the other hand, I could see if there’s anything better I can rfeplace it with now, e.g. offering greater capacity and speed. Of course, have to be careful to ensure capacity…
Following a web-search, and due consideration, my plan is:
- SSD is possible, but may have to be careful about some technical issues in selection and ongoing system maintenance. Also, given they cost a small number of hundreds of pounds, it is difficult to justify investing such an expensive component in a computer that, due to its age and visible wear-and-tear, is only worth about the same amount itself.
- Hybrid SSHD is plug-compatible and looks the same to the OS as an ordinary HD, thus no technical complications should arise (no special configuration or ongoing maintenance). Also, the price is below £100, which is justifiable for the described system.
- Physically, to fit in the MacBook, the drive must have a SATA 2.5″ form factor and no more than 9.5 mm in height.
A recommended SSHD Drive:
- Seagate 750GB Momentus XT hybrid
- ST750LX003
- This (unlike larger 1TB variant) comes with 7200 rpm HD
- It is available from Amazon:
- SATA 6Gb/s compatibility with NCQ for interface speed.
- Product Dimensions 10 x 7 x 0.9 cm
- Item model number ST750LX003
- Shock Tolerance:350 g @ 2ms (operating) / 1000 g @ 1ms (non-operating)
- Interfaces:1 x Serial ATA-600, Compatible Bays:1 x internal – 2.5″ x 1/8H
- Spindle Speed:7200 rpm
- Drive Transfer Rate:600 MBps (external), Average Latency:4.2 ms
- Non-Recoverable Errors:1 per 10^14
- There is a 1TB variant but its spindle speed is only 5400 rpm
Read the rest of this entry »
Posted in Apple, disk, MacBook Pro | No Comments »
August 9th, 2013
To discover on which machine (by name) your Sapphire is registered/activated, enter your Sapphire’s serial number into the following:
Posted in Sapphire | No Comments »
August 4th, 2013
I have on many occasions double-clicked an AVI file on my system, only to have it come up in Windows Media Player, where it plays shakily, as if getting frames or fields alternated. VLC won’t play it at all, I believe this is because VLC only uses its own internal codecs, which do not include Cineform.
It is nice to know that I am not alone in this experience:
- http://hddv.net/showthread.php?4185-cineform-hdlink (forum thread from 2008)
- harshvfx
- I view the footage and it is distorted. it shakes badly as if it is playing 2 things at once. one on the right and one on the left. But when it is in premier it looks fine.
- Eugenia Loli-Queru:
- DO NOT try to playback Cineform on WMP (I have the same problem too btw). It is not a viewing codec and it is obviously not optimized to work well with WMP. If your video editor supports Cineform correctly, then you need not to worry.
- BARSENAL
- Try windows media player classic. Free for download on the net. If your computer is up to it you can play back CineForm AVIs without a hitch. With a quad core and good card you can actually use CineForm as a delivery format straight from the PC to an HDTV. I do. Looks fantastic.
Posted in Cineform, Windows Media | No Comments »
August 4th, 2013
Problem: 10-bit QuickTime (QT) Cineform footage in Premiere CS6 on Windows 7 looked ok with Sequence in 8-bit mode but crazy (mostly noise) when same Sequence was in “Maximum bit depth” mode.
Solution: Re-wrap the footage as AVI-Cineform (or else use Premiere CS5.5 or a different NLE).
I posted this on the Adobe Premiere forum at http://forums.adobe.com/thread/1268633
Posted in Premiere, QuickTime, Windows 7 | No Comments »
August 3rd, 2013
The following is aimed at Windows Vista, but I think (though being no expert) thatmuch of it applies equally to Windows 7:
Posted in Windows, Windows 7 | No Comments »
August 3rd, 2013
In my post http://blog.davidesp.com/archives/573 I reported that when I imported 10-bit footage to Sony Vegas 10, even in 32-bit mode, it still appeared to act as if only using 8-bit footage.
Since then, I re-did the test for Sony Vegas 12. I applied a 10-bit recording from a CineDeck, in QuickTime (.mov) containing Cineform 10-bit, taken from SDI output of a Sony EX3 camera. In that case, Vegas 12, with 32-bit (Video Levels) mode, did correctly make use of the 10 bits, as verified by bands on the vectorscope on dark areas of high-alpha-increased underexposed footage.
One thing I noted was the tendency of 8-bit to round-down. Consequently, when switching project to 32-bit mode (hence 10-bits used), the dark levels visibly (and on vectorscope) brightened. I guess better compatibility would in that case be obtained (in that NLE or by pre-processing the footage) by first subtracting “4” from the 10-bit levels, since the “2^4” represented by those extra 2 bits would in 8-bit format not exist, hence effectively would be rounded-down. Or maybe the offset should be 1 less than this, i.e. subtract 3 (depends how the rounding gets done).
Workarounds would be to either pre-process the 10-bit footage (to subtract the offset) or else, less conveniently, apply a levels effect to increase the input minimum level by that amount. But would be awkward and may or may-not work, depending on Vegas 12 nuances. Something to be tested!
Posted in 10-bit depth, Sony Vegas | No Comments »
August 3rd, 2013
Today my Adobe updater reported that a bunch of new Apps, all with a “CC” suffix, were available. This naming confused me: was this the new version after CS6? Or was it some kind of collaborative bloatware I didn’t need right now? Such confusion arose because I had expected the new version to be called something like CS6.5 or CS7.
- Premiere Pro CC is the new version after CS6, Adobe have chosen not to name it numerically e.g. CS7.
OK but then the recurring (every version) question: if I install this new version, will it coexist with the old one or will it wipe it out?
- According to a websearch (as below), they should coexist. But I haven’t tried it yet.
Read the rest of this entry »
Posted in Premiere | No Comments »
July 24th, 2013
How to join a Google Group:
Official help:[https://support.google.com/groups/answer/1067205?hl=en]
BUT below is my experience of it:
- Google.com:[More > Groups]
- Groups:[Search for groups or messages]:[xyz]
- Click on the one you want
- -> Says “Loading…”, may take a minute or so…
- -> Messages under that group/forum are listed:
- xyz a of b topics (c unread) * [Join group to post] [G+1]
- Click blue Button:[Join group to post]
- -> Form:[Join the xyz group]
- Form: Enable [Automatically subscribe me to email updates when I post to a topic]
Posted in Google, Networking | No Comments »
July 22nd, 2013
To convert from [.flv] to another format, use VLC Media Player’s [Media > Convert/Save] option. Be sure to set the destination as well as the source. VLC can only convert to formats in its own internal container and codec sets, but e.g. can convert to [.mp4] containing H264.
Thereafter can use e.g. Sony Vegas to generate e.g. [.avi] containing CFHD, e.g. for onward use in applications that don’t recognize mp4-h264. Vegas is more accommodating and flexible than (straight use of) Adobe Media Encoder, as regards non (broadcast) standard frame sizes and proportions. Conveniently, Vegas automatically matches the Project to the footage on footage-import.
Prior to that, I tried installing and using Riga, the two-way FLV convertor, but it didn’t work on my Window 7 (64-bit) machine, opening only a blank window where a GUI was expected, and both the downloader and installer were both full of bloatware (NB needed to install in Advanced mode in order to avoid some of that). Pointless…
Posted in Adobe Media Encoder, AVI, Cineform, flv, H264, mp4, Sony Vegas, VLC | No Comments »
July 20th, 2013
How to extract DVD contents to plain mpg files
- Open Sony Vegas 12
- Menu:[File > Import > DVD Camcorder Disc…]
- Dialog:
- [Source > Browse…]
- [Destination > Browse…]
Posted in DVD, Sony Vegas | No Comments »
July 20th, 2013
Can use Mocha either stand-alone and export result as an image-sequence, or in combination with AE in order to export as a movie-file.
Some points:
- Go to Track tab
- Put In/Out points over the useful bits (e.g. not overexposed bits).
- Put playhead in middle of duration, note Frame-Number, then track both forwards and backwards from this point.
- Go to Stabilize tab.
- There is a Stabilize button to preview what it will look like.
- Must select a Layer (tracked-region) first
- (in principle, could have more than one tracked region).
- Remember to disable this button before attempting to track again.
If exporting for Registax, then it is sensible to use TIFF format, but it must be with no alpha (otherwise Registax 5 gets its colors weird).
If using Registax (5) then:
- Align=None
- Drizzle=25%
- Limit
- (just in order to get to the next stage0
- Stack
- Wavelet
- Default (not Gaussian), Linear (not Dyadic), most sliders near full.
- Do All
- Save Image
- Save as a TIFF, so can manipulate levels in Gimp etc)
Read the rest of this entry »
Posted in After Effects, Mocha, stacking, Uncategorized | No Comments »
July 19th, 2013
I tried to run a java-based network-analysis application (Cytoscape). Mostly it ran ok, though a few glitches occurred. Then I read the documentation, which stated that it required version 6 of Java. Needless to say, I had Java 7 on my system. I have previously read that Java 7 was not entirely backwards-compatible with Java 6. So now I’d like to see how well it runs under Java 6.
Which leads to the problem…
Where can one get Java 6?
Read the rest of this entry »
Posted in Java, programming | No Comments »
July 16th, 2013
Some BBC documents I came across:
- http://www.bbc.co.uk/guidelines/dq/contents/television.shtml
- ID
- DQ – Defining Quality
- This section brings together all policies and standards that apply to the delivery of television programmes.
- For other information, please see the TV Commissioning Site: http://www.bbc.co.uk/commissioning/.
- Signal Levels
- In a picture signal, each component is allowed to range between 0 and 100% (or 0mV and 700mV). This equates to digital sample levels 16 and 235 (8-bit systems) or 64 and 940 (10 bit systems).
- Blanking
- Digitally delivered pictures are considered to have a nominal active width of 702 pixels (52us) starting on the 10th pixel and ending on the 711th pixel in a standard REC 601 (720 sample) width.
- A minimum width of 699 pixels (51.75us) within these limits must be achieved.
- Additional active pixels outside the above limits must be an extension of the main picture.
- Vertical Blanking must not exceed 26 lines per field.
- Line 23 may contain a whole line of picture, be totally blank ed, or the last half may contain picture relevant to programme. Line 23 must not contain any form of signalling as it is likely to appear in picture during letterbox style presentation.
- Likewise picture content in line 623 is also optional, but if present it must be related to the programme
- Aspect Ratio
- Active Picture Width
- Active picture width is 52us / 702 pixels. All aspect ratio calculations are based on this. Any processes based on 720 pixel width may introduce unwanted geometry or safe area error.
- Use of HD Material (for SD programmes)
- Some standard definition programmes will contain material from high definition sources.
- Particular care must be taken to deliver the best possible quality of down-converted material.
- It is acceptable to use a broadcast VTR’s “on board” down converter to produce standard definition copies of high definition programmes.
- Most non linear editing packages do not produce acceptable down conversion and should not be used without the broadcaster’s permission
- Safe Areas for Captions
- Audio
- Stereo audio levels and measurement (loudness or volume)
- Stereo programme audio levels are currently measured by Peak Programme Meters (PPM). The Maximum or Peak Programme Level must never exceed 8dBs above the programme’s reference level. The following levels, as measured on a PPM meter to BS6840: Part 10 with reference level set at PPM 4, are indicative of typical levels suitable for television, and are given as guidance only.
- Stereo phase
- Stereo programme audio must be capable of mixing down to mono without causing any noticeable phase cancellation.
- Material (levels in PPM):
- Dialog: Normal: 3-5, Peak 6
- Uncompressed Music: Normal: 5, Peak 6
- Compressed Music: Normal: 4, Peak:4
- Heavy M&E (gunshots, loud traffic etc): Normal: 5-6
- Background M&E (ambient office or street noise etc or light mood music): 1-3
- http://www.bbc.co.uk/guidelines/dq/pdf/tv/tv_delivery_to_network_programmes_SD_v1.0-2011.pdf
- Technical Standards for Delivery of Television Programmes to BBC
- This document is only to be used for the delivery of programmes commissioned in Standard Definition (SD).
Posted in BBC, Uncategorized | No Comments »
July 16th, 2013
Like the title says (providing you have time for post-production), it is sensible to do Run&Gun Shooting with Fast Shutter, then Deshake and Add Motion Blur in Post.
In Summary:
- For a bumpy aircraft flight, I shot with 1/50 second shutter and stabilized it in post. The inevitable result, though more pleasing than the non-deshaken footage, exhibited shimmering effects due to motion blur on the various objects in the frame.
- The shimmering could of course have been vastly reduced by shooting with a much faster shutter-speed. One reason I didn’t was to avoid the staccato “Saving Private Ryan” look. However I now realize that a convincing motion blur can (at least in theory, until I test it) be artificially introduced in post, following the de-shaking.
- Some options exist for artificially introducing motion blur in post:
- (Some degree of risk: Not perfect, but the imperfections might not necessarily be noticeable, or at least they may be less so than if not following this overall path).
- RE:Vision Effects’ plug-in ReelSmart Motion Blur (RSMB).
- Convenient, as it is a plug in for Premiere as well as After Effects (and various NLES/Tools).
- After Effects’ Time Warp plugin (even if not warping time) has a Motion Blur function.
- Comparison between them:
- http://www.screenr.com/T3d
- Time Warp works, but painfully-slowly.
- RSMB is very-much faster.
- Sometimes they get fooled when a motion-vector suddenly changes, leading to odd artefacts, though possibly not too noticeable in a changing/moving image.
- Tips for reducing the problem at shoot-stage:
- Shoot with elbows on a bean-bag.
- If camera has rolling-shutter effect, then some cameras reduce this more when you increase the framerate than when you decrease the shutter angle by equivalent amount.
- Potential methods for removing blur from the original footage, by deconvolution:
In Detail:
I shot a flight in an aeroplane (a Tristar) as a passenger that happened to have a camera (A Sony Z1) as opposed to a proper production. I used the Z1 because it had a (small) CCD sensor, thereby avoiding the rolling-shutter effect associated with most (not all) CMOS-sensor cameras.
Lazily, I left it at its default setting of 1/50 second. I had a vague idea that I didn’t want a fast-shutter staccato “Saving Private Ryan” look, but that’s as far as my thinking went. Instead of increasing shutter-speed, I applied the Z1’s built-in ND filters so I could keep keep its iris reasonably wide, so as to obtain the shallowest focus possible (with this small-sensor camera), especially to try to defocus as much as possible the inevitable muck on the passenger windows. I had no particular plan, I was just being a tourist…
But of course, once I got back to the editing, grander plans (belatedly) came to mind: I would string some kind of video together as an entertaining souvenir for the (transient) passengers, staff (one of whom was changing his job) and of course myself. I found some “little stories”, a “little drama”, a “celebratory ending”, and royalty-free music that was great accompaniment.
One of the first jobs was to stabilize it. For that I used Gunnar Thalin’s Deshaker plugin for VirtualDub. Following this, the pictures were smooth and drifting like I wanted them to be, but marred by occasional shimmering of individual objects (like houses below) that had motion-blurred at the sensor stage, prior to deshaking.
If only I had used a faster shutter… but then it would have got that staccato look I didn’t want. Or would it? It occurred to me that some kind of motion-estimation-based post production technique might be able to substitute motion blur (at a stage after the deshaking).
Time for a Web-Search:
- Google:[fast shutter stabilize motion blur]
- http://www.guthspot.se/video/deshaker.htm
- “Question”:
- – I get some blurring/shimmering in frames where the camera shakes the most.
- Response:
- What you see is probably motion blur, i.e. motion occuring within a frame. This is present in the source video too, but it doesn’t become distracting until Deshaker has removed the motion between the frames.
- To get rid of this effect you need to use a faster shutter speed while filming. How fast it needs to be depends on the camera and the amount of shake. For a camera with built-in stabilizer, I’d recommend at least 1/200 sec, or so. (Faster if it doesn’t have built-in stabilizer.)
- http://rungunshoot.com/reel-smart-motion-blur/
- Title: Skip the ND (Neutral Density) Filter and add your motion blur back in post
- One way to add motion-blur in post is RE:Vision Effects’ plug-in ReelSmart Motion Blur (RSMB).
- This plug-in, designed mainly for 3D graphics artists who need to add blur to their rendered objects, tracks vectors frame-to-frame and generates the appropriate blurs and streaks to mimic actual motion blur.
- It can be used in two modes: RSMB (basic) and RSMBPro (advanced). I have only used the basic mode because it has been satisfactory for my needs.
- Simply drag the plug-in to your clips in your timeline and drop. That’s really about it. If you want to tweak, there are only two parameters in basic mode:
- Motion Blur Amount: simulates different shutter speeds. Since cinema is universally shot with a 1/48 shutter, and this is the default setting of the plug-in, you should really just leave this alone unless going for a special look
- Motion Sensitivity: adjusts how much the warping reacts to motion. I’ve found that reducing the sensitivity helps reduce warping artifacts in scenes with intense motion, but in my tests it handled almost all motion well when set at .5 or 50%.
- Is it flawless? No. If you freeze-frame some shots, you can see warping where the foreground and background mesh in weird ways. But these artifacts are hardly noticeable when played back a regular speed.
- The main caveat to using this plug-in is increased render time. So I would recommend applying it as a final step before rendering for output. But don’t apply it to all your clips as a compound clip, or even worse as a rendered movie file, because then it will try to warp your different shots together, resulting in some very strange artifacts.
- http://www.reduser.net/forum/showthread.php?79306-Shooting-motorcycles-from-the-back-of-a-pickup
- Question:
- we are planning to shoot from the bed of a pickup truck.
- I am aware that the rental of either a gyro or steadicam rig would be ideal, but the budget is limited and the rental situation here in Idaho is less than ideal.
- So instead we have rigged a kind of “ghetto fabbed” large cinesadle for our tripod to be loosely ratchet strapped on top of in the truck bed (to reduce vibration), then we will stabilize in CS6 warp stabilizer.
- My questions is:
- What do you guys think of 4k 24 VS 3k 48?
- Currently we have been using a shutter of 192 for 24 and a shutter of 384 for 48, any suggestions here?
- Reply:
- your shutter speeds are a bit high. You might get the Private Ryan strobing effect. Have you run any tests?
- Reply:
- We have done some testing at 4k, not yet at 3k. What would you think of as an ideal shutter? The problem we have been running into is the motion blur caused by movement/vibration, causing the shots at a more standard shutter speed to look much softer.
- We have done some testing at 4k, not yet at 3k. What would you think of as an ideal shutter? The problem we have been running into is the motion blur caused by movement/vibration, causing the shots at a more standard shutter speed to look much softer.
- Reply:
- Testing testing testing!!!
- We are doing a similar shoot, except shooting out the front window, ie, driver’s POV on some rough roads.
- We built a bungee rig with straps through the windows and the camera hanging for the bungees, we tried a steadycam arm on a combo shorty stand, and other goofy looking gadgets.
- So far the best was going handheld with elbows propped on a padded 2×4. Fortunatly for us, the client wanted smoother and we will be renting one of these
- $1200 a week i think we were quoted. Maybe we can shoot some other fun stuff the rest of the week!
- I guess I would err on the side of fast shutters than slow, the stabilize will look better with less motion blur. In our tests, it messed up on the sharp bumps where there was a lot of movement between frames, the motion blur made it a little goofy looking.
- Reply:
- The RE:Vision plugin works pretty good in most cases – I agree that it’s better to sacrifice motion blur if there’s ANY plan for post stabilization, and just fake it on the stabilized footage.
- 48fps is only gonna give you the effect of slower motorcycles when played back at 24, so I would say shoot at 4k to give the stabilization/post blurring process more data to work with (and a wider shot w/less of a cropped sensor). Also, use a lens w/IS.
- {I assume that means Image Optical Stabilization)
- All that said, I got some great shots of some electric motorcycles six years ago from a truck bed on a dirt road using a steadicam… (actually a cheap rental Glidecam). It’s easy to operate since you’re just sitting/kneeling there, so you don’t need to hire an experienced operator.
- Reply:
- Increase framerate and cushion the camera with bungies or lock the camera hard to the car. Then remove frames in post and stabilize. the upped framrate will get you around rolling shutter in a way the shutter will not. So better to shoot 48fps 360 than 24fps 180.?
- {Well I’d never have thought of that, good tip. This is a RED camera forum, but maybe applies to some other cameras also?}
- Reply:
- First, partially deflate the tires on the pickup – especially the rear wheels. That will remove most of the vibration.
- Next, keep the camera lower to the bed – the higher you are, the more “sway” introduced. If you have ever tried to shoot from the back of a truck standing up, you know that stability is lacking – it will fight you.
- If you want to be clever and build a rig:
- Mount a high hat in the middle of a piece of plywood.
- Drill a series of holes at the edge of the plywood.
- Mount some drilled rails along the top of each side panel of the bed (use the rectangular holes as gravity mounting points)
- Install numerous high strength rubber straps / cords between the rail holes and plywood holes.
- Result: a floating camera platform. The rubber straps will absorb a lot of the vibration.
- Downside is it tracks with the level of the bed – so as the truck takes a corner, the platform tilts. Then again, a tripod will do the same thing.
- So, another approach is to construct a floating mount suspended from an overhead rail. With a bit of practice, you can keep the horizon level in a turn. Again, heavy duty rubber to take the load and absorb vibration.
- If you are able to get a Steadicam or Tyler mount w/gyro, best place to position yourself is sitting down on the tailgate.
- Reply:
- http://ai.stanford.edu/~schuon/deblur.htm
- Potential methods for removing blur from the original footage, by deconvolution:
- Matlab algorithms (downloadable)
Posted in deconvolution, Deshaker, motion blur, shutter | No Comments »
July 15th, 2013
In Windows XP it was simple: just right-click the TaskBar icon, select Move and drag the window back onto screen. But WIndows 7 has no such right-click option. So what’s the Windows 7 alternative? It is this:
http://social.technet.microsoft.com/Forums/windows/en-US/f3040564-0457-4c91-af71-dce1bc673a99/moverecover-offscreen-window
- Simply activate that window’s icon on the TaskBar, then [Windows-Key] + [RightArrow]
Posted in Windows, Windows 7 | No Comments »
July 14th, 2013
Some links about Multicam in Premiere of CS6:
Posted in multicam, Premiere | No Comments »
July 14th, 2013
The ability to rearrange the order of video and audio (etc.) tracks in an editing-project in a Non-Linear Editing project.
It’s one of those basic things I assumed all NLEs would allow. But not so. Some have workarounds involving the creation of new Sequences and pasting in contents from original Sequences, in which case why haven’t they simply automated that workaround? Bizarre!
Read the rest of this entry »
Posted in Adobe, After Effects, Avid, Media Composer, Premiere, Symphony | No Comments »
July 14th, 2013
I have an existing GenArts Sapphire v.2 installation, as a plugin to Final Cut Pro (FCS7/ FCP7). I upgraded it to v6 with a view to using the licence instead for plugin to After Effects (AE), since I no longer use FCS, only Adobe Production Premium (CS6). Before activating for AE, I need to deactivate for FCP. How to do that? A Google-search for [final cut pro sapphire deactivate] gave no obvious useful source of information.
Then it found http://www.genarts.com/support/sapphire/final-cut-pro, leading to http://www.genarts.com/support/sapphire/final-cut-pro#Sv6FCP%20-%20How%20do%20I%20uninstall%20Sapphire%20from%20my%20current%20machine?, as follows:
- How do I uninstall Sapphire from my current machine?
- {I was initially concerned by the title, that if I simply uninstalled the application then that might lose me the opportunity to deactivate (and get a deactivation code or whatever GenArts’ process involved…) }
- To uninstall:
- On Mac, go to /Applications/GenArtsSapphireFXPLUG folder and double click on “Uninstall Sapphire”.
- {Actually it was [GenArtsSapphireFxPlug] }
- If your machine is not connected to the web, then select “Display an uninstall code to register on another computer’s web browser”. Follow the instructions to register the uninstall via another machine.
- {My machine was connected to the web, and presumably therefore, no opportunity was given for me to select such an option}
- {Aha! So uninstalling gives you an uninstall-code! Or decrements my license install-count (presumably held at GenArts), though if it does that, it does it invisibly (which is disconcerting – I’d prefer some explicit confirmation of the resulting install-count)}
- {I won’t know for sure this worked as intended until I try to apply the serial number on my new After Effects plugin}.
Posted in FCP7, Final Cut, GenArts, Sapphire | No Comments »
July 14th, 2013
On the rare occasions I produce a DVD, always the same question: How best (easiest and best quality) do I design and print the on-disk label?
In the end, the best option seemed to be to (download and) use the CD/DVD Label-Designer application that came with my disk-printing capability printer (a Canon).
Initial use of it brought up a templates-selection stage that appeared clunky and restrictive. However that was just the initial “wizard” stage of using it, and subsequently I was able to move text, create new text etc. to my satisfaction.
Read the rest of this entry »
Posted in Blu-Ray, Blu-Ray, CD, DVD, DVD, Optical Disk, printer, Uncategorized | No Comments »
July 14th, 2013
(This is actually an older post, from about a wek or so ago, but it was left languishing in “Draft” status. But rather than delete it, here it is, out-of-sequence, for posterity)
Nowadays for video editing I mainly use Adobe CS6. However I have still some old projects edited with Sony Vegas (10) which now have new clients. One such project was shot as HDV on a Z1, giving 1440×1080 interlaced, at 50 fields/second, which I call 50i (it doesn’t really make sense to think of it as 25 fps). The required new deliverable from this is a PAL-SD DVD, 720×5786 50i. In addition, I want to deliver high-quality progressive HD (not V) 1920×1080 progressive.
The PAL-SD frame size of 720×576 has exactly half the width of the HDV source and just over half its height. My naive initial thought was that the simple/cheap way to convert from the HDV source to the SD deliverable would be to merely allow each of the HDV fields to be downscaled to the equivalent SD field. This could be performed in Sony Vegas itself, to produce an SD intermediate file as media asset to Encore to produce a DVD.
Some potential complications (or paranoia) that come to mind in this approach are:
- Levels-changes, through processes associated with the intermediate file. For example it might accidentally be written as 16-235 range and read at 0-255 range. In general, uncertainty can arise over the different conventions of different NLEs and also the different settings/options that can be set for some codecs, sometimes independently for write and for read.
- HD (Rec 709) to SD (Rec 601) conversion: I think Vegas operates only in terms of RGB levels, the 601/709 issue is only relevant to the codec stage, where codec metadata defines how a given data should be encoded/decoded. The codec I intend to use is GoPro-Cineform, with consistent write/encode and read/decode settings. Provided Vegas and Encore respect those, there should be no issue. But there is the worry that either of these applications might impose their own “rules of thumb”, e.g. that small frames (like 720×576) should be interpreted as 601, overriding the codec’s other settings.
- Interlace field order. HDV is UFF, whereas SD 50i (PAL) is LFF. Attention is needed to ensure the field order does not get swapped, as this would give an impression of juddery motion.
So I did some experiments…
- Vegas (1) Project Settings:
- Frame Size: 720×576
- Field Order: LFF
- PAR: 1.4568
- Render Settings:
- Frame Size: (as Project)
- Field order: LFF (I think the default might have been something else)
- PAR: 1.4568
- Video Format: Cineform Codec
What Worked:
- Sony Vegas (v.10) project for PAL-SD Wide, video levels adjusted to full-range (0-255) via Vegas’s Levels FX, then encoded to GoPro-Cineform.
- Just as a test, this was initially read into an Adobe Premiere project, set for PAL-SD-Wide. There, Premiere’s Reference Monitor’s YC Waveform revealed the levels range as 0.3 to 1 volts, which corresponds to NTSC’s 0-100% IRE on the 16-235 scale. No levels-clipping was observed.
- So using the 0-255 levels in Vegas was the right thing to do in this instance.
- The Configure Cineform Codec panel in Sony Vegas (v.10) was quite simple, offering no distinction between encode and decode, allowing only for various Quality levels and for the Encoded Format to be YUV or RGB. The latter was found to have no effect on the levels seen by Premiere, it only affected the file-size, YUV being half the size of RGB. Very simple – I like that!
- In Premiere, stepping forwards by frame manually, the movements looked smooth.
In Adobe Encore (DVD-Maker) CS6:
- Imported the intermediate file as an Asset and appended it to the existing main timeline.
- Encore by default assumed it was square-pixels. Fixed that as follows:
- [theClip >RtClk> Interpret Footage] to selrct the nearest equivalent to what I wanted: [Conform to SD PAL Widescreen (1.4587)].
- Why does Encore’s [1.4587] differ from Vegas’s [1.4568] ? Any consequence on my result?
- Generated a “Virtual DVD” to a folder.
- Played that “Virtual DVD” using Corel WinDVD
- In a previous experiment, involving a badly-produced DVD having swapped field-order, I found this (unlike WMP or VLC) reproduced the juddering effect I had seen on a proper TV-attached DVD player. So WinDVD is a good test.
- Made a physical DVD via Encore.
- The physical DVD played correctly on TV (no judder).
An alternative would be to deinterlace the original 50i to produce an intermediate file at 50p, ideally using best-quality motion/pixel based methods to estimate the “missing” lines in each of the original fields. But would the difference from this more sophisticated approach be noticeable?
There also exists an AviSynth script for HD to SD conversion (and maybe HDV to SD also?).
- It is called HD2SD, and I report my use of it elsewhere in this blog. I found it not to be useful, producing a blurry result in comparison to that of Sony Vegas ‘s scaling (bicubic).
Posted in Adobe, Cineform, Premiere, Uncategorized, video | No Comments »
July 14th, 2013
As explained as part of my recent “Best of Breed” post, I wish to identify the best NLE for multicam editing. It is possible to achieve such editing in a variety of NLEs, with much the same technical quality. What matters here is friendliness and flexibility, leading to productivity (and hence, in limited-time situations, to greater product quality).
I like the sound of FCPX (with required add-ons) on Mac OS and of LightWorks which is currently on Windows only, soon to go Linux and intended in future to be on Mac OS also. I need to watch a few YouTubes about these and and give them a try. Hopefully I can get a colleague with FCPX to demonstrate it and als I plan to download/install a copy of the free version of LightWorks. Then try them out on archived previous live-event multicam projects.
Read the rest of this entry »
Posted in FCPX, LightWorks, multicam, Uncategorized | No Comments »
July 14th, 2013
I strayed upon the following, informative:
http://www.personal-view.com/talks/discussion/6912/nle-alternatives-to-premiere/p1
- 5thwall May 8
- I’ve been using FCPX, mostly. $299 as most everyone knows. But the real cost is closer to $1300 when you add up all the plugins to get more pro support.
- My list of “helper” apps:
- Compressor: $50
- Motion: $50
- Pro Versioner $60 (for backing up events and projects)
- Event Manager X: $5 (a must for dealing with loads of events – hopefully Apple will institute better mgmt in software)
- Xto7: $50 (hate X? send it to 7!)
- 7toX: $10 (love X? send it from 7 to X!)
- Sync-N-Link: $200 (replicates Avid functionality for syncing clips with jam synced audio)
- SliceX with Mocha: $150 (great tracker and object remover)
- Lock & Load: $100 (a much better image stabilizer)
- X2Pro Audio Convert: $150 (export to AAF)
- Pluraleyes: $200 (sync multiple clips with multiple tracks of non-timecoded audio to separate clips FCPX can’t currently do that unless you make a multiclip).
- Davinci Resolve Lite: Free
- Total for FCPX and helper Apps: $1325
Posted in FCP7, FCPX | No Comments »
July 14th, 2013
What’s new in Avid Media Composer (etc.) version 7.0? Below are the highlights that took my attention:
http://provideocoalition.com/ssimmons/story/avid-media-composer-7-ships.-heres-25-new-features
- Cached Waveform Redraw
- Less clunky then, hopefully…
- Track Selection for Relink
- Background Queue monitoring, inside MC and from web browser
- Start/Stop/Pause Background Services
- Spanned Markers
- Dynamic Media Folders
- FrameFlex: Reframing HiRes Media
- e.g. pan/crop/zoom parts of HD into an SD target, or 4/5K to HD etc.
- AMA Managed Media
- Prior to this, AMA was a bit of a “Cinderella”, not managed in the manner of Imported media.
- Audio Mixer Improvements
- Background Consolidate/Transcode
- Adjusting Audio Clip Gain in Timeline
- Consolidate/Transcode only AMA clips
- Color Management- for various camera types
- Sounds to me like LUTs and Looks…
- Change Track of Marker in Marker Window
- Vertical Scroll in Timeline
Additional links:
Posted in Avid, Media Composer, Symphony | No Comments »
July 14th, 2013
I am becoming less enthusiastic about the “Integrated Suite” philosophy or perhaps actuality of Adobe CS6, in favour of a “Best of Breed” approach, where I cherry-pick the best tool for each kind of job and then design or discover my own workflow for integrating them.
I reached this conclusion from the following experiences:
- As regards editing itself:
- For general A & B Roll” editing, I find Premiere is ok, though for improved usability, I’d prefer a Tag-based system (as in FCPX) to the traditional Bin-based one (as in Adobe & Avid).
- For MultiCam editing, even in Adobe CS6, I find Premiere does the job but I find it clunky, frustrating and limited at times, like it has not yet been fully “baked” (though “getting there”)…
- e.g. In the two such projects I have so far worked on, there has been an annoying 2-second delay from pressing the spacebar to actual playing. Maybe some kind of buffering?
- I found a setting for “Pre-roll” in the Preferences but altering it made no difference.
- The following http://forums.adobe.com/thread/387405 suggested that the embedded audio (in video file) could be the issue, the solution to which was to relink to a WAV file.
- e.g. It brings up a separate MultiCam Monitor instead of using the Source Monitor. You have to remember to activate this each time before playing. I find that a nuisance (and time-waster when I forget) especially because I tend to alternate multicam editing as such with tweaking the cut timings until they feel right, and sometimes that can only be done in retrospect.
- e.g. When you stop playing in multicam mode, it places a cut (that you probably didn’t want) wherever the playhead happens to be at the time.
- I see I am not the only one complaining about this: “ExactImage, Sep 15, 2012″at http://forums.adobe.com/thread/1069438
- A workaround given at that link: Before to stop the playback press the key 0 (zero) of the keyboard and then you can stop the play (with the Space bar) without the cut in the timeline.” Duh!
- e.g Markers are really useful in multicam, but while Premiere’s are steadily improving with product version, they are way clunkier and more limited than those in Sony Vegas:
- e.g. I put a marker at the start of an interesting section (of timeline), I select it and define its duration to be non-zero, so I can stretch it out to mark a region, then I drag the playhead to the find the end of that interest, I try to drag the marker’s right-hand end up to the playhead, but instead the playhead gets reset to the start of marker. Duh!
- e.g. Markers cannot be promoted from clip (media or nested Sequence) to current Sequence.
- e.g. waveform displays (assuming you can get them to appear in the first place) go blank when sliding clips around. Really annoying when trying to synchronise to music etc.
- …so I will explore other options for multicam:
- In the past (as will be apparent from the above) I have had more joy, as regards Multicam, with Sony Vegas.
- I will check out what people think of other NLEs as potential “Best of Breed” for multicam editing. Thus far I have heard (from web-search) good things about FCPX and LightWorks.
- For audio enhancement, such as denoising, I find iZotope’s RX2 far superior to the one in Adobe Audition.
- For making a DVD:
- I find Encore to be handy in some ways but limited and clunky in others.
- e.g. can’t replace an asset with one of a different type (e.g. [.avi] and [.mpg]).
- The advantage of using an integrated DVD-Maker such as Encore might be limited:
- e.g. many people are not using the direct link, but exporting from Premiere/AME, in which case any third-party DVD Builder could be used.
- The only significant advantage I am aware of is the ability to define Scene/Chapter points in Premiere and have them recognised/used by Encore.
- But maybe some third-party DVD Builder applications can also recognise these? Or can be configured/helped to do so? Worth finding out.
- ?
Posted in LightWorks, multicam, Music, Premiere, Sony Vegas, video, Video Computer Technology, workflow | No Comments »
July 14th, 2013
In one Adobe CS6 Encore (a DVD constructor) project, the [Check Project…] feature found no problems, but on attempting to [Build] the project, the following error was reported: “Encore failed to encode”.
A web-search (further below) revealed that this error message could have reflected any of a number of potential problems.
In my specific project’s case, I found that shortening the filename name fixed the problem. Possibly the filename length was the issue, but it could have been any of the following (experimentation is needed to confirm what it was). Possibly Encore doesn’t like one or more of the following, as regards either filenames or, possibly, the total text representing the volume, folder-chain and file-name.
- Long filenames
- Possibly the limit is 80 characters.
- Specific kinds of character in the filename, such as:
- Spaces (it’s safer to use underscores instead).
- Unusual (legal but not popularly used) characters, such as “&” (ampersand).
It is possible to configure Encore to use Adobe Media Encoder (AME) instead of its own internal one. Doesn’t work for Encore’s [Build] operation but does work for its [asset >RtClk> Transcode Now] operation. The advantages I expect of of using AME in this way:
- It has been said (as of CS5) that AME is faster, being 64-bit as opposed to 32-bit for the encoder in Encore of CS5.
- I suspect/hope that AME might also be more robust than Encore’s internal encoder.
- …and also higher quality; indeed one post implied this may be true for CS6.
- Consistency is a great thing; having used AME from Premiere etc. I expect any lessons gained will apply here.
- AME has some nicer usability-features than Encore, such as a Pause button and the ability to queue a number of jobs.
- These features could be handy for encoding multiple assets for a DVD or Blu-Ray Disk (BD).
For me, the learning-points about Adobe are:
- Potentially (to be tested) the best workflow for Encore is:
- Encode via AME:
- Preferably from Premiere.
- Or via AME directly
- Or, if Encore is so configured (away from its default) then via its [asset >RtClk> Transcode Now] option
- (doesn’t happen if you instead use the [Build] option, which always employs Encore’s internal encoder).
- At http://forums.adobe.com/message/5297248 one poster recommends: << it is a good idea to use “transcode now” before building to separate the (usually longer) transcode of assets step from building the disk.>>
- I’m guessing that the only “cost” of not using Encore’s internal encoder might be the “fit to disk” aspect, and that might be helpful for quick turn-around jobs.
- (Though on the other hand, if that encoder is less robust (I don’t know, only suspect), then that factor would constitute a risk to that quick turn-around…)
- Encore’s error-reporting (error message) system should be more informative, the current “Encore failed to encode” message is too general.
- According to Adobe Community forum posts identified in the Web-Search (further below):
- Others make this same point.
- One post explains that <<Encore uses Sonic parts for some (most?) of the work… and since Sonic does not communicate well with Encore when there are errors… bad or no error messages are simply a way of life when using Encore>>>
- Another refers to an underpinning software component by Roxio, namely pxengine, which required to be updated for Windows 7 (from the previous XP).
- The post states (correctly or otherwise – I don’t know) that the file is [PxHlpa64.sys], located in [C:\windows\System32\drivers] and (as of CS5) the version should be [3.0.90.2].
- A further post alleges that the specific subsystem is called Sonic AuthorCore, which is also used by Sonic Scenarist.
- It would be simple for Adobe to trap filename-type errors in the front-end part of Encore, prior to sending that data to its (alleged) sub-system that is maintained by Sonic.
- In the long term, the preferred fix would of course be for the sub-system developer to update that system to remove the limitations.
- Encore currently has some kind of (hidden) limitation on the kind or length of text representing the filename or file-path-and-name, ideally this limitation should be removed or at least the maximum allowed length should be increased.
Not directly relevant, but noticed in passing (while configuring Encore:[Edit > Preferences]):
- Encore’s “Library” location is: [C:\Program Files\Adobe\Adobe Encore CS6\Library]
- It is possible to define which display (e.g. external display) gets used for Preview. Useful for quality-checking.
Read the rest of this entry »
Posted in Adobe Media Encoder, Encore, oddness, Uncategorized | No Comments »
July 14th, 2013
In Adobe CS6 Encore, suppose you have a timeline containing a clip, then (maybe after having added Scene/Chapter markers there) for some reason you need to replace the clip, e.g. due to a slight re-edit or tweak. All you want to do is substitute a new clip for the existing clip, one-for-one, keeping the markers (that you have only just added) in place (together with their links to DVD menu buttons you may also have just now created).
In Encore, media (“Asset”) replacement is not as straightforward or as flexible as in Premiere…
I discovered (the hard way) that:
- You can’t replace an asset by another of different file extension.
- e.g. It won’t let you replace an [.avi] file by a [.mpg] file.
- If you manually delete an existing clip from a timeline, any chapter markers disappear along with it.
- I guess therefore that such markers “belong” to the clip, not the timeline.
- This is despite their superficial resemblance to markers appearing in a Premiere timeline, which do belong to the Sequence (of which the timeline is a view).
- Consistency would be good to have among these suite products…
- Also in Encore, it would help to have the ability to Copy/Paste markers from one asset to another.
Read the rest of this entry »
Posted in Encore, oddness, Uncategorized | No Comments »
July 13th, 2013
Ordinarily, VirtualDub cannot understand MPEG-2 video files, but there is a plugin that makes this possible:
- MPEG-2 plugin v4.5 by fccHandler, Released March 23, 2012
- File: [MPEG2.vdplugin] goes into folders Plugins32 or Plugins64 (as appropriate) of the folder your [VirtualDub.exe] resides in (32-bit or 64-bit):
- Not the existing folder, simply called [plugins]
- VirtualDub will find and use the plugins automatically
- YouTube: http://www.youtube.com/watch?v=B78dsIqaW7Y
- Download link – http://tinyurl.com/ykd42fy
- Discovered via Google:[virtualdub mpeg2]
Prior to awareness of this, I would have used VirtualDubMod, but that development has been discontinued as of 2005 (though at http://sourceforge.net/projects/virtualdubmod/ the download area says “Last Update: 2013-05-07”
Posted in mpeg2, VirtualDub | No Comments »
July 13th, 2013
What is the best workflow for going from a high-resolution footage, potentially either progressive or interlaced, possibly through an intermediate Master (definitely in progressive format) to a variety of target/deliverable/product formats, from the maximum down to lower resolution and/or interlaced formats such as SD-DVD ?
Here’s one big fundamental: Naively one might have hoped that long-established professional NLEs such as Premiere might provide high-quality optical processing based downscaling from HD to SD, but my less optimistic intuition, about the un-likelihood of that, proved correct. In my post http://blog.davidesp.com/archives/815 I note the BBC Technical standards for SD Programmes state: <<Most non linear editing packages do not produce acceptable down conversion and should not be used without the broadcaster’s permission>>.
Having only ever used Adobe (CS5.5 & CS6) for web-based video production, early experiences in attempting to produce a number of target/deliverable (product) formats proved more difficult and uncertain than I had imagined… For a current project, given historical footage shot in HDV (1440×1080, fat pixels), I wanted to generate various products from various flavors of HD (e.g. 1920x1080i50, 1280x720p50) down to SD-DVD (720×576). So I embarked on a combination of web-research and experimentation.
Ultimately, this is the workflow that worked (and satisfied my demands):
- Master: Produce a 50 fps (if PAL) progressive Master at the highest resolution consistent with original footage/material.
- Resolution: The original footage/material could e.g. be HD or HDV resolution. What resolution should the Master be?
- One argument, possibly the best one if only making a single format deliverable or if time is no object, might be to retain the original resolution, to avoid any loss of information through scaling.
- However I took the view that HDV’s non-standard pixel shape (aspect ratio) was “tempting fate” when it came to reliability and possibly even quality in subsequent (downstream in the workflow) stages of scaling (down) to the various required formats (mostly square-pixel, apart from SD-Wide so-called “16:9” pixels, of 1.4568 aspect ratio (or other, depending where you read it).
- So the Master resolution would be [1920×1080].
- Progressive: The original footage/material could e.g. be interlaced or progressive, but the Master (derived from this) must be progressive.
- If original footage was interlaced then the master should be derived so as to have one full progressive frame for each interlaced field (hence double the original frame-rate).
- The concept of “doubling” the framerate is a moot point, since interlaced footage doesn’t really have a frame rate, only a field rate, because the fields are each shot at different moments in time. However among the various film/video industry/application conventions, some people refer to 50 fields/second interlaced as 50i (or i50) wile others refer to it as 25i (or i25). Context is all-important!
- Quality-Deinterlacing: The best way to convert from interlaced fields-to-frames is via motion/pixel/optical -based tools/techniques:
- I have observed the quality advantage in practice on numerous projects in the distant past, e.g. when going from HDV or SD (both 50i) to a variety of (lower) corporate web-resolutions.
- This kind of computation is extremely slow and heavy, hence (for my current machines at least) more an overnight job than a real-time effect… In fact for processing continuously recorded live events of one or two hours, I have found 8 cores (fully utilised) to take a couple of 24-hour days or so – for [AviSynth-MultiThread + TDeint plugin] running on a [Mac Pro > Boot Camp > Windows 7].
- But (as stated) this general technique observably results in the best quality, through least loss of information.
- There are a number of easily-available software tools with features for achieving this, Adobe and otherwise:
- e.g. AviSynth+TDeint, (free) After-Effects, Boris.
- e.g. FieldsKit is a nice convenient deinterlacing plugin for Adobe (Premiere & After Effects), and is very friendly and useful should you want to convert to a standard progressive video (e.g. 25fps), but (at this time) it can only convert from field-pairs to frames, not from fields to frames.
- I submitted a Feature Request to FieldsKit’s developers.
- Intermediate-File Format: A good format for an Intermediate file or a Master file is the “visually lossless” wavelet-based 10-bit 422 (or more) codec GoPro-Cineform (CFHD) Neo
- Visually lossless (such as CFHD) codecs save considerable amounts of space as compared to uncompressed or mathematically lossless codecs like HuffYUV and Lagarith.
- I like Cineform in particular because:
- It is application-agnostic.
- It is available in both VFW [.avi] and QuickTime [.mov] varieties (which is good because I have found that it can be “tempting fate” to give [.mov] files to certain Windows apps, and indeed not to give it to others). The Windows version of CFHD comes with a [.avi] <-> [.mov] rewrapper (called HDLink).
- Another advantage is that CFHD can encode/decode not only the standard broadcast formats (and not only HD) but also specialized “off-piste” formats. I have found that great for corporate work. It’s as if it always had “GoPro spirit”!
- CHFD Encoder Settings from within Sony Vegas 10:
- These settings worked for me in the context of this “Sony-Vegas-10-Initially-then-Adobe-CS6-centric” workflow:
- Technical Production History of a Master for an Actual Project:
- This is merely for my own reference purposes, to document some “project forensics” (while I still remember them and/or where they’re documented):
- This was a “Shake-Down” experience, not exactly straightforward, due to an unexpected “hiccup” between Sony Vegas 10 and AviSynth-WAVSource. Hiccups are definitely worth documenting too…
- The stages:
- Sony Vegas Project: An initial HDV 50i (to match the footage) Intermediate file, containing the finished edit, was produced by Sony Vegas 10 Project:
- [Master 021a (Proj HDV for Render HDV) (veg10).veg] date:[Created:[2013-07-01 15:30], Modified:[2013-07-03 20:07]]
- Movie duration was about 12 minutes.
- Audio & Video Settings:
- Project Settings:
- HDV 1440×1080 50i UFF 44.1KHz
- The audio was 44.1KHz, both for Project and Render, since most of the audio (music purchased from Vimeo shop) was of that nature.
- Render Settings:
- I believe I will have used the following Sony Vegas Render preset: [CFHD ProjectSize 50i 44KHz CFHD (by esp)] .
- Though I think there may have been a bug in Vegas 10, whereby the Preset did not properly set the audio sampling frequency, so it had to be checked & done manually)
- The CFHD Codec settings panel only offered two parameters, which I set as follows: Encoded format:[YUV 4:2:2], Encoding quality:[High]
- The result of Rendering from this Project was the file:
- [Master 021a (Proj HDV for Render HDV) (veg10).avi] date:[Created:[2013-07-01 15:30], Modified:[2013-07-01 18:58]]
- Modified date minus creation date is about 3.5 hours, which I guess accounts for the render-time (on a 2-core MacBook Pro of 2009 vintage winning Windows 7 under Boot Camp).
- The next stage of processing was to be by AviSynth.
- However AviSynth had problems reading the audio out of this file (it sounded like crazy buzzes).
- To expedite the project, and guessing that Vegas 10 had produced a slightly malformed result (maybe related to the audio setting bug?), and hoping that it was just a container-level “audio framing” issue, I “Mended” it by passing it through VirtualDub, in [Direct Stream Copy] mode, so that it was merely rewrapping the data as opposed to decompressing and recompressing it. The resulting file was:
- [Master 021a HDV Mended (VDub).avi], date:[Created:[2013-07-08 18:22], Modified:[2013-07-08 18:30]]
- Since that time, I have discovered the existence of the Cineform tool CFRepair, from forum post at DVInfo: http://www.dvinfo.net/forum/cineform-software-showcase/507364-problem-cfrepair.html which itself provided a download link as http://miscdata.com/cineform/CFRepair.zip.
- Worth trying it out sometime, on this same “broken” file…
- This was processed into full HD progressive (one frame per field, “double-framerate”) by an AViSynth script as follows, its results being drawn through VirtualDub into a further AVI-CFHD file, constituting the required Master.
- AviSynth Script:[HDV to HD 1920×1080.avs] date:[Created:[2013-07-04 18:13], Modified:[2013-07-08 22:05]]
- I used AvsP to develop the script. It provides helpful help of various kinds and can immediately show the result in its preview-pane.
- Multi-threaded:
- To make best use of the multiple cores in my machine, I used the AviSynth-MT variant of AviSynth. It’s a (much larger) version of the [avisynth.dll] file. For a system where AviSynth (ordinaire) is already installed, you simply replace the [avisynth.dll] file in the system folder with this one. Of course its sensible to keep the old one as a backup (e.g. rename it as [avisynth.dll.original]).
- Audio Issue:
- This particular script, using function [AVISource] to get the video and and [WavSource] to get the audio, only gave audio for about the first half of the movie, with silence thereafter.
- Initially, as a workaround, I went back to VirtualDub and rendered-out the audio as a separate WAV file, then changed the script to read its [WAVSource] from this.
- That worked fine, “good enough for the job” (that I wanted to expedite)
- However afterwards I found a cleaner solution: Instead of functions [AVISource] and [WAVSource], use the single function [DirectShowSource]. No audio issues. So use that in future. And maybe avoid Vegas 10?
- The script was processed by “pulling” its output video stream through VirtualDub which saved it as a video file, again AVI-CFHD. Since no filters (video processing) was to be performed in VirtualDub, I used it in [Fast Recompress] mode. In this mode, it leaves the video data in YUV (doesn’t convert it into RGB), making it both fast and information-preserving. Possibly (not tested) I could have simply have rendered straight from AvsP:[Tools > Save to AVI]. When I first tried that, I got audio issues, as reported above, hence I switched to rendering via VirtualDub, but in retrospect (having identified a source, perhaps the only source, of those audio issues) that (switch) might have been unnecessary.
- The resulting Master file was [Master 021a HDV 50i to HD 50p 1920×1080 (Avs-VDub).avi] date:[Created:[2013-07-08 21:55], Modified:[2013-07-08 22:47]]
- “Modified minus created” implies a render-time of just under an hour. This was on a [MacBook Pro (2009) > Boot Camp > Windows 7] having two cores, fully uitilised.
- Quality inspection of Master:
- Check image quality, e.g. deinterlacing, via VirtualDub.
- VirtualDub is great in a close-inspection role because its Preview can zoom well beyond 100% and, vitally, it displays the video as-is, with no deinterlacing etc. of its own.
- e.g. zoom to 200% to make any interlacing comb-teeth easily visible. There should not be any, since this Master is meant to be progressive.
- Premiere Project: Make a Premiere project consistent with the Master, and add chapter markers here.
- Make Premiere Project consistent with the Master, not the Target.
- …especially when there is more than one target…
- Don’t directly encode the master (by Adobe Media Encoder), but instead go via Premiere.
- I have read expert postings on Adobe forums stating that as of Adobe CS6, this is the best route.
- This appears to be the main kind of workflow the software designers had in mind, hence a CS6 user is well-advised to follow it.
- It represents a “well-trodden path” (of attention in CS6’s overall development and testing).
- Consequently, (it is only in this mode that) high-quality (and demanding, hence CUDA-based) algorithms get used for any required scaling.
- Not knowing the application in detail, hence having to adopt the speculative approach to decision-making, it feels likely that this workflow would have a greater chance of reliability and quality than other, relatively off-piste ones.
- Premiere is the best stage at which to add Chapter Markers etc.
- Chapter markers etc. get stored as ??XMP?? and are thereby visible to Encore (Adobe’s DVD-Builder)
- Better to place such markers in Premiere rather than in Encore, since:
- In Encore, Chapter markers act as if they are properties of Assets, not Timelines.
- If you delete an asset from a timeline, the chapter markers disappear also.
- Encore (CS6) Replace Asset has some foibles.
- In Encore, if you were to put an [.avi] file asset on a timeline, then add markers then try to replace that asset with a [.mpg] file, you would be in for a disappointment; if the file extension differs then the markers disappear. If required, then the markers would have to be re-created from scratch. Same again if you subsequently replaced back to a new [.avi] file.
- The Foibles of Encore (CS6)’s Replace Asset function, in more detail:
- Good news: If the new asset has the same file extension then any existing markers are retained.
- This possibly suggests that they are transferred from the old asset to the new one.
- Bad news: If the new asset file extension differs from the old one, then:
- You get an error (popup): ???
- e.g. it refused my attempt to replace an [.avi] file by a [.m2v] file).
- Partial-workaround:
- You can instead delete the existing asset from the timeline, prior to dragging another asset there..
- ..BUT as a side-effect that deletes any of the old asset’s markers also…
- …and furthermore Encore has no way to copy a set of markers from one asset to another
- …which would otherwise have been a nice work-around for the above side-effect.
- Premiere Export: Export / Render to Target Format.
- You may wish to render to a number of formats, e.g. SD-Wide DVD, Blu-Ray Disk (BD), YouTube upload format, mobile phone or tablet.
- The most efficient strategy is to Queue a number of jobs from Premiere onto Adobe Media Encoder (AME.
- AME can run some things in parallel (I think).
- AME has a [Pause] button, very useful for overnight silence or prior to travel (Windows Sleep/Hibernate).
- Menu:[File > Export > Media]
- Export Settings:
- For targets of differing aspect ratio (e.g. SD-Wide derived from HD master):
- Source Scaling:
- e.g. for HD -> SD, use [Scale to Fill] since this avoids “pillarboxing” i.e. black bars either side.
- For DVD Target, use inbuilt preset MPEG2-DVD
- Ensure [Pixel Aspect Ratio] and interlace sense etc. are as required.
- The [MPEG2-DVD] preset generates two files:
- [.m2v] for the video
- [Dolby Digital] or [MPEG] or [PCM]
- [PCM] option results in a [.wav] file of 16 bits, 48 KHz (there is no 44.1 KHz option).
- Maximum Render Quality
- Use this if scaling, e.g. down from HD Master to SD Target.
- File Path & Name.
- Where you want the export/encode result to go.
- Click the [Queue] button, to send the job to the Adobe Media Encoder (AME)
- Quality Inspection of Result (intermediate or target file):
- Check the quality of the encodes via VirtualDub, e.g. for DVD-compatible video media, the correctness of interlacing and for progressive media the quality of deinterlacing.
- For interlaced downscaled material derived from higher resolution interlaced, the combs should be fine-toothed (one pixel in height). A poor quality result (as expected for straight downscaling by any typical NLE such as Premiere, from HD interlaced to SD interlaced) would instead exhibit combing with thick blurry teeth.
- VirtualDub is great tool for a a close-inspection role because its Preview can zoom well beyond 100% and, vitally, it displays the video as-is, with no deinterlacing etc. of its own.
- In the past I have searched for and experimented with a number of candidate tools to be effective and convenient in this role. VirtualDub was the best I could find.
- e.g. zoom to 200% to make the teeth easily visible.
- Plain VirtualDub is unable to read MPEG2 video, but a plugin is available to add that ability:
- The [mpeg2.vdplugin] plugin by FCCHandler, from http://sourceforge.net/projects/fcchandler/files/Virtualdub%20Mpeg2%20plugin/.
- It reads straight MPEG2 files, including [.m2v], but not Transport Stream files such as [.m2t] from the Sony Z1.
- For [.m2v] files, VirtualDub may throw up an audio-related error, since such files contain no audio. Fix: In VirtualDub, disable audio.
- Its ReadMe file contains installation instructions. Don’t just put it in VirtualDub’s existing [plugins] folder.
- DVD Construction via Adobe Encore.
- Name the Project according to the disk-label (data) you would like to see for the final product.
- If you use Encore to actually burn the disk, this is what gets used for that label.
- Alternative options exist for just burning the disk, e.g. the popular ImgBurn, and this allows you to define your own disk-label (data).
- Import the following as Assets:
- Video file, e.g. [.m2v]
- If Video File was an [.m2v] then also import its associated Audio file – it does not get automatically loaded along with the [.m2v] file.
- Create required DVD structure
- This is too big a topic to cover here.
- Quality Inspection: [Play From Here]
- Menu:[File > Check Project]
- Click [Start] button
- Typical errors are actions [Not Set] on [Remote] or [End Action]
- I plan to write a separate blog entry on how to fix these.
- When everything is ok (within the scope of this check), it says (in status bar, not as a message): “No items found”.
- A worrying choice of phrase, but all it means is “no error-items found”.
- Menu:[File > Build > Folder]
- Don’t select [Disk], since:
- May want to find and fix any remaining problems prior to burning to disk.
- May want to use an alternative disk burning application, such as ImgBurn.
- From forums, I see that many Adobe users opt for ImgBurn.
- Set the destination (path and filename) for the folder in which the DVD structure will be created.
- At that location it creates a project-named folder and within that the VIDEO_TS folder (but no dummy/empty AUDIO_TS folder).
- I once came across an ancient DVD player that insisted on both AUDIO_TS and VIDEO_TS folder being present and also they had to be named in upper-case, not lower.
- Under [Disk Info] there is a colored bar, representing the disk capacity
- Although the Output is to a folder, the Format is DVD, single-sided, which Encore realizes can hold up to 4.7 GB.
- The [DVD ROM] option allows you to include non-DVD files, e.g. straight computer-playable files e.g. ([.mp4])
- These go to the root of the drive, alongside the VIDEO_TS folder.
- Finally, click the [Build] button.
- On one occasion, it failed at this stage, with a “Encode Failed” or “Transcode Failed” (depending where I looked) error. Solution: Shorten the file name.
- Ok it was long-ish but I didn’t realize Encore would be so intolerant to that. The suggestion of it only struck me later (the appearance of this guess was thanks to years of experience with computing etc.).
- Quality Inspection of the DVD
- I have found Corel WInDVD to show results representative of a standard TV with a DVD Player.
- I have found popular media player such as VLC and Windows Media Player (WMP) to behave differently to this, hence not useful for quality-checking. Problems I found included:
- False Alarm: Playing went straight to the main video, didn’t stop at the Main Menu (as had been intended). However it worked fine on a standard physical DVD player.
- Hidden Problem: In one case I deinterlaced improperly, resulting in “judder” on movements when played on TV (via physical DVD player). However it appeared fine on both VLC and WMP.
- Metadata
- In the case of WMV files, just use Windows Explorer:[aFile >RtClk> Properties > Details] and edit the main items of metadata directly.
- For DVD generated by Adobe Encore, the Disk label (data) is the same as the Project name.
- ImgBurn, a popular alternative to Encore as regards actually burning a disk, provides a way of changing this disk-label.
Posted in Adobe, After Effects, AviSynth, Blu-Ray, Blu-Ray, Boris, Cineform, CUDA, deinterlacing, DVD, DVD, Encore, interlacing, Premiere, Premiere, resizing, Sony Vegas, Uncategorized, VirtualDub, workflow | No Comments »
July 12th, 2013
Foreword
I get the main gist of Adobe’s CS6 Cloud concept, which is not as flexible as the Kindle model, but I am nevertheless slightly “cloudy” or at least hazy over practical details like how to seamlessly transfer from one machine to another, and I have concerns such as what would happen if my main machine became unavailable, for example due to loss or damage/corruption. Or what would happen if I forget to exit or deactivate (whatever) on one machine (e.g. at a work location) then would it still be possible to work on another machine (e.g. at home or remote location)? I am also concerned whether there is any potential for serious hiccups and delays to a project in progress, resulting from any unknown (to me) intricacies of Adobe’s license control system. So I set forth (on the web) to find out:
My Summary:
(The following points are based on my own interpretation of Adobe advice e.g. at http://helpx.adobe.com/x-productkb/policy-pricing/activation-deactivation-products.html.
I take no responsibility for their correctness, especially since I started from a position of such uncertainty. However I hope they are helpful).
- There are two stages:
- Installation:
- Can Install only to a maximum of two machines
- These can be any mixture of Windows and Mac.
- Could install to a third machine only after (deactivating if active and) uninstalling from either of the existing two machines.
- (What an un-cloud-like nuisance, wasting time on this, together with worries over any possible loss of plugins, presets, preferences etc.)
- Activation:
- Activate/Deactivate: Menu:[Help] – in any of the CS6 applications.
- Can Activate only one of these (two) “CS6-carrying” machines at a time.
- Not as flexible as Apple’s FCP7 used to be, where the only condition was essentially that both instances could not be running at the same time.
- Some potential problems, avoidance and solutions:
- Virtual machine: Running CS5 software on a virtual machine can increase the activation count. Solution: Start the software within the virtual machine then Menu:[Help > Deactivate].
- Computer Modification: Changing (e.g. upgrading) a computer’s configuration (e.g. hardware, hard drive, or operating system). Have your serial number handy, and click the [Chat Now] button on the Adobe webpage http://helpx.adobe.com/x-productkb/policy-pricing/activation-deactivation-products.html to talk with a live agent.
- Locate your serial number:
- Go to Adobe.com.
- Click Sign in, in the upper-right corner.
- For Adobe ID, enter your email address. This email address is the address you used originally to create your Adobe ID and download or register your product.
- If you don’t remember your password, click [Trouble signing in?] below the [Sign In] button.
- From the Welcome menu in the upper right, choose [My products and services].
- A list of your registered or downloaded products appears.
- Click the triangle in the left column adjacent to the product name.
- Your serial number appears below the product name.
- Activation Error-Code: If your activation attempt fails with an error code number (for example 93:-12 or 93:-14), look up the code in Activation error codes: http://helpx.adobe.com/x-productkb/policy-pricing/activation-error-codes.html.
- Computer Inaccessible: Can’t access the previous computer on which you installed the software? Click the [Chat Now] button (at http://helpx.adobe.com/x-productkb/policy-pricing/activation-deactivation-products.html) to talk with a live agent. Be sure to have any purchase-related information ready.
- Failed to Deactivate before Unuinstalling: Uninstalled your software without first deactivating it? Reinstall the software (presumably any one application) and then in that application do Menu:[Help > Deactivate].
- Forgot to Exit the application on a works machine? Tough (I guess), or maybe ask really nicely (and hope)? A risky situation to be steered clear of…
Read the rest of this entry »
Posted in activation, Adobe | No Comments »
July 8th, 2013
Posted in AviSynth | No Comments »
July 8th, 2013
Enabling multi-threading in AviSynth is dead-easy!
Steps:
- Get Modified AviSynth MT
- Make a copy of the existing [avisynth.dll] on your system
- Replace the original [avisynth.dll] with the one from “Modified AviSynth MT”
- Use SetMTMode (with appropriate parameters) at the start of your script.
- In the case of my simple scripts, that appears to be sufficient!
Read the rest of this entry »
Posted in AviSynth | No Comments »
July 8th, 2013
Posted in VirtualDub | No Comments »
July 8th, 2013
In yEd, the wonderfully flexible, smart and free diagramming/graphing tool, suppose I want to write some notes/prose or even paste-in some script (dramatic or algorithmic). That can be done as follows:
http://yed.yworks.com/support/qa/38/how-can-i-get-multi-line-labels
- Several options:
- Force a new-line:
- [Control-Enter]
- [Enter]
- when the label is entered in the tabular view of the node’s properties,
- or in the node’s properties dialog (which can be opened by hitting F6 [Mac OS: Command-I])
- HTML Markup
- Automatic text-wrapping:
- Automatic text wrapping for a label is configured using the Cropping label configuration. For a node label, for example, it can be set in the node’s Properties dialog under the [Label] tab:
- Placement: [Internal: Top]
- Size: [Fit Node Width]
- Configuration: [Cropping]
Posted in yEd | No Comments »
July 8th, 2013
Posted in Sapphire | No Comments »
July 8th, 2013
Suppose you have original footage that is different to that of the required product. For example you have progressive footage and require an interlaced product. Or perhaps the given footage is interlaced, but at a different resolution to that product.
While it is naively possible to simply “bung whatever footage one shot into an NLE and render the requried format”, this will not in all cases provide the optimum quality. Obtaining a quality interlaced product from progressive footage (e.g. as-shot or intermediate or an animation) requires some more “beyond the box” thinking and processes.
The following article extract (link and bullet-points) explains how to go from Progressive to Interlaced using a video-processing application such as After Effects.
- The first stage is to derive double-rate progressive footage from the original, specifically via motion-compensated/estimated /optical-flow tools/techniques as opposed to simple frame-blending (which would give rise to unwanted motion-blur artefacts). This can be achieved via various applications (e.g. as listed in the article). For such processes, I have traditionally used AviSynth (e.g. QTGMC & MVTools, which I covered at http://blog.davidesp.com/archives/502), but I look forward to evaluating other applications in this regard.
- For footage that is already interlaced but which is at a different resolution to the required product, I typically use AviSynth’s TDeint plugin, which use motion/optical methods via which one can derive complete progressive frames corresponding to each field of the given footage. Then these frames can be resized to the required product resolution, prior to the second stage.
- The second stage is to derive from this (double-rate progressive footage) the required interlaced footage, by extracting each required field (upper and lower alternating) from each frame in turn. For this, I have traditionally used Sony Vegas, which does this well. The article claims After Effects does it well, and better than (the erstwhile) Final Cut Pro, but no mention is made of Adobe Premiere (though it may well perform this task well). Naturally, AviSynth could also be used for this, either by extending its script or as a separate script.
- I queried whether Premiere could do it, on Adobe Premiere forum: http://forums.adobe.com/thread/1250083.
- One reply said <<Premiere is pretty smart about such matters. You should have no issues.>>
- Note that it can be useful to preserve a double-rate intermediate file for other purposes (e.g. downscaling of HD to SD or maybe in future, double-the-current-normal-rate will become the new normal).
Steps:
- http://library.creativecow.net/articles/solorio_marco/interlacing_progressive_footage.php
- Interlacing Progressive Footage
- {The following is slightly re-worded/paraphrased from the original}
- Frame-Doubling:
- The first step is to double up the literal frame count, resulting in one of the following:
- Double the duration.
- Double the frame-rate.
- In order to do this properly, the new frames need to be interpolated by means of a vector-based pixel warping or morphing algorithm.
- This can be accomplished by a variety of different applications, including:
- Motion 3 (by use of the Optical Flow feature)
- After Effects (by use of Layer > Frame Blending > Pixel Motion)
- Shake
- Twixtor plugin (which can be used in Final Cut Pro, After Effects and several other host applications)
- Boris FX
- You do NOT want to frame-blend this step.
- The best way to tell if this step is working correctly is to look at the new frames that have been created. If they have an overlapping ghost look to them, then it’s frame-blending, which you do not want. If the new frames literally look like new frames with no ghosting or overlapping, then you’re on the right track.
- Interlacing:
- This can be done in After Effects, Final Cut Pro and pretty much any other video application
- After Effects renders out a cleaner interlace (actually, a perfect interlace) than does Final Cut Pro
- In Adobe After Effects:
- Setup:
- Select the rendered clip in the Project window and right-click it and select Interpret Footage > Main.
- Suppose the original clip was “30p”, i.e. 29.97 fps, then the rendered clip will be “60p” i.e. 59.94 fps.
- In the Frame Rate section, conform the frame-rate to the correct value, namely 59.94 fps, or “60p”.
- Create a new Comp of “60i”
- Place the 60p clip in that Comp’s timeline
- (Even though your timeline is only 29.97 FPS and you can’t see the extra frames when scrubbing frame by frame, don’t fear; when you render the final clip, it will use the extra frames in the 60p clip to create the new fields.)
- Render:
- Render this by Menu:Composition > Make Movie].
- This should open up the [Render Queue] window with a new comp in the queue. You’ll need to change the Render Settings either by selecting a pulldown option next to it or by clicking the name next to the pulldown option.
- Ensure you render this clip with [Field Rendering] turned on. You’ll need to select either Upper Field First (UFF) or Lower Field First (LFF), depending on your editing hardware and format of choice.
Posted in interlacing, Twixtor, Uncategorized | No Comments »
July 8th, 2013
Be not afraid to use VirtualDub to save AviSynth script results to a file, provided VirtualDub is in its [Fast Recompress] mode.
I had read that for the benefit of its image-altering filters, VirtualDub operates in RGB color-space, as opposed to YUV color-space, a lightly-compressed alternative that can represent a subset of RGB-space, and is typically used for video storage and transmission. Given this, when running VirtualDub to take the output of one file, pass it through some “Filters” (effects) and generate another, the implicit color-space transformations would be YUV->RGB->YUV, thereby losing some quality (e.g. quantization banding on smooth gradients such as skies).
In contrast, AviSynth generally maintains YUV-space, unless your script tells it otherwise. It’s designed so that opening an [.avs] script is broadly equivalent to opening a file.
This initially caused me concern at the thought of using VirtualDub to “run” (open and stream) an AviSynth script file (or rather, AViSynth’s result from that script) and save to a result file (as an [.avi] file). Was there a way of avoiding the intermediate RGB color-space? The answer is YES.
When VirtualDub is in its [Fast Recompress] mode, it gains not only “Fast” speed but also avoids quality-loss by maintaining the YUV color-space of the AviSynth video-stream..
Posted in AviSynth, VirtualDub, YUV | No Comments »
July 8th, 2013
I knew basically what these were about:
- Max bid depth to make use of all the information in a more-than-8-bit video file, such as a 10-bit recording.
- Max render quality to employ higher-quality but slower scaling algorithms – only relevant when scaling of course.
However, there are options to set them in the Sequence and also in the Render. Like others, I wanted to know firmly (not just by guesswork) how/when to use these.
The answers appear to be:
- Their values in the Sequence settings only affect the preview, not the render.
- Their values in the Render dialog override their values in the Sequence.
Hence:
- In the Sequence, one would tend to leave them disabled, other than temporarily for quality check or comparison.
- In Render dialog, one might tend to have them initially disabled, for render-speed, then enable them later on for final quality-check and production.
Read the rest of this entry »
Posted in 10-bit depth, Adobe, Premiere | No Comments »
July 8th, 2013
Rewrapping means taking the encoded contents out of one container file-type and putting it in another, with no decode/re-encode happening. For example, given a [.mov] file, one might rewrap it to a [.avi] file. These file-types are each merely containers, designed to contain various encode formats (e.g. DV, Lagarith, Cineform, DivX) without having to “understand” them.
Rewrapping may for example be required for some Windows-based applications, that either don’t handle [.mov], either at all or (as I have encountered) not fully. Similarly, some applications (Windows or Mac based) will only work (or work properly) with [.mov] files. For instance I have found the Windows variant of Boris RED (versions 4 and 5) to work properly with HD 50 fps progressive only via [.mov] container, as reported at http://forums.creativecow.net/thread/15/859544 while someone else has found Avid Media Composer 5 to prefer [.mov], reported at http://community.avid.com/forums/p/84923/487414.aspx.
One tool for doing this: HDLink, a utility bundled with the Windows version of Go-Pro-Cineform “visually lossless” wavelet-based codec (that I have used for a number of years). HDLink can convert Cineform files from [.mov] to [.avi] and vice-versa. Incidentally, for the Mac version of Cineform, there is a broadly equivalent utility called ReMaster, but that can only convert in one direction, from [.avi] to [.mov].
To re-wrap:
- (Just now, I merely did [Convert] tab, select file and [Start], ans all worked fine, but maybe full work instruction should be as follows?)
- Use HDLink’s [Convert] tab.
- Select/Ensure the required destination file-type:
- Click [Prefs] button (at bottom of dialog)
- In [Prefs], ensure [Destination File Format for … Conversion] is set as you require.
- And (I guess?) enable [Force re-wrap CF MOV->AVI], to ensure it doesn’t sneakily do a transcode?
- Select the Input file and go.
- The rewrapped version will appear in the same folder.
The process is of course much faster than transcoding, involving simple computation, hence the overall speed will tend to be limited by the storage (e.g. hard disk and/or its transfer bus, especially if it’s a slow old thing like USB2) rather than the CPU (which may consequently show an extremely low % usage).
Read the rest of this entry »
Posted in AVI, Cineform, QuickTime, rewrapping | No Comments »
July 1st, 2013
HD2SD is an HD to SD convertor implemented by Dan Isaac as an AviSynth”package” (my term, for the plugin of that name and its dependent bits).
Its development was apparently prompted by the relatively poor scaling performances of NLEs at that time (e.g. Adobe CS4). Some claim that it is still superior, even to Adobe CS6’s latest CUDA-based scaling algorithms, though those run a close second. In my own experience to date, of converting a 1440×1080 HDV footage to 720×576 PAL-SD-Wide equivalent, the results were poorer than SOny Vegas 10’s “Best” (Bicubic) scaling algorithm. Regardless, there is always the possibility of error in such experiments, and in any case, its “place in history” and potential for use in future remain.
Links:
- Introduction
- Download
- Tutorial – including how to install the various bits and options for multithreading
Posted in Uncategorized | No Comments »
July 1st, 2013
The story so far:
- I have a resurfaced (old) project shot in HDV 1440×1080 i50, Video Levels 16-255.
- This has been edited in Sony Vegas 10, as a project consistent with the footage (hence HDV), but with Audio 44kHz (due to predominantly CD music background), and with levels over full-range 0-255.
- My first attempt involved (from Vegas 10) rendering down to SD, encoded in GoPro-Cineform. This I imported to Adobe Encore and generated a DVD which looked acceptable.
- In retrospect, I discovered that I had enabled Vegas’s renderer’s “Stretch Video / Don’t Letterbox” option. Ideally I’d have wanted it to be cropped (top and bottom) to fill. I am less familiar than I would like with Vegas-10’s nuances in this respect..
- Subsequently I experimented with the AviSynth’s-HD2SD approach, which prior to Adobe CS5 was claimed by others to give superior results to scaling within Premiere etc. However:
- It has since been observed by some that Adobe CS6’s new CUDA-based scaling algorithms are almost as good.
- In my own experiments with using HD2SD on my current (old) project’s HDV-to-SD requirement, I found HD2SD’s results inferior to (e.g. more blurred than) Sony Vegas’s “Best” (Bicubic) scaling processes, which I believe/assume to happen equivalently both in-project and on-render.
Links:
Posted in Uncategorized | No Comments »
July 1st, 2013
Frame image Scaling in Adobe CS6
- I think I read on various webpages that downscaling and encoding within Encore should be avoided.
- http://forums.adobe.com/message/4018118
- CS6 CUDA-Based Scaling is Sophisticated/High-Quality:
- Adobe Media Player in CS6 has sophisticated CUDA-based scaling algorithms that go beyond its non-CUDA-based ones.
- They are so good that they are said to be broadly equivalent to AviSynth-HD2SD
- But the CUDA-based algorithms only come into play when AME is encoding direct from a Premiere project (regardless of whether that project is open).
- They do not happen when encoding either a plain media (e.g. video) file or an After Effects (AE) Composition (Comp).
- HD to SD Conversion:
- HD frame (hence sensor and screen) aspect (ratio) is squarer than PAL-SD-Wide.
- Hence to avoid distortion, one can either:
- Crop the HD top and bottom (the most pragmatic solution, but then bear in mind effects on “Safe” regions)
- “Pillarbox” the HD within the SD frame, i.e. pad the HD image’s left and right margins, typically with black.
Posted in Adobe, Blu-Ray, CUDA, DVD, Encore, resizing | No Comments »
June 21st, 2013
Suppose one has a short HD video,and wishes to burn it to disk for playing (at full resolution) on an HD television via a Blu-Ray player. How vital is it to burn it onto an actual Blu-Ray disk? Would it suffice instead to burn the Blu-Ray format (folder structure etc.) to a standard DVD?
I suspected that (latter suggestion) might work, but needed confirmation. I found it by accident, at the following.
The YouTube tutorial video “Adobe Encore Essentials 14. Tips and Tricks”, at http://www.youtube.com/watch?v=gVqvsgbxn2E , explains that this is indeed possible, but that when using Adobe Encore (at least), a work-around is necessary:
- First export in Blu-Ray format to a local folder, then use a third-party DVD burner such as ImgBurn (that I already have) to burn this to a standard DVD.
I will try that! The proof will be when it has been demonstrated to play ok on a typical Blu-Ray player and HD TV. Though of course that would only constitute proof for that particular viewing system…
Posted in Adobe, Blu-Ray, CD, DVD, Encore, Optical Disk | No Comments »
April 5th, 2013
It can be very annoying when I type say Gimp into Spotlight and it defaults to the Windows version. That causes Parallels to launch, then Windows within that then Windows-Gimp…when all I really wanted was Mac-Gimp. So easy to type without looking!
The solution, from the following weblink, is to open up Mac’s [SystemPreferences > Personal > Spotlight > Privacy] then drag the VM folders there (I assume this simply creates references to those folders). The VM folders are to be found, from your root directory, [Applications > Windows 7 Applications] (say).
http://reviews.cnet.com/8301-13727_7-20067723-263.html
Posted in Mac, Parallels, Uncategorized | No Comments »
March 15th, 2013
Posted in Wordpress | No Comments »
March 15th, 2013
Recently, my Hosting account received an upgrade on WordPress to version 3.5.2. Some immediate issues:
- Sudden increase in Spam user-comments
- Possibly coincidental, but can’t help wondering whether its associated with the upgrade, like maybe it caused blog pages to be more spam-machine-compatible? Just a gut-feeling, no knowledge or evidence.
- The volume was not impossible to handle manually, just irritating.
- I chose to enable a shielding-service. It seems to be working so far, blocking Spam but of course at the cost of discouraging user-comments, as well as some other things…
- Toolbar did not have the Indent button. In fact only the first half of that toolbar was present, buttons like Bold and Indent buttons are normally to be found in the second row of that toolbar, which was not present.
- Fix: Click the right-most button, whose ToolTip says, unhelpfully, “wordpress.wp_adv_desc” (sounds to me like some unfinished programming…). It enables the second row of the toolbar.
Read the rest of this entry »
Posted in Wordpress | No Comments »
March 15th, 2013
On my Windows 7 machine, while copying files (manually backing-up) from an internal drive to an external USB drive that was formatted by someone else, the following warning message appeared:
- “Are you sure you want to copy this file without its properties”
This turned out to be due to the external disk having been formatted as FAT32 instead of NTFS as per my internal drive.
Read the rest of this entry »
Tags: NTFS
Posted in backup, file mgt | No Comments »
March 10th, 2013
My current project, a live rock performance (at an offshore radio party on a ship) involved significant quantities of handheld footage. I’m editing this one in Adobe Premiere, A lot of the handheld footage benefited from stabilization. The easiest stabilization to hand is the Warp Stabilizer effect within Premiere.
It is really handy, and worked for me maybe 75% of the time, other situations gave unrealistic or unusable results. So there is still a role for keeping back-up options such as Gunnar Thalin’s excellent Deshaker (and rendering to intermediates e.g. in GoPro-Cineform).
It is SLOW, a real time-loser, the main delay being its Motion Analysis stage.
- This stage is computationally intensive in principle, a fundamental issue for any such device.
- Some systems employ parallel execution here, to good effect: vastly reduced analysis (waiting) time.
- However it seems that Premiere CS6 does not employ GPU here, and from Windows’ Task Manager, I infer that it is not even using multithreading (though I don’t know that for a fact).
Other than that, it does apparently use GPU/CUDA for its subsequent stabilize/deshake stage, and indeed that stage is very quick indeed, facilitating experimentation with settings (e.g. Subspace Warp or Position mode) to obtain the desired effect.
Incidentally, I found the default Subspace Warp mode to be “fragile”, so I use Position instead:
- It often makes things in the background flap or wobble in unrealistic manner.
- I therefore use Position mode, the simplest mode, as my default, then only advance to “Rotation” (etc.) if there is camera rotation.
- It didn’t work well with very noisy footage, e.g. Sony Z1 in Hyper-Gain mode, even if when denoising was applied earlier in the effects-chain.
Lastly, it’s a shame there’s no way/settings for:
- Defining a mask, rectangular or otherwise, for region(s) to focus on or to avoid. For example to prevent it locking onto a singer’s head instead of the stage.
- Telling it to definitely not try to compensate for rolling-shutter. When I know the camera is CCD, I ought to be able to tell the software not to consider rolling-shutter. I never fully trust “Auto”, not in any application or context…
Read the rest of this entry »
Posted in Adobe, Cineform, Deshaker, Premiere, stabilizer | No Comments »
March 8th, 2013
Before VFX: Blockbuster movies without visual effects. The site at the following link has a collection of of behind-the-scenes photos prior to visual effects, hence revealing green screen etc. shots, actors festooned with CGI motion-tracking rigs etc.
Discovered via NoFilmSchool, which I subscribe to and heartily recommend for makers and enthusiasts of movies and videos etc.
It even has some shots from John Carter, in which I was a film Extra, though sadly none of “my” scenes. I wish I could re-cut it, not only for my bits 🙂 but also to allow its climate catastrophe message to be more dramatically expressed, some of the “cutting-floor” scenes were truly emotional. Regardless, “all the world’s a stage” 🙁
Posted in cgi, chromakey, film, moviemaking, Uncategorized | No Comments »
February 28th, 2013
XDCAM-EX Metadata in Adobe (Premiere etc.): it works a bit but in my experience I can’t say it’s easy all the way, and it seems that, in the past (2009-2011) at least, others were also finding issues. For example it doesn’t (as far as I can tell) display the camera settings data such as exposure.
What’s the matter with metadata? Avid seem to have made a better go at joining it up, and I wonder if this has any connection with their policy of leaving it to the camera manufacturers to produce corresponding media-reading (“AMA”) plugins.
Read the rest of this entry »
Posted in Adobe, After Effects, metadata, Prelude, Premiere, XDCAM EX | No Comments »
February 28th, 2013
As remarked in an earlier blog entry, I was concerned about how best to import/use XDCAM-EX footage in an After Effects CS, especially when that footage could be spanned across more than one [.mp4] file, especially given that their contents can overlap. In Premiere this is not an issue, because its (new) Media Browser feature provides instead a higher-level view, of clips rather than lower-level [.mp4] essence-files.
Sadly, as yet, AE CS6 has no equivalent of the Media Browser.
Best workaround:
- In Premiere, use Media Browser to import an XDCAM-EX clip, then copy it and paste that “virtual” clip into AE.
Workflows involving Adobe Prelude:
- The web-search record (below) not only provides the foundation for the above statements, it also contains an explanation of the different workflows (e.g. whether or not to sort/trim/rename clips in Prelude). Some workflows are best for short-form (typically involving tens of footage-clips) while other workflows may be more appropriate for long-form (hundreds or thousands of clips).
Read the rest of this entry »
Posted in Adobe, After Effects, Prelude, Premiere, Uncategorized, workflow, XDCAM EX | No Comments »
February 28th, 2013
While editing an Adobe Premiere CS6 project based on XDCAM-EX footage (from an EX3), I thought I’d enhance the footage in After Effects (where more sophisticated enhancement effects than in Premiere are available). Should be easy I thought, taking advantage of the CS6 suite’s Dynamic Link feature.
In Premiere, I selected the relevant clip and did [RightClick > Replace With After Effects Composition]. As expected, this opened After Effects, with the appropriate dynamic link to Premiere…
…BUT…
All I got on the Preview in After Effects, and indeed back in Premiere, was Color Bars. I assumed this indicated some kind of failure in After Effects.
Naively, I concluded that, on my system at least, After Effects CS6 could not read XDCAM-EX. A brief web-search (further below) revealed user experiences and video convertor article-adverts implying that I was not alone with this problem. But an Adobe blog entry suggested that no such problem existed in AE CS6 and some and Adobe documentation (pdf) said so explicitly. For the moment then, I was confused…
Then I rebooted and tried again. This time it worked. I succeeded in making AE projects both by directly importing the footage (as mp4 files) in AE and via Dynamic Link from Premier.
The direct import dialog was slightly weird though: it claimed it was listing “All Acceptable Files” but these included not only [.mp4] files but also e.g. [.smi] files, which, when I selected one of these it complained: “…unsupported filetype or extension”. Incidentally, the reason I tried it at all was that XDCAM-EX is a spanned format, where a single recording can be spanned/split/spread over multiple [.mp4] files. Furthermore, there can be an overlap of content from one [.mp4] to the next (in a span), so in principle (I haven’t tried it), simply placing one [.mp4] after another on the timeline would give rise to a (short) repetition at each transition (from one [.mp4] to the next).
But this is already over-long for a single blog-post, so I’ll deal with that issue in a separate post.
Read the rest of this entry »
Posted in Adobe, After Effects, transcode, workflow, XDCAM EX | No Comments »
February 28th, 2013
Following-up from my previous look at magnetometers http://blog.davidesp.com/archives/646.
I have an iPhone 4 (ordinaire) running iOS 4. Apparently it has a magnetometer, and a number of Apps to alarm, display and log data from it are available. Hey, it’s getting towards being a “Tricorder” (of Star Trek fame)…
The ones I have tried are:
- MAD – Magnetic Anomaly Detector
- When I run it, I tend to click (enable) all three buttons (they each display their current mode, not switch effect).
- If I’m simply in a room, I tend to drop the threshold (slider) to half or a quarter. Otherwise if driving I leave it Full.
- The Log is simply a text-pane, one can Select/Copy etc; unfortunately the log gets cleared when you exit the app.
- EMF Detector
- Has an “analog meter” style of display and audio tone (optional, volume-controllable).
- Maybe useful for tracing wires etc.? But how reliable? In my house it ignored a light-switch and around it but “got excited” over certain parts of window frames and metal radiators (certain corners only) for reasons I don’t understand.
- XSensor
- Displays and optionally logs/emails data from several of the sensors on iPhone: Magnetics, Accelerations, GPS, Gyros.
- Fun for finding out about the sensors, their capabilities, their noise-issues etc.
- Accelerometer Data (“ordinaire” or Pro)
- Data can be raw or Low-Pass filtered (for absolute gravity and orientation) or High-Pass (monitoring for their changes).
- Accelerometer data can be streamed (via UDP) to computer or logged to CSV file.
- The Pro version saves to Flash, instead of just RAM, hence greater logging capacity.
- Sensor Kinetics
- Plain sensors: Accelerometer, Gyroscope, Magnetometer
- Derived sensors: Linear Acceleration, Gravity, Attitude.
- Nice graphics (clarity as well as entertainment value)
- ?
Posted in iPhone, magnetism | No Comments »
February 22nd, 2013
- http://en.wikipedia.org/wiki/Magnetic_anomaly_detector
- Magnetic anomaly detector
- http://www.geo.ucalgary.ca/~wu/Goph547/CSM_MagNotes.pdf
- Geophysical Surveying Using Magnetics Methods
- Magnetometer Sites:
- http://spears.lancs.ac.uk/samnet/
- BOR: Borok, CIS
- CRK: Crooktree, UK
- ESK: Eskdalemuir, UK. BGS station, but archived at 1s resolution by SAMNET
- FAR: Faroes
- HAN: Hankasalmi, Finland. IMAGE station, but archived at 1s resolution by SAMNET
- HAD: Hartland, UK. BGS station, but archived at 1s resolution by SAMNET
- HLL: Hella, Iceland.
- KIL: Kilpisjärvi, Finland. IMAGE station, but archived at 1s resolution by SAMNET
- LAN: Lancaster, UK.
- LER: Lerwick, UK. BGS station, but archived at 1s resolution by SAMNET
- NUR: Nurmijärvi, Finland. IMAGE station, but archived at 1s resolution by SAMNET
- OUJ: Oulujärvi, Finland. IMAGE station, but archived at 1s resolution by SAMNET
- UPS: Uppsala, Sweden. Geological Survey of Sweden station
- http://blog.stevemarple.co.uk/
- A hi-tech, relatively low-cost (?) garden magnetometer. Under development.
- “a simple, low-cost, battery-powered magnetometer for auroral alerts and citizen science”
Posted in Uncategorized | No Comments »
February 22nd, 2013
A brief search, starting with Amazon, revealed these:
- Beautiful Magnets
- Strong (Neodymium) Magnets
- Cylindrical
- Longitudinal N-S orientation
- Diametric N-S Polarisation
Posted in magnetism | No Comments »
February 21st, 2013
Context:
- I had a Sequence containing two video tracks, each having a pair of (associated) audio tracks.
- Sequence Properties: 1080p, square pixels, 25 fps.
- One track contained a single continuous clip of duration just over one hour[01:02:46:10].
- Properties: 1080p, square pixels, 25 fps.
- Format: Sony XDCAM-EX: MPEG2 @ 35 Mbps VBR: MPEG2HD35_1920_1080_MP@HL
- The other track contained a number of discrete clips, intermittently spaced over that time.
- Properties: 1080i, fat pixels (PAR=4/3), 25 fps (50 fields/sec), UFF.
- Format: Sony Z1 HDV: MPEG2 @ 25Mbps CBR
- This sequence, as it stood, played fine.
- Then I nested that sequence (seqA) inside another sequence (seqB).
Problem:
- Then I did some multicam “music video” edits, mostly near the end of the sequence
- Now, when I hit the spacebar to play seqB, there is a delay of several seconds before playing actually begins.
- If I try re-creating from scratch, by nesting seqA inside new seqC then seqC plays fine.
- If I try copying the multicam-edited elements of seqB (the multicam edit-sequence) into new seqD (a new multicam edit-sequence) then the sluggish response to [Play] still occurs.
- Doh! I had hoped that would be a simple workaround..
Partial Workaround:
- Following web-advice regarding a broadly-similar issue with multicamera sequences comprising spanned clips (e.g. AVCHD or Canon’s H264) , I tried transcoding the footage to GoPro-Cineform
- Based on Adobe’s workaround-advice regarding broadly similar problems with long hence spanned AVCHD footage. My footage is not AVCHD, but the main clip is Sony XDCAM-EX, which has some features (like spanning) in common with AVCHD. Worth a shot!
- On a 4-Core i7 PC with GPU, it encoded at about real-time, which in my case was about an hour. CPU was only 25% i.e. equivalent to a single core
- Replaced the relevant clip in seqA.
- To my delight, the clip-markers (in that clip in seqA) were retained/applied in that replacement footage.
- However, the sluggish [Play]-start remained, though possibly shortened, from about 6 seconds to 4 seconds.
Further Workaround:
- Duplicate seqA
- Nest it in a separate multicam sequence (seqE)
- Do multicam edits on further segments of the event in that (seqE)
- Intend later to nest/sequence usable bits of each multicam edit-sequence in a Master sequence.
- Where there’s a will, there’s a workaround…
- Still, I expect better of Adobe…
- I lost about 3 hours to this (including web-searching, waiting transcoding and general experimentation).
Further gripes:
- God it’s clunky!
- Every time I stop multicam-preview to tweak the multicam cut timings, then return to multicam editing, I have to remember to activate the multicam monitor, not the timeline (where the tweaks are done). Unfortunately my reflex is simply to hit the spacebar. It is a nuisance to have to fight that reflex…
- Every time I stop multicam-preview, it leaves a cut at the final position of the playhead. Not useful and simply clutters the timeline, distracting from real cuts.
- Zoom [+] only affects the Timeline, not the multicam monitor. As a result, I tend to set the playhead position using the timeline. Doh! must remember to click (activate) back to the multicam monitor once more…
- Ranged (duration not zero) markers are great but adjusting their right-hand end can be tricky, since this can change the playhead and/or timeline-display. Things snatch and interact that shouldn’t (I feel).
- Sony Vegas is far better in these respects, though not in some others, so I’m sticking with Adobe…
- Unexpected Preview-Rendering is happening…!? How come?
- In principle, that shouldn’t be happening? I have a state-of -the-art (4-core i7 & GPU) laptop specifically for CS6, no effects applied, just cutting between two cameras, some plain dissolves (between segments of the multicam sequence) – but surely the Mercury Engine should take them in its stride? (or can’t it cope yet with multicam?).
Read the rest of this entry »
Posted in Adobe, AVCHD, multicam, Prelude, Premiere, Sony EX XDCAM, transcode, workflow, XDCAM EX | No Comments »
February 16th, 2013
I use the free ImgBurn application (treading carefully through the minefield of include-ware). On a laptop, prior to verification of a burn, it ejects the DVD but cannot reload it as the laptop doesn’t offer that capability. There is an Option setting to prevent the ejection, but that results in a less comprehensive verification as the disk initialise step (implicit in reload) is then side-stepped.
Posted in DVD | No Comments »
February 16th, 2013
Just now I opened SonicFire Pro on and a popup appeared with the following announcement:
This version of SonicFire Pro can interact with the following applications:
- Adobe Premiere CS5 and up
- Adobe After Effects CS5 and up
- Avid Pinnacle 15 / Studio and up
If you use any of the programs listed above, you can access an advanced set of features that make it even easier to add customized SmartSound music to your productions.
Something to maybe look into, when I get time. But right now I’m focusing on burning some DVDs. So I click the [Later…] button.
Posted in Adobe, After Effects, DVD, Premiere, Sonicfire | No Comments »
February 12th, 2013
A Sequence played with good audio, but when I nested it (inside another sequence), all went silent. This turned out to be the latest incarnation of a crazy historical feature of Adobe Premiere. It wasted a good part of an hour of my time experimenting and finally Googling to find the (simple, once you know) way out.
The problem:
- A simple straightforward sequence consisting of video recordings from two cameras, each arranged in their own tracks, some audio tracks enabled, others disabled.
- Embed (nest) that sequence in another sequence
- No audio visible or heard.
Workaround:
- Ensure all audio tracks are enabled in the nested sequence.
- Don’t disable tracks, disable(audio elements of) clips.
- Use Alt-Click to select just the required audio element(s).
Read the rest of this entry »
Posted in Adobe, audio, oddness, Premiere | No Comments »
