Archive for the ‘Uncategorized’ Category
Friday, May 29th, 2015
This post (the first I have made for a long time, due to using Evernote instead) is about “A Lens-Changing Protocol for DP & AC”, where, in the Film Industry, DP = “Director of Photography” and AC = “Assistant Camera” (Camera Assistant). The word “protocol” refers to the fact that they have to interact, following an established etiquette … or protocol…
WolfCrow‘s regular email-newsletter drew my attention to a presentation by the legendary Freddie Wong: RocketJump: How to Be a Success on YouTube & Beyond. In that presentation, he mentioned a free online “Film School”. So I went to his RocketJump website and found my way to the school’s main Youtube page to the specific YT page for a course: Pro Tip: How to (Properly) Change a Lens, which also has its own follow-up forum thread with good points, in particular those by “KahlevN”.
Having absorbed all I could from all those sources, I evolved a “Business Process” workflow diagram via the yEd app, using its BPMN graphical convention. I had never even seen that before, let alone used it, but proceeded regardless (with my best guesswork) to produce the following, based solely on the aforementioned course and comments:
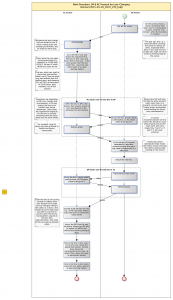
Is it helpful? Could a schematic like this benefit the design, analysis or explanation of such a practical workflow? I can imagine something like it being used for training/reminding and for demonstrating to independent assessors that a company has a “quality process” is in existence, defined in a formal-looking manner (you could call that “Theatre of Quality”).
Or is there a BPMN expert out there who’s sensibilities are offended by any incorrectness in my use of precisely defined graphical syntax or semantics? Or is there a better or more appropriate notation for diagramming workflows like this?
Any helpful comments gratefully received…
Posted in Uncategorized | No Comments »
Saturday, March 22nd, 2014
Suppose you have some RAW footage, in CinemaDNG format (a number-sequenced set of [.dng] files), for example shot on a Blackmagic Cinema Camera (BMCC). Compared to “visually lossless” say ProRes or DNxHD (let alone H264 etc.), CinemaDNG occupies an awful lot of disk space, primarily because it is mathematically lossless. The GoPro-CineformRAW encoding format offers significant reductions in file size (and hence data rate) at the cost of a practically negligible loss of visual information (and a purchase price). This codec can be purchased as part of the GoPro Studio Premium product. A comparison-grid of the various GoPro Studio products is here.
CineformRAW is an attractive compression-format, but unless care is applied to some very technical-level encoding options/settings, compatibility problems can arise when importing to DaVinci Resolve. The latter is in widespread use but is especially relevant to BMCC owners because it is supplied as free software with that camera. I experienced such problems myself: one version of Resolve (v.10.0) interpreted CineformRAW clips as green-tinted, while another (v.10.1) just gave black frames.
Happily, a simple solution existed: RAW4Pro, which is essentially a front-end to CineformRAW (and also to DNxHD, useful e.g. if you want HD proxies).
Summary:
- Install
- A product incorporating the GoPro-Cineform RAW codec.
- The RAW4Pro utility
- Essentially a front-end to generate CineformRAW and also to generate HD (e.g. as proxies) as DNxHD, in each case in either MOV or AVI container-formats.
- Run RAW4Pro
- Select (Browse-to) input-folder, output folder.
- Select:
- Sound: Audio-Merge
- Initially, extract audio from source file to a WAV file, then merge this audio in with the generated file. The WAV file remains, regardless.
- The alternative (if not enabled) is no audio in the generated file (and no WAV file).
- Processing: Convert-Only
- Quality: Fine
- Clicking the [?] button reveals that this creates 10-bit Log (colour-channel resolution).
- Video Format:
- Cineform RAW (encoding format)
- MOV (container format)
- LUT: NoneClick the [Process Clip] button.
- Result:
- A movie file with name prefixed by :R4P_” and suffixed by “_sound”, incorporating both video (10-bit Log) and audio tracks.
- An audio WAV file, similarly prefixed, generated as a “side effect”, may or may not be useful to you, can be deleted.
(more…)
Posted in Blackmagic, camera, Cineform, codec, Compressor, DaVinci Resolve, DNxHD, Encoding, Formats, GoPro, RAW, Uncategorized | No Comments »
Tuesday, February 18th, 2014
I took an Avid Media Composer (7.0.2) Sequence built from AMA-linked XDCAM-EX footage and transferred that Sequence via AAF to Adobe Premiere (CC 7.2.1)
It worked, even for my AMA-linked footage (Sony XDCAM EX / BPAV) – though it wasn’t as straightforward as I expected – due to “a known issue with AAF in Premiere Pro CC (7.2.1)”. It did succeed with Premiere CS6 (6.0.5), though even then some clunky wrangling was found necessary. Thereafter I opened an existing Premiere CC project and Imported the CS6 sequence successfully. Again I had to double-check the Sequence (this time in Premiere) matched the footage (clips).
(more…)
Posted in Avid, Premiere, Uncategorized | No Comments »
Sunday, February 9th, 2014
Background
Adobe Premiere has a speech-to-text translator, as part of its content-analysis capability. At best it is 80% or so correct in its interpretations, though in my experience only 20-30% reliable. But to optimize its chances, one must select the (spoken) language appropriate to the media (content) being analyzed. But by default, only one language, US-English is available. So how do you get further options?
Summary:
- By default, the only language model (sic) installed is that for US-English.
- Optionally, one can download (free) Installers for other language modules.
- One can download the installer for International English language models (sic), from http://www.adobe.com/uk/products/premiere/extend.displayTab3.html
- These English-language models include: Australian, British, Canadian.
- Run the Installer
- Although intended for both CCand CS6, it only installs to [C:\Program Files (x86)\Common Files\Adobe\SpeechAnalysisModels\CS6]
- Manually copy content from [C:\Program Files (x86)\Common Files\Adobe\SpeechAnalysisModels\CS6]
to [C:\Program Files (x86)\Common Files\Adobe\SpeechAnalysisModels\4.0]
- Likewise, for Mac OS:
- Copy all content of [/Library/Application Support/Adobe/SpeechAnalysisModels/CS6
- to [/Library/Application Support/Adobe/SpeechAnalysisModels/4.0]
- Incidentally, it is possible to inject (eg via C++ code) a text script directly into XMP metadata
- See Details for a link and example code.
(more…)
Posted in Adobe, Adobe Media Encoder, Premiere, Premiere, Uncategorized | No Comments »
Saturday, July 20th, 2013
Can use Mocha either stand-alone and export result as an image-sequence, or in combination with AE in order to export as a movie-file.
Some points:
- Go to Track tab
- Put In/Out points over the useful bits (e.g. not overexposed bits).
- Put playhead in middle of duration, note Frame-Number, then track both forwards and backwards from this point.
- Go to Stabilize tab.
- There is a Stabilize button to preview what it will look like.
- Must select a Layer (tracked-region) first
- (in principle, could have more than one tracked region).
- Remember to disable this button before attempting to track again.
If exporting for Registax, then it is sensible to use TIFF format, but it must be with no alpha (otherwise Registax 5 gets its colors weird).
If using Registax (5) then:
- Align=None
- Drizzle=25%
- Limit
- (just in order to get to the next stage0
- Stack
- Wavelet
- Default (not Gaussian), Linear (not Dyadic), most sliders near full.
- Do All
- Save Image
- Save as a TIFF, so can manipulate levels in Gimp etc)
(more…)
Posted in After Effects, Mocha, stacking, Uncategorized | No Comments »
Tuesday, July 16th, 2013
Some BBC documents I came across:
- http://www.bbc.co.uk/guidelines/dq/contents/television.shtml
- ID
- DQ – Defining Quality
- This section brings together all policies and standards that apply to the delivery of television programmes.
- For other information, please see the TV Commissioning Site: http://www.bbc.co.uk/commissioning/.
- Signal Levels
- In a picture signal, each component is allowed to range between 0 and 100% (or 0mV and 700mV). This equates to digital sample levels 16 and 235 (8-bit systems) or 64 and 940 (10 bit systems).
- Blanking
- Digitally delivered pictures are considered to have a nominal active width of 702 pixels (52us) starting on the 10th pixel and ending on the 711th pixel in a standard REC 601 (720 sample) width.
- A minimum width of 699 pixels (51.75us) within these limits must be achieved.
- Additional active pixels outside the above limits must be an extension of the main picture.
- Vertical Blanking must not exceed 26 lines per field.
- Line 23 may contain a whole line of picture, be totally blank ed, or the last half may contain picture relevant to programme. Line 23 must not contain any form of signalling as it is likely to appear in picture during letterbox style presentation.
- Likewise picture content in line 623 is also optional, but if present it must be related to the programme
- Aspect Ratio
- Active Picture Width
- Active picture width is 52us / 702 pixels. All aspect ratio calculations are based on this. Any processes based on 720 pixel width may introduce unwanted geometry or safe area error.
- Use of HD Material (for SD programmes)
- Some standard definition programmes will contain material from high definition sources.
- Particular care must be taken to deliver the best possible quality of down-converted material.
- It is acceptable to use a broadcast VTR’s “on board” down converter to produce standard definition copies of high definition programmes.
- Most non linear editing packages do not produce acceptable down conversion and should not be used without the broadcaster’s permission
- Safe Areas for Captions
- Audio
- Stereo audio levels and measurement (loudness or volume)
- Stereo programme audio levels are currently measured by Peak Programme Meters (PPM). The Maximum or Peak Programme Level must never exceed 8dBs above the programme’s reference level. The following levels, as measured on a PPM meter to BS6840: Part 10 with reference level set at PPM 4, are indicative of typical levels suitable for television, and are given as guidance only.
- Stereo phase
- Stereo programme audio must be capable of mixing down to mono without causing any noticeable phase cancellation.
- Material (levels in PPM):
- Dialog: Normal: 3-5, Peak 6
- Uncompressed Music: Normal: 5, Peak 6
- Compressed Music: Normal: 4, Peak:4
- Heavy M&E (gunshots, loud traffic etc): Normal: 5-6
- Background M&E (ambient office or street noise etc or light mood music): 1-3
- http://www.bbc.co.uk/guidelines/dq/pdf/tv/tv_delivery_to_network_programmes_SD_v1.0-2011.pdf
- Technical Standards for Delivery of Television Programmes to BBC
- This document is only to be used for the delivery of programmes commissioned in Standard Definition (SD).
Posted in BBC, Uncategorized | No Comments »
Sunday, July 14th, 2013
On the rare occasions I produce a DVD, always the same question: How best (easiest and best quality) do I design and print the on-disk label?
In the end, the best option seemed to be to (download and) use the CD/DVD Label-Designer application that came with my disk-printing capability printer (a Canon).
Initial use of it brought up a templates-selection stage that appeared clunky and restrictive. However that was just the initial “wizard” stage of using it, and subsequently I was able to move text, create new text etc. to my satisfaction.
(more…)
Posted in Blu-Ray, Blu-Ray, CD, DVD, DVD, Optical Disk, printer, Uncategorized | No Comments »
Sunday, July 14th, 2013
(This is actually an older post, from about a wek or so ago, but it was left languishing in “Draft” status. But rather than delete it, here it is, out-of-sequence, for posterity)
Nowadays for video editing I mainly use Adobe CS6. However I have still some old projects edited with Sony Vegas (10) which now have new clients. One such project was shot as HDV on a Z1, giving 1440×1080 interlaced, at 50 fields/second, which I call 50i (it doesn’t really make sense to think of it as 25 fps). The required new deliverable from this is a PAL-SD DVD, 720×5786 50i. In addition, I want to deliver high-quality progressive HD (not V) 1920×1080 progressive.
The PAL-SD frame size of 720×576 has exactly half the width of the HDV source and just over half its height. My naive initial thought was that the simple/cheap way to convert from the HDV source to the SD deliverable would be to merely allow each of the HDV fields to be downscaled to the equivalent SD field. This could be performed in Sony Vegas itself, to produce an SD intermediate file as media asset to Encore to produce a DVD.
Some potential complications (or paranoia) that come to mind in this approach are:
- Levels-changes, through processes associated with the intermediate file. For example it might accidentally be written as 16-235 range and read at 0-255 range. In general, uncertainty can arise over the different conventions of different NLEs and also the different settings/options that can be set for some codecs, sometimes independently for write and for read.
- HD (Rec 709) to SD (Rec 601) conversion: I think Vegas operates only in terms of RGB levels, the 601/709 issue is only relevant to the codec stage, where codec metadata defines how a given data should be encoded/decoded. The codec I intend to use is GoPro-Cineform, with consistent write/encode and read/decode settings. Provided Vegas and Encore respect those, there should be no issue. But there is the worry that either of these applications might impose their own “rules of thumb”, e.g. that small frames (like 720×576) should be interpreted as 601, overriding the codec’s other settings.
- Interlace field order. HDV is UFF, whereas SD 50i (PAL) is LFF. Attention is needed to ensure the field order does not get swapped, as this would give an impression of juddery motion.
So I did some experiments…
- Vegas (1) Project Settings:
- Frame Size: 720×576
- Field Order: LFF
- PAR: 1.4568
- Render Settings:
- Frame Size: (as Project)
- Field order: LFF (I think the default might have been something else)
- PAR: 1.4568
- Video Format: Cineform Codec
What Worked:
- Sony Vegas (v.10) project for PAL-SD Wide, video levels adjusted to full-range (0-255) via Vegas’s Levels FX, then encoded to GoPro-Cineform.
- Just as a test, this was initially read into an Adobe Premiere project, set for PAL-SD-Wide. There, Premiere’s Reference Monitor’s YC Waveform revealed the levels range as 0.3 to 1 volts, which corresponds to NTSC’s 0-100% IRE on the 16-235 scale. No levels-clipping was observed.
- So using the 0-255 levels in Vegas was the right thing to do in this instance.
- The Configure Cineform Codec panel in Sony Vegas (v.10) was quite simple, offering no distinction between encode and decode, allowing only for various Quality levels and for the Encoded Format to be YUV or RGB. The latter was found to have no effect on the levels seen by Premiere, it only affected the file-size, YUV being half the size of RGB. Very simple – I like that!
- In Premiere, stepping forwards by frame manually, the movements looked smooth.
In Adobe Encore (DVD-Maker) CS6:
- Imported the intermediate file as an Asset and appended it to the existing main timeline.
- Encore by default assumed it was square-pixels. Fixed that as follows:
- [theClip >RtClk> Interpret Footage] to selrct the nearest equivalent to what I wanted: [Conform to SD PAL Widescreen (1.4587)].
- Why does Encore’s [1.4587] differ from Vegas’s [1.4568] ? Any consequence on my result?
- Generated a “Virtual DVD” to a folder.
- Played that “Virtual DVD” using Corel WinDVD
- In a previous experiment, involving a badly-produced DVD having swapped field-order, I found this (unlike WMP or VLC) reproduced the juddering effect I had seen on a proper TV-attached DVD player. So WinDVD is a good test.
- Made a physical DVD via Encore.
- The physical DVD played correctly on TV (no judder).
An alternative would be to deinterlace the original 50i to produce an intermediate file at 50p, ideally using best-quality motion/pixel based methods to estimate the “missing” lines in each of the original fields. But would the difference from this more sophisticated approach be noticeable?
There also exists an AviSynth script for HD to SD conversion (and maybe HDV to SD also?).
- It is called HD2SD, and I report my use of it elsewhere in this blog. I found it not to be useful, producing a blurry result in comparison to that of Sony Vegas ‘s scaling (bicubic).
Posted in Adobe, Cineform, Premiere, Uncategorized, video | No Comments »
Sunday, July 14th, 2013
As explained as part of my recent “Best of Breed” post, I wish to identify the best NLE for multicam editing. It is possible to achieve such editing in a variety of NLEs, with much the same technical quality. What matters here is friendliness and flexibility, leading to productivity (and hence, in limited-time situations, to greater product quality).
I like the sound of FCPX (with required add-ons) on Mac OS and of LightWorks which is currently on Windows only, soon to go Linux and intended in future to be on Mac OS also. I need to watch a few YouTubes about these and and give them a try. Hopefully I can get a colleague with FCPX to demonstrate it and als I plan to download/install a copy of the free version of LightWorks. Then try them out on archived previous live-event multicam projects.
(more…)
Posted in FCPX, LightWorks, multicam, Uncategorized | No Comments »
Sunday, July 14th, 2013
In one Adobe CS6 Encore (a DVD constructor) project, the [Check Project…] feature found no problems, but on attempting to [Build] the project, the following error was reported: “Encore failed to encode”.
A web-search (further below) revealed that this error message could have reflected any of a number of potential problems.
In my specific project’s case, I found that shortening the filename name fixed the problem. Possibly the filename length was the issue, but it could have been any of the following (experimentation is needed to confirm what it was). Possibly Encore doesn’t like one or more of the following, as regards either filenames or, possibly, the total text representing the volume, folder-chain and file-name.
- Long filenames
- Possibly the limit is 80 characters.
- Specific kinds of character in the filename, such as:
- Spaces (it’s safer to use underscores instead).
- Unusual (legal but not popularly used) characters, such as “&” (ampersand).
It is possible to configure Encore to use Adobe Media Encoder (AME) instead of its own internal one. Doesn’t work for Encore’s [Build] operation but does work for its [asset >RtClk> Transcode Now] operation. The advantages I expect of of using AME in this way:
- It has been said (as of CS5) that AME is faster, being 64-bit as opposed to 32-bit for the encoder in Encore of CS5.
- I suspect/hope that AME might also be more robust than Encore’s internal encoder.
- …and also higher quality; indeed one post implied this may be true for CS6.
- Consistency is a great thing; having used AME from Premiere etc. I expect any lessons gained will apply here.
- AME has some nicer usability-features than Encore, such as a Pause button and the ability to queue a number of jobs.
- These features could be handy for encoding multiple assets for a DVD or Blu-Ray Disk (BD).
For me, the learning-points about Adobe are:
- Potentially (to be tested) the best workflow for Encore is:
- Encode via AME:
- Preferably from Premiere.
- Or via AME directly
- Or, if Encore is so configured (away from its default) then via its [asset >RtClk> Transcode Now] option
- (doesn’t happen if you instead use the [Build] option, which always employs Encore’s internal encoder).
- At http://forums.adobe.com/message/5297248 one poster recommends: << it is a good idea to use “transcode now” before building to separate the (usually longer) transcode of assets step from building the disk.>>
- I’m guessing that the only “cost” of not using Encore’s internal encoder might be the “fit to disk” aspect, and that might be helpful for quick turn-around jobs.
- (Though on the other hand, if that encoder is less robust (I don’t know, only suspect), then that factor would constitute a risk to that quick turn-around…)
- Encore’s error-reporting (error message) system should be more informative, the current “Encore failed to encode” message is too general.
- According to Adobe Community forum posts identified in the Web-Search (further below):
- Others make this same point.
- One post explains that <<Encore uses Sonic parts for some (most?) of the work… and since Sonic does not communicate well with Encore when there are errors… bad or no error messages are simply a way of life when using Encore>>>
- Another refers to an underpinning software component by Roxio, namely pxengine, which required to be updated for Windows 7 (from the previous XP).
- The post states (correctly or otherwise – I don’t know) that the file is [PxHlpa64.sys], located in [C:\windows\System32\drivers] and (as of CS5) the version should be [3.0.90.2].
- A further post alleges that the specific subsystem is called Sonic AuthorCore, which is also used by Sonic Scenarist.
- It would be simple for Adobe to trap filename-type errors in the front-end part of Encore, prior to sending that data to its (alleged) sub-system that is maintained by Sonic.
- In the long term, the preferred fix would of course be for the sub-system developer to update that system to remove the limitations.
- Encore currently has some kind of (hidden) limitation on the kind or length of text representing the filename or file-path-and-name, ideally this limitation should be removed or at least the maximum allowed length should be increased.
Not directly relevant, but noticed in passing (while configuring Encore:[Edit > Preferences]):
- Encore’s “Library” location is: [C:\Program Files\Adobe\Adobe Encore CS6\Library]
- It is possible to define which display (e.g. external display) gets used for Preview. Useful for quality-checking.
(more…)
Posted in Adobe Media Encoder, Encore, oddness, Uncategorized | No Comments »
Sunday, July 14th, 2013
In Adobe CS6 Encore, suppose you have a timeline containing a clip, then (maybe after having added Scene/Chapter markers there) for some reason you need to replace the clip, e.g. due to a slight re-edit or tweak. All you want to do is substitute a new clip for the existing clip, one-for-one, keeping the markers (that you have only just added) in place (together with their links to DVD menu buttons you may also have just now created).
In Encore, media (“Asset”) replacement is not as straightforward or as flexible as in Premiere…
I discovered (the hard way) that:
- You can’t replace an asset by another of different file extension.
- e.g. It won’t let you replace an [.avi] file by a [.mpg] file.
- If you manually delete an existing clip from a timeline, any chapter markers disappear along with it.
- I guess therefore that such markers “belong” to the clip, not the timeline.
- This is despite their superficial resemblance to markers appearing in a Premiere timeline, which do belong to the Sequence (of which the timeline is a view).
- Consistency would be good to have among these suite products…
- Also in Encore, it would help to have the ability to Copy/Paste markers from one asset to another.
(more…)
Posted in Encore, oddness, Uncategorized | No Comments »
Saturday, July 13th, 2013
What is the best workflow for going from a high-resolution footage, potentially either progressive or interlaced, possibly through an intermediate Master (definitely in progressive format) to a variety of target/deliverable/product formats, from the maximum down to lower resolution and/or interlaced formats such as SD-DVD ?
Here’s one big fundamental: Naively one might have hoped that long-established professional NLEs such as Premiere might provide high-quality optical processing based downscaling from HD to SD, but my less optimistic intuition, about the un-likelihood of that, proved correct. In my post http://blog.davidesp.com/archives/815 I note the BBC Technical standards for SD Programmes state: <<Most non linear editing packages do not produce acceptable down conversion and should not be used without the broadcaster’s permission>>.
Having only ever used Adobe (CS5.5 & CS6) for web-based video production, early experiences in attempting to produce a number of target/deliverable (product) formats proved more difficult and uncertain than I had imagined… For a current project, given historical footage shot in HDV (1440×1080, fat pixels), I wanted to generate various products from various flavors of HD (e.g. 1920x1080i50, 1280x720p50) down to SD-DVD (720×576). So I embarked on a combination of web-research and experimentation.
Ultimately, this is the workflow that worked (and satisfied my demands):
- Master: Produce a 50 fps (if PAL) progressive Master at the highest resolution consistent with original footage/material.
- Resolution: The original footage/material could e.g. be HD or HDV resolution. What resolution should the Master be?
- One argument, possibly the best one if only making a single format deliverable or if time is no object, might be to retain the original resolution, to avoid any loss of information through scaling.
- However I took the view that HDV’s non-standard pixel shape (aspect ratio) was “tempting fate” when it came to reliability and possibly even quality in subsequent (downstream in the workflow) stages of scaling (down) to the various required formats (mostly square-pixel, apart from SD-Wide so-called “16:9” pixels, of 1.4568 aspect ratio (or other, depending where you read it).
- So the Master resolution would be [1920×1080].
- Progressive: The original footage/material could e.g. be interlaced or progressive, but the Master (derived from this) must be progressive.
- If original footage was interlaced then the master should be derived so as to have one full progressive frame for each interlaced field (hence double the original frame-rate).
- The concept of “doubling” the framerate is a moot point, since interlaced footage doesn’t really have a frame rate, only a field rate, because the fields are each shot at different moments in time. However among the various film/video industry/application conventions, some people refer to 50 fields/second interlaced as 50i (or i50) wile others refer to it as 25i (or i25). Context is all-important!
- Quality-Deinterlacing: The best way to convert from interlaced fields-to-frames is via motion/pixel/optical -based tools/techniques:
- I have observed the quality advantage in practice on numerous projects in the distant past, e.g. when going from HDV or SD (both 50i) to a variety of (lower) corporate web-resolutions.
- This kind of computation is extremely slow and heavy, hence (for my current machines at least) more an overnight job than a real-time effect… In fact for processing continuously recorded live events of one or two hours, I have found 8 cores (fully utilised) to take a couple of 24-hour days or so – for [AviSynth-MultiThread + TDeint plugin] running on a [Mac Pro > Boot Camp > Windows 7].
- But (as stated) this general technique observably results in the best quality, through least loss of information.
- There are a number of easily-available software tools with features for achieving this, Adobe and otherwise:
- e.g. AviSynth+TDeint, (free) After-Effects, Boris.
- e.g. FieldsKit is a nice convenient deinterlacing plugin for Adobe (Premiere & After Effects), and is very friendly and useful should you want to convert to a standard progressive video (e.g. 25fps), but (at this time) it can only convert from field-pairs to frames, not from fields to frames.
- I submitted a Feature Request to FieldsKit’s developers.
- Intermediate-File Format: A good format for an Intermediate file or a Master file is the “visually lossless” wavelet-based 10-bit 422 (or more) codec GoPro-Cineform (CFHD) Neo
- Visually lossless (such as CFHD) codecs save considerable amounts of space as compared to uncompressed or mathematically lossless codecs like HuffYUV and Lagarith.
- I like Cineform in particular because:
- It is application-agnostic.
- It is available in both VFW [.avi] and QuickTime [.mov] varieties (which is good because I have found that it can be “tempting fate” to give [.mov] files to certain Windows apps, and indeed not to give it to others). The Windows version of CFHD comes with a [.avi] <-> [.mov] rewrapper (called HDLink).
- Another advantage is that CFHD can encode/decode not only the standard broadcast formats (and not only HD) but also specialized “off-piste” formats. I have found that great for corporate work. It’s as if it always had “GoPro spirit”!
- CHFD Encoder Settings from within Sony Vegas 10:
- These settings worked for me in the context of this “Sony-Vegas-10-Initially-then-Adobe-CS6-centric” workflow:
- Technical Production History of a Master for an Actual Project:
- This is merely for my own reference purposes, to document some “project forensics” (while I still remember them and/or where they’re documented):
- This was a “Shake-Down” experience, not exactly straightforward, due to an unexpected “hiccup” between Sony Vegas 10 and AviSynth-WAVSource. Hiccups are definitely worth documenting too…
- The stages:
- Sony Vegas Project: An initial HDV 50i (to match the footage) Intermediate file, containing the finished edit, was produced by Sony Vegas 10 Project:
- [Master 021a (Proj HDV for Render HDV) (veg10).veg] date:[Created:[2013-07-01 15:30], Modified:[2013-07-03 20:07]]
- Movie duration was about 12 minutes.
- Audio & Video Settings:
- Project Settings:
- HDV 1440×1080 50i UFF 44.1KHz
- The audio was 44.1KHz, both for Project and Render, since most of the audio (music purchased from Vimeo shop) was of that nature.
- Render Settings:
- I believe I will have used the following Sony Vegas Render preset: [CFHD ProjectSize 50i 44KHz CFHD (by esp)] .
- Though I think there may have been a bug in Vegas 10, whereby the Preset did not properly set the audio sampling frequency, so it had to be checked & done manually)
- The CFHD Codec settings panel only offered two parameters, which I set as follows: Encoded format:[YUV 4:2:2], Encoding quality:[High]
- The result of Rendering from this Project was the file:
- [Master 021a (Proj HDV for Render HDV) (veg10).avi] date:[Created:[2013-07-01 15:30], Modified:[2013-07-01 18:58]]
- Modified date minus creation date is about 3.5 hours, which I guess accounts for the render-time (on a 2-core MacBook Pro of 2009 vintage winning Windows 7 under Boot Camp).
- The next stage of processing was to be by AviSynth.
- However AviSynth had problems reading the audio out of this file (it sounded like crazy buzzes).
- To expedite the project, and guessing that Vegas 10 had produced a slightly malformed result (maybe related to the audio setting bug?), and hoping that it was just a container-level “audio framing” issue, I “Mended” it by passing it through VirtualDub, in [Direct Stream Copy] mode, so that it was merely rewrapping the data as opposed to decompressing and recompressing it. The resulting file was:
- [Master 021a HDV Mended (VDub).avi], date:[Created:[2013-07-08 18:22], Modified:[2013-07-08 18:30]]
- Since that time, I have discovered the existence of the Cineform tool CFRepair, from forum post at DVInfo: http://www.dvinfo.net/forum/cineform-software-showcase/507364-problem-cfrepair.html which itself provided a download link as http://miscdata.com/cineform/CFRepair.zip.
- Worth trying it out sometime, on this same “broken” file…
- This was processed into full HD progressive (one frame per field, “double-framerate”) by an AViSynth script as follows, its results being drawn through VirtualDub into a further AVI-CFHD file, constituting the required Master.
- AviSynth Script:[HDV to HD 1920×1080.avs] date:[Created:[2013-07-04 18:13], Modified:[2013-07-08 22:05]]
- I used AvsP to develop the script. It provides helpful help of various kinds and can immediately show the result in its preview-pane.
- Multi-threaded:
- To make best use of the multiple cores in my machine, I used the AviSynth-MT variant of AviSynth. It’s a (much larger) version of the [avisynth.dll] file. For a system where AviSynth (ordinaire) is already installed, you simply replace the [avisynth.dll] file in the system folder with this one. Of course its sensible to keep the old one as a backup (e.g. rename it as [avisynth.dll.original]).
- Audio Issue:
- This particular script, using function [AVISource] to get the video and and [WavSource] to get the audio, only gave audio for about the first half of the movie, with silence thereafter.
- Initially, as a workaround, I went back to VirtualDub and rendered-out the audio as a separate WAV file, then changed the script to read its [WAVSource] from this.
- That worked fine, “good enough for the job” (that I wanted to expedite)
- However afterwards I found a cleaner solution: Instead of functions [AVISource] and [WAVSource], use the single function [DirectShowSource]. No audio issues. So use that in future. And maybe avoid Vegas 10?
- The script was processed by “pulling” its output video stream through VirtualDub which saved it as a video file, again AVI-CFHD. Since no filters (video processing) was to be performed in VirtualDub, I used it in [Fast Recompress] mode. In this mode, it leaves the video data in YUV (doesn’t convert it into RGB), making it both fast and information-preserving. Possibly (not tested) I could have simply have rendered straight from AvsP:[Tools > Save to AVI]. When I first tried that, I got audio issues, as reported above, hence I switched to rendering via VirtualDub, but in retrospect (having identified a source, perhaps the only source, of those audio issues) that (switch) might have been unnecessary.
- The resulting Master file was [Master 021a HDV 50i to HD 50p 1920×1080 (Avs-VDub).avi] date:[Created:[2013-07-08 21:55], Modified:[2013-07-08 22:47]]
- “Modified minus created” implies a render-time of just under an hour. This was on a [MacBook Pro (2009) > Boot Camp > Windows 7] having two cores, fully uitilised.
- Quality inspection of Master:
- Check image quality, e.g. deinterlacing, via VirtualDub.
- VirtualDub is great in a close-inspection role because its Preview can zoom well beyond 100% and, vitally, it displays the video as-is, with no deinterlacing etc. of its own.
- e.g. zoom to 200% to make any interlacing comb-teeth easily visible. There should not be any, since this Master is meant to be progressive.
- Premiere Project: Make a Premiere project consistent with the Master, and add chapter markers here.
- Make Premiere Project consistent with the Master, not the Target.
- …especially when there is more than one target…
- Don’t directly encode the master (by Adobe Media Encoder), but instead go via Premiere.
- I have read expert postings on Adobe forums stating that as of Adobe CS6, this is the best route.
- This appears to be the main kind of workflow the software designers had in mind, hence a CS6 user is well-advised to follow it.
- It represents a “well-trodden path” (of attention in CS6’s overall development and testing).
- Consequently, (it is only in this mode that) high-quality (and demanding, hence CUDA-based) algorithms get used for any required scaling.
- Not knowing the application in detail, hence having to adopt the speculative approach to decision-making, it feels likely that this workflow would have a greater chance of reliability and quality than other, relatively off-piste ones.
- Premiere is the best stage at which to add Chapter Markers etc.
- Chapter markers etc. get stored as ??XMP?? and are thereby visible to Encore (Adobe’s DVD-Builder)
- Better to place such markers in Premiere rather than in Encore, since:
- In Encore, Chapter markers act as if they are properties of Assets, not Timelines.
- If you delete an asset from a timeline, the chapter markers disappear also.
- Encore (CS6) Replace Asset has some foibles.
- In Encore, if you were to put an [.avi] file asset on a timeline, then add markers then try to replace that asset with a [.mpg] file, you would be in for a disappointment; if the file extension differs then the markers disappear. If required, then the markers would have to be re-created from scratch. Same again if you subsequently replaced back to a new [.avi] file.
- The Foibles of Encore (CS6)’s Replace Asset function, in more detail:
- Good news: If the new asset has the same file extension then any existing markers are retained.
- This possibly suggests that they are transferred from the old asset to the new one.
- Bad news: If the new asset file extension differs from the old one, then:
- You get an error (popup): ???
- e.g. it refused my attempt to replace an [.avi] file by a [.m2v] file).
- Partial-workaround:
- You can instead delete the existing asset from the timeline, prior to dragging another asset there..
- ..BUT as a side-effect that deletes any of the old asset’s markers also…
- …and furthermore Encore has no way to copy a set of markers from one asset to another
- …which would otherwise have been a nice work-around for the above side-effect.
- Premiere Export: Export / Render to Target Format.
- You may wish to render to a number of formats, e.g. SD-Wide DVD, Blu-Ray Disk (BD), YouTube upload format, mobile phone or tablet.
- The most efficient strategy is to Queue a number of jobs from Premiere onto Adobe Media Encoder (AME.
- AME can run some things in parallel (I think).
- AME has a [Pause] button, very useful for overnight silence or prior to travel (Windows Sleep/Hibernate).
- Menu:[File > Export > Media]
- Export Settings:
- For targets of differing aspect ratio (e.g. SD-Wide derived from HD master):
- Source Scaling:
- e.g. for HD -> SD, use [Scale to Fill] since this avoids “pillarboxing” i.e. black bars either side.
- For DVD Target, use inbuilt preset MPEG2-DVD
- Ensure [Pixel Aspect Ratio] and interlace sense etc. are as required.
- The [MPEG2-DVD] preset generates two files:
- [.m2v] for the video
- [Dolby Digital] or [MPEG] or [PCM]
- [PCM] option results in a [.wav] file of 16 bits, 48 KHz (there is no 44.1 KHz option).
- Maximum Render Quality
- Use this if scaling, e.g. down from HD Master to SD Target.
- File Path & Name.
- Where you want the export/encode result to go.
- Click the [Queue] button, to send the job to the Adobe Media Encoder (AME)
- Quality Inspection of Result (intermediate or target file):
- Check the quality of the encodes via VirtualDub, e.g. for DVD-compatible video media, the correctness of interlacing and for progressive media the quality of deinterlacing.
- For interlaced downscaled material derived from higher resolution interlaced, the combs should be fine-toothed (one pixel in height). A poor quality result (as expected for straight downscaling by any typical NLE such as Premiere, from HD interlaced to SD interlaced) would instead exhibit combing with thick blurry teeth.
- VirtualDub is great tool for a a close-inspection role because its Preview can zoom well beyond 100% and, vitally, it displays the video as-is, with no deinterlacing etc. of its own.
- In the past I have searched for and experimented with a number of candidate tools to be effective and convenient in this role. VirtualDub was the best I could find.
- e.g. zoom to 200% to make the teeth easily visible.
- Plain VirtualDub is unable to read MPEG2 video, but a plugin is available to add that ability:
- The [mpeg2.vdplugin] plugin by FCCHandler, from http://sourceforge.net/projects/fcchandler/files/Virtualdub%20Mpeg2%20plugin/.
- It reads straight MPEG2 files, including [.m2v], but not Transport Stream files such as [.m2t] from the Sony Z1.
- For [.m2v] files, VirtualDub may throw up an audio-related error, since such files contain no audio. Fix: In VirtualDub, disable audio.
- Its ReadMe file contains installation instructions. Don’t just put it in VirtualDub’s existing [plugins] folder.
- DVD Construction via Adobe Encore.
- Name the Project according to the disk-label (data) you would like to see for the final product.
- If you use Encore to actually burn the disk, this is what gets used for that label.
- Alternative options exist for just burning the disk, e.g. the popular ImgBurn, and this allows you to define your own disk-label (data).
- Import the following as Assets:
- Video file, e.g. [.m2v]
- If Video File was an [.m2v] then also import its associated Audio file – it does not get automatically loaded along with the [.m2v] file.
- Create required DVD structure
- This is too big a topic to cover here.
- Quality Inspection: [Play From Here]
- Menu:[File > Check Project]
- Click [Start] button
- Typical errors are actions [Not Set] on [Remote] or [End Action]
- I plan to write a separate blog entry on how to fix these.
- When everything is ok (within the scope of this check), it says (in status bar, not as a message): “No items found”.
- A worrying choice of phrase, but all it means is “no error-items found”.
- Menu:[File > Build > Folder]
- Don’t select [Disk], since:
- May want to find and fix any remaining problems prior to burning to disk.
- May want to use an alternative disk burning application, such as ImgBurn.
- From forums, I see that many Adobe users opt for ImgBurn.
- Set the destination (path and filename) for the folder in which the DVD structure will be created.
- At that location it creates a project-named folder and within that the VIDEO_TS folder (but no dummy/empty AUDIO_TS folder).
- I once came across an ancient DVD player that insisted on both AUDIO_TS and VIDEO_TS folder being present and also they had to be named in upper-case, not lower.
- Under [Disk Info] there is a colored bar, representing the disk capacity
- Although the Output is to a folder, the Format is DVD, single-sided, which Encore realizes can hold up to 4.7 GB.
- The [DVD ROM] option allows you to include non-DVD files, e.g. straight computer-playable files e.g. ([.mp4])
- These go to the root of the drive, alongside the VIDEO_TS folder.
- Finally, click the [Build] button.
- On one occasion, it failed at this stage, with a “Encode Failed” or “Transcode Failed” (depending where I looked) error. Solution: Shorten the file name.
- Ok it was long-ish but I didn’t realize Encore would be so intolerant to that. The suggestion of it only struck me later (the appearance of this guess was thanks to years of experience with computing etc.).
- Quality Inspection of the DVD
- I have found Corel WInDVD to show results representative of a standard TV with a DVD Player.
- I have found popular media player such as VLC and Windows Media Player (WMP) to behave differently to this, hence not useful for quality-checking. Problems I found included:
- False Alarm: Playing went straight to the main video, didn’t stop at the Main Menu (as had been intended). However it worked fine on a standard physical DVD player.
- Hidden Problem: In one case I deinterlaced improperly, resulting in “judder” on movements when played on TV (via physical DVD player). However it appeared fine on both VLC and WMP.
- Metadata
- In the case of WMV files, just use Windows Explorer:[aFile >RtClk> Properties > Details] and edit the main items of metadata directly.
- For DVD generated by Adobe Encore, the Disk label (data) is the same as the Project name.
- ImgBurn, a popular alternative to Encore as regards actually burning a disk, provides a way of changing this disk-label.
Posted in Adobe, After Effects, AviSynth, Blu-Ray, Blu-Ray, Boris, Cineform, CUDA, deinterlacing, DVD, DVD, Encore, interlacing, Premiere, Premiere, resizing, Sony Vegas, Uncategorized, VirtualDub, workflow | No Comments »
Monday, July 8th, 2013
Suppose you have original footage that is different to that of the required product. For example you have progressive footage and require an interlaced product. Or perhaps the given footage is interlaced, but at a different resolution to that product.
While it is naively possible to simply “bung whatever footage one shot into an NLE and render the requried format”, this will not in all cases provide the optimum quality. Obtaining a quality interlaced product from progressive footage (e.g. as-shot or intermediate or an animation) requires some more “beyond the box” thinking and processes.
The following article extract (link and bullet-points) explains how to go from Progressive to Interlaced using a video-processing application such as After Effects.
- The first stage is to derive double-rate progressive footage from the original, specifically via motion-compensated/estimated /optical-flow tools/techniques as opposed to simple frame-blending (which would give rise to unwanted motion-blur artefacts). This can be achieved via various applications (e.g. as listed in the article). For such processes, I have traditionally used AviSynth (e.g. QTGMC & MVTools, which I covered at http://blog.davidesp.com/archives/502), but I look forward to evaluating other applications in this regard.
- For footage that is already interlaced but which is at a different resolution to the required product, I typically use AviSynth’s TDeint plugin, which use motion/optical methods via which one can derive complete progressive frames corresponding to each field of the given footage. Then these frames can be resized to the required product resolution, prior to the second stage.
- The second stage is to derive from this (double-rate progressive footage) the required interlaced footage, by extracting each required field (upper and lower alternating) from each frame in turn. For this, I have traditionally used Sony Vegas, which does this well. The article claims After Effects does it well, and better than (the erstwhile) Final Cut Pro, but no mention is made of Adobe Premiere (though it may well perform this task well). Naturally, AviSynth could also be used for this, either by extending its script or as a separate script.
- I queried whether Premiere could do it, on Adobe Premiere forum: http://forums.adobe.com/thread/1250083.
- One reply said <<Premiere is pretty smart about such matters. You should have no issues.>>
- Note that it can be useful to preserve a double-rate intermediate file for other purposes (e.g. downscaling of HD to SD or maybe in future, double-the-current-normal-rate will become the new normal).
Steps:
- http://library.creativecow.net/articles/solorio_marco/interlacing_progressive_footage.php
- Interlacing Progressive Footage
- {The following is slightly re-worded/paraphrased from the original}
- Frame-Doubling:
- The first step is to double up the literal frame count, resulting in one of the following:
- Double the duration.
- Double the frame-rate.
- In order to do this properly, the new frames need to be interpolated by means of a vector-based pixel warping or morphing algorithm.
- This can be accomplished by a variety of different applications, including:
- Motion 3 (by use of the Optical Flow feature)
- After Effects (by use of Layer > Frame Blending > Pixel Motion)
- Shake
- Twixtor plugin (which can be used in Final Cut Pro, After Effects and several other host applications)
- Boris FX
- You do NOT want to frame-blend this step.
- The best way to tell if this step is working correctly is to look at the new frames that have been created. If they have an overlapping ghost look to them, then it’s frame-blending, which you do not want. If the new frames literally look like new frames with no ghosting or overlapping, then you’re on the right track.
- Interlacing:
- This can be done in After Effects, Final Cut Pro and pretty much any other video application
- After Effects renders out a cleaner interlace (actually, a perfect interlace) than does Final Cut Pro
- In Adobe After Effects:
- Setup:
- Select the rendered clip in the Project window and right-click it and select Interpret Footage > Main.
- Suppose the original clip was “30p”, i.e. 29.97 fps, then the rendered clip will be “60p” i.e. 59.94 fps.
- In the Frame Rate section, conform the frame-rate to the correct value, namely 59.94 fps, or “60p”.
- Create a new Comp of “60i”
- Place the 60p clip in that Comp’s timeline
- (Even though your timeline is only 29.97 FPS and you can’t see the extra frames when scrubbing frame by frame, don’t fear; when you render the final clip, it will use the extra frames in the 60p clip to create the new fields.)
- Render:
- Render this by Menu:Composition > Make Movie].
- This should open up the [Render Queue] window with a new comp in the queue. You’ll need to change the Render Settings either by selecting a pulldown option next to it or by clicking the name next to the pulldown option.
- Ensure you render this clip with [Field Rendering] turned on. You’ll need to select either Upper Field First (UFF) or Lower Field First (LFF), depending on your editing hardware and format of choice.
Posted in interlacing, Twixtor, Uncategorized | No Comments »
Monday, July 1st, 2013
HD2SD is an HD to SD convertor implemented by Dan Isaac as an AviSynth”package” (my term, for the plugin of that name and its dependent bits).
Its development was apparently prompted by the relatively poor scaling performances of NLEs at that time (e.g. Adobe CS4). Some claim that it is still superior, even to Adobe CS6’s latest CUDA-based scaling algorithms, though those run a close second. In my own experience to date, of converting a 1440×1080 HDV footage to 720×576 PAL-SD-Wide equivalent, the results were poorer than SOny Vegas 10’s “Best” (Bicubic) scaling algorithm. Regardless, there is always the possibility of error in such experiments, and in any case, its “place in history” and potential for use in future remain.
Links:
- Introduction
- Download
- Tutorial – including how to install the various bits and options for multithreading
Posted in Uncategorized | No Comments »
Monday, July 1st, 2013
The story so far:
- I have a resurfaced (old) project shot in HDV 1440×1080 i50, Video Levels 16-255.
- This has been edited in Sony Vegas 10, as a project consistent with the footage (hence HDV), but with Audio 44kHz (due to predominantly CD music background), and with levels over full-range 0-255.
- My first attempt involved (from Vegas 10) rendering down to SD, encoded in GoPro-Cineform. This I imported to Adobe Encore and generated a DVD which looked acceptable.
- In retrospect, I discovered that I had enabled Vegas’s renderer’s “Stretch Video / Don’t Letterbox” option. Ideally I’d have wanted it to be cropped (top and bottom) to fill. I am less familiar than I would like with Vegas-10’s nuances in this respect..
- Subsequently I experimented with the AviSynth’s-HD2SD approach, which prior to Adobe CS5 was claimed by others to give superior results to scaling within Premiere etc. However:
- It has since been observed by some that Adobe CS6’s new CUDA-based scaling algorithms are almost as good.
- In my own experiments with using HD2SD on my current (old) project’s HDV-to-SD requirement, I found HD2SD’s results inferior to (e.g. more blurred than) Sony Vegas’s “Best” (Bicubic) scaling processes, which I believe/assume to happen equivalently both in-project and on-render.
Links:
Posted in Uncategorized | No Comments »
Friday, April 5th, 2013
It can be very annoying when I type say Gimp into Spotlight and it defaults to the Windows version. That causes Parallels to launch, then Windows within that then Windows-Gimp…when all I really wanted was Mac-Gimp. So easy to type without looking!
The solution, from the following weblink, is to open up Mac’s [SystemPreferences > Personal > Spotlight > Privacy] then drag the VM folders there (I assume this simply creates references to those folders). The VM folders are to be found, from your root directory, [Applications > Windows 7 Applications] (say).
http://reviews.cnet.com/8301-13727_7-20067723-263.html
Posted in Mac, Parallels, Uncategorized | No Comments »
Friday, March 8th, 2013
Before VFX: Blockbuster movies without visual effects. The site at the following link has a collection of of behind-the-scenes photos prior to visual effects, hence revealing green screen etc. shots, actors festooned with CGI motion-tracking rigs etc.
Discovered via NoFilmSchool, which I subscribe to and heartily recommend for makers and enthusiasts of movies and videos etc.
It even has some shots from John Carter, in which I was a film Extra, though sadly none of “my” scenes. I wish I could re-cut it, not only for my bits 🙂 but also to allow its climate catastrophe message to be more dramatically expressed, some of the “cutting-floor” scenes were truly emotional. Regardless, “all the world’s a stage” 🙁
Posted in cgi, chromakey, film, moviemaking, Uncategorized | No Comments »
Thursday, February 28th, 2013
As remarked in an earlier blog entry, I was concerned about how best to import/use XDCAM-EX footage in an After Effects CS, especially when that footage could be spanned across more than one [.mp4] file, especially given that their contents can overlap. In Premiere this is not an issue, because its (new) Media Browser feature provides instead a higher-level view, of clips rather than lower-level [.mp4] essence-files.
Sadly, as yet, AE CS6 has no equivalent of the Media Browser.
Best workaround:
- In Premiere, use Media Browser to import an XDCAM-EX clip, then copy it and paste that “virtual” clip into AE.
Workflows involving Adobe Prelude:
- The web-search record (below) not only provides the foundation for the above statements, it also contains an explanation of the different workflows (e.g. whether or not to sort/trim/rename clips in Prelude). Some workflows are best for short-form (typically involving tens of footage-clips) while other workflows may be more appropriate for long-form (hundreds or thousands of clips).
(more…)
Posted in Adobe, After Effects, Prelude, Premiere, Uncategorized, workflow, XDCAM EX | No Comments »
Friday, February 22nd, 2013
- http://en.wikipedia.org/wiki/Magnetic_anomaly_detector
- Magnetic anomaly detector
- http://www.geo.ucalgary.ca/~wu/Goph547/CSM_MagNotes.pdf
- Geophysical Surveying Using Magnetics Methods
- Magnetometer Sites:
- http://spears.lancs.ac.uk/samnet/
- BOR: Borok, CIS
- CRK: Crooktree, UK
- ESK: Eskdalemuir, UK. BGS station, but archived at 1s resolution by SAMNET
- FAR: Faroes
- HAN: Hankasalmi, Finland. IMAGE station, but archived at 1s resolution by SAMNET
- HAD: Hartland, UK. BGS station, but archived at 1s resolution by SAMNET
- HLL: Hella, Iceland.
- KIL: Kilpisjärvi, Finland. IMAGE station, but archived at 1s resolution by SAMNET
- LAN: Lancaster, UK.
- LER: Lerwick, UK. BGS station, but archived at 1s resolution by SAMNET
- NUR: Nurmijärvi, Finland. IMAGE station, but archived at 1s resolution by SAMNET
- OUJ: Oulujärvi, Finland. IMAGE station, but archived at 1s resolution by SAMNET
- UPS: Uppsala, Sweden. Geological Survey of Sweden station
- http://blog.stevemarple.co.uk/
- A hi-tech, relatively low-cost (?) garden magnetometer. Under development.
- “a simple, low-cost, battery-powered magnetometer for auroral alerts and citizen science”
Posted in Uncategorized | No Comments »
Wednesday, January 23rd, 2013
I recently came across a handy script for recording streams. It was in the scripting language python. So I went to obtain it. So far no problem.
But that got me thinking: I’d read somewhere a long time ago of python, or was it ruby (on rails or otherwise), being used to support broadcast or film digital production workflows. So first I wanted to confirm that, through web-search. Then second I wanted to compare the languages, to see which one I felt best about.
Google:[python ruby workflow video production adobe avid]
- http://devopsanywhere.blogspot.co.uk/2011/09/how-ruby-is-beating-python-in-battle.html
- This is a really good article, I can see that for me, python is the obvious choice – more readable to me. Furthermore:
- Ruby’s greatest strength is its amazing flexibility. There is a lot of “magic” in ruby and sometimes it is dark magic. Python intentionally has minimal magic. It’s greatest strengths are the best practices it enforces across its community. These practices make Python very readable across different projects; they ensure high quality documentation; they make the standard library kick ass.
- (For a particulat given simple example, <<The python example is far more readable and maintainable. >>
- On the other hand (in favour of ruby):
- If ruby reminds of perl, your eyes do not deceive you. In many ways it is the love child of perl and smalltalk.
- In the past have had a very good experience of using smalltalk
- every large program should have its own internal DSL suited to the problem space … it seems much easier to create DSL’s (Domain Specific Languages). Ruby certainly spawns DSLs with much greater frequency than python. No single pythonic build tool dominates the problem space like rake does in the ruby community. Most python projects seems to use setup.py for administrative tasks even though that is not its explicit purpose.
- http://en.wikipedia.org/wiki/List_of_Python_software
- Lists Implementations, Development Environments, Applications etc.
- http://blog.eltrovemo.com/364/diy-broadcast-how-to-build-your-own-tv-channel-with-open-source-other-goodies/
- DIY BROADCAST: How to build your own TV Channel with Open Source & other goodies
- Loads of great links eg for screenwriting (Celtx), multicam recording (Ingex Studio), editing (EditShare LightWorks), archive (BackBlaze) and playout (OpenPlayout, MLT). Also 3D modelling (Blender), color correction (DaVinci Resolve Lite), Live Graphics (CasparCG), Digital Asset Management (EnterMedia). And more … but you get the drift…
- http://doingthatwrong.com/home/2012/10/18/running-scripts-with-textexpander
- Example scripting and, serendipitously, some recommended iOS (iPhone/iPad) apps for note-taking and html script production, namely Nebulous Notes and TextExpander (which can work together).
Posted in broadcast, Ruby, scripting, Uncategorized, workflow | No Comments »
Saturday, January 19th, 2013
GMIC: An Image Processing Pipeline(s) Scripting Language
I found this by accident, but it looks really handy for “industrial-scale” image processing.
- http://gmic.sourceforge.net/
- G’MIC stands for GREYC’s Magic Image Converter. This project aims to:
- Define a lightweight but powerful script language (G’MIC) dedicated to the design of image processing operators and pipelines.
- Provide an interpreter of this language, distributed as a C++ open-source library embeddable in third-party applications.
- Propose four different user interfaces for this image processing framework:
- The command-line executable gmic to use the G’MIC framework from a shell
- In this setting, G’MIC may be seen as a serious (and friendly) competitor of the ImageMagick or GraphicsMagick software suites
- The interactive and extensible plug-in gmic_gimp to bring G’MIC capabilities to the image retouching software GIMP.
- ZArt: a real-time interface for webcam images manipulation.
- G’MIC Online, a web service allowing users to apply image processing algorithms directly from a web browser.
-
- G’MIC is focused on the design of possibly complex pipelines for converting, manipulating, filtering and visualizing generic 1d/2d/3d multi-spectral image datasets. This includes of course color images, but also more complex data as image sequences or 3d(+t) volumetric float-valued datasets.
- G’MIC is an open framework: the default language can be extended with custom G’MIC-written commands, defining thus new available image filters or effects. By the way, G’MIC already contains a substantial set of pre-defined image processing algorithms and pipelines (more than 1000).
- G’MIC has been designed with portability in mind and runs on different platforms (Windows, Unix, MacOSX). It is distributed under the CeCILL license (GPL-compatible). Since 2008, it is developed in the Image Team of the GREYC laboratory, in Caen/France, by permanent researchers working in the field of image processing on a daily basis.
- Main features:
- G’MIC defines a complete image processing framework (provides interfaces for C++, shell, gimp and web), and can manage generic image data as other image-related tools. More precisely:
- It can process a wide variety of image types, including multi-spectral (arbitray number of channels) and 3d volumetric images, as well as image sequences, or 3d vector objects. Images with different pixel types are supported, allowing to process flawlessly images with 8bits or 16bits integers per channel, as well as float-valued dataset.
- It internally works with lists of images. Image manipulations and interactions can be done either grouped or focused on specific items.
- It provides small but efficient visualization modules dedicated to the exploration/viewing of 2d/3d multi-spectral images, 3d vector objects (elevation map, isocurves, isosurfaces,…), or 1d graph plots.
- It is highly extensible through the importation of custom command files which add new commands that become understood by the language interpreter
- It proposes commands to handle custom interactive windows where events can be managed easily by the user.
- It is based on the latest development versions of the CImg Library, a well established C++ template image processing toolkit, developed by the same team of developers.
Posted in Gimp, image-processing, Uncategorized, workflow | No Comments »
Saturday, January 19th, 2013
The MathMap plugin for Gimp provides:
- A sophisticated scripting GUI+Language, specialised for graphics in Gimp+MathMap.
- e.g. One can peek individual pixels, run Mandelbrot algorithms, in very concise code.
- An assortment of processing functions written in that language
- A Graphical Nodal filter-application editor
Example Scripts and Visual Results:
Video (Screencast) Presentations:
- Demo of the MathMap Composer
- Inaccessible (as of 2013-01-19) since it is a Private video (on YouTube).
- Alternative demo.
- And another demo.
- Introduction to the MathMap Language
- Inaccessible (as of 2013-01-19) since it is a Private video (on YouTube).
- MathMap Cocoa Introduction
- Inaccessible (as of 2013-01-19) since it is a Private video (on YouTube).
- New features in MathMap 1.3.4
Explanatory Websites (BUT see further below for special required installation procedure instructions for Gimp v2.8):
Download & Installation instructions
(more…)
Posted in Gimp, scripting, Uncategorized | No Comments »
Friday, December 14th, 2012
Web-research produced the following:
- http://www.dvxuser.com/V6/archive/index.php/t-260937.html?s=f59ef633f56960080b1be215f5bd6bd5
or http://www.dvxuser.com/V6/showthread.php?260937-Bad-audio-in-films for (fully-formatted version):
- The general rule, especially for beginners, is shotguns outside and hypercardioids inside. Lavs are okay when absolutely needed, though they often have a much drier, less natural sound to them because of where they’re placed. That missing ambience has to be added back in post. Wireless should be a last resort.
- Unfortunately, a shotgun mic cannot be zoomed, and is not good at rejecting low-frequency sounds, including echos reflected from walls and floors.
- Use of interference-tube shotguns are often the cause of that hollow, boxy sound you hear in low-budget indie films. Some shotguns, like the Sanken CS-3, use a different principle to achieve directionality, so are not susceptible to the same sorts of problems.
- To get clean dialogue, the first and most important rule is to get the mic as close to the subject as possible. That means riding the frame-line with the mic and risking the occasional (hopefully rare ) dip into the frame. A lav mic on the subject can go a long way toward “solving” the problem of a reverberant room.
- One of the biggest problems here is with small productions that have no sound person, and resign themselves to putting the mic wherever they can. On-camera is the absolute last place ever to place a mic for production sound. Get the mic off the camera and into the action. The effective working distance for a mic for on-camera dialog is 6″-20″, and 20″ is pushing it. The closer to the source, the more direct sound in proportion to ambient reflections will be recorded.
- Audio that is recorded too low is going to have noise problems later. Not only will the levels have to be raised in post, increasing the level of any noise in the signal, low audio levels also create problems when audio plug-ins and filters are added. Since low (digital) audio levels don’t use but half, or less, of the available bits, processing through lots of things like compression and EQ can make the audio start to sound blocky (the sound equivalent of pixellated).
- Room tone. Cutting dialog together requires some continuity of sound, and when taking a clip from take 1 and a piece from take 2 and cutting them together the room tone will be needed both to smooth out the edit (so that the room tone doesn’t disappear between lines) and often to keep continuity of sound between takes. If the traffic goes away, bugs start/stop chirping outside, or the room tone otherwise changes between takes, room tone is how you recover. Be sure to record :30 of room tone for each scene, and record it again if something changes. After the last take, ask everyone to stay still and quiet, and record in the same space with the same mics and with all the same equipment running.
- Ambient sound beds add realism to the background. SFX and Foley replace all the sounds of people walking, moving, handling objects, etc. (none of that is actually recorded in production, where dialog is the only focus). Layers and layers of audio come together to paint the big picture.
- http://en.wikibooks.org/wiki/Electronics_Fundamentals/Electromagnetic_Devices/Microphone
- The most common unidirectional microphone is a cardioid microphone, so named because the sensitivity pattern is heart-shaped.
- A hyper-cardioid microphone is similar but with a tighter area of front sensitivity and a smaller lobe of rear sensitivity.
- A super-cardioid microphone is similar to a hyper-cardioid, except there is more front pickup and less rear pickup.
- These three patterns are commonly used as vocal or speech microphones, since they are good at rejecting sounds from other directions.
- http://www.dvxuser.com/V6/showthread.php?234912-Question-Shotgun-vs-Hypercardioid
- {This has a mine of information on microphone types, designs and properties in-situ indoors etc.}
- A shotgun uses an interference tube that relys of phase interactions between that portion of the sound wave hitting it from the front, entering the tube through the front and traveling down inside the tube and the portion of the same wave passing alongside the tube and entering it through the side ports.
- For sound coming from dead-ahead, the two wave sets in the tube reinforce each other but for sound hitting it from the side the waves are out of phase and cancel.
- However, when considering sound reflected from the environment, its phase is already shifted with respect to the direct component of the same sound and so the pattern of orderly cancellation in the interference tube breaks down and some frequencies are reinforced while others cancel. The result is called ‘comb filtering’ and results in distortion of the recorded sound, typically sounding like the source is down in a well or standing in a metal culvert.
- In comparison, hypercardiods do not use phase interference to achieve their directivity, operating instead on pressure differentials. As a result, they are not subject to the same degree of selective frequency distortion of the reflected sound that an interference tube mic exihbits.
- Sanken CS3-e is a shotgun with 3 capsule array giving it better and more even frequency balance for the sides. Many have found that it is a shotgun which can be well used also indoors, it is also fairly compact in length.
- http://forums.creativecow.net/thread/30/865231
- {Discussion thread about recommended makes/models of hypercardiod mics}
- http://www.pinknoise-systems.co.uk/Used_Mint_Sanken_CS3e_microphone_with_Rycote_Modular_WS4_Kit_–product–1486.html
- Used ‘Mint’ Sanken CS3e microphone with Rycote Modular WS4 Kit
- Price: £1,260.00
- http://www.visuals.co.uk/salesProductDetail.php?PRODUCTID=1021270
Posted in audio, microphones, Uncategorized | No Comments »
Sunday, November 4th, 2012
Worked, but config was not as straightforward as I first (naively) assumed:
The big “Gotcha”:
- Must first Disable the iLink (IEEE 1394, small FireWire) interface. Otherwise SDI won’t work at all. I guess EX3’s SDI & iLink might share some circuitry?
- In EX3 Menu, OTHERS category (last i.e. final category):
Then, in EX3 Menu, VIDEO SET category (3rd category), then:
- [YPbPr/SDI Out Select] : HD
- [YPbPr/SDI Out Display] : Off
This worked fine in practice.
FurtherTips:
- Under EX3 OTHERS Menu-Category:
- With EX3 [Country] = [NTSC Area]:
- “HQ 1080/60i” gives [1080 interlaced 59.94fps 4:2:2 YUV10].
- “HQ 1080/30p” gives [1080 progressive 29.97fps 4:2:2 YUV10 ].
- “HQ 1080/24p” gives ??? (Cinedeck accepted it only at 30 fps)
- With (correspondingly) [PAL Area]:
- “HQ 1080/50i” gives [1080 interlaces 50fps 4:2:2 YUV10]
(more…)
Posted in 10-bit depth, camera, Cinedeck, monitor, recording, Sony EX XDCAM, Uncategorized | No Comments »
Thursday, September 20th, 2012
I got the impression that WireCast (Windows & Mac) was the most popular choice, notably including that made by an expert reviewing site. I understand (haven’t tested) that the current Windows version (Mac to come later) can “broadcast” to a virtual camera e.g. acceptable to Skype. Also it works the other way round, so e.g. Skype interviews can be included in a broadcast program. (more…)
Posted in network, streaming, TV, Uncategorized | No Comments »
Sunday, September 2nd, 2012
My MacBook Pro, of 2009 vintage, has both FireWire 800 (FW 800) and ExpressCard among its data & communications ports. These work fine in Mac OS X, but not in [Boot Camp > Windows 7 (64-bit)]. That’s how it’s always been with this laptop. A while has passed since I last searched the web, so I wondered whether any solution had finally been found. I was prompted by the serendipitous discovery (in a desk drawer) of an ExpressCard to FireWire card, offering dual FS800 ports. It was originally purchased in an attempt to work around the non-functioning (in BC-W7) native FW port of the machine, but that attempt had not, to date, been successful. I wondered if maybe a solution to using that work-around might now be available.
No.
Sadly I just wasted valuable time looking around. All I confirmed was that I was not alone with this problem.
(more…)
Posted in Boot Camp, FireWire, MacBook Pro, Uncategorized, Windows 7 | No Comments »
Saturday, September 1st, 2012
Just as I’m starting to get used to Adobe Premiere CS5.5, I notice that its audio effects listing (in menus etc.) does not my system’s VST collection. Most annoyingly, because of that, my iZotope Ozone effects are excluded from Premiere. Seems unreasonable, given my long track record of employing such plugins in Sony Vegas.
I spent a good hour or two trying to understand and solve this, including much googling. At the end of that, I’m not sure what the problem is exactly, but it does look to me like Premiere is slightly lacking with regard to its ability to interface to VST effects. For a start, one of its assumed registry entries appears inappropriate to Windows 7 64-bit. Having hacked that into shape, Premiere at least noticed the existence of Ozone (and other VST effects on my system) then found itself unable to load it.
The best solution I found was really a work-around. Prom Premiere timeline, [aClip >RtClk> Edit in Adobe Audition]. That application has no trouble recognising iZotope plugins. However before getting too blinkered, try the native Audition effects first, including Noise Reduction, because they are pretty-good.
(more…)
Posted in Adobe, audio, iZotope Ozone, Premiere, Uncategorized, VST | No Comments »
Friday, August 31st, 2012
Shooting green-screen onto a 4:2:0 chroma-subsampled format, intending of course to use it for chroma-keying. Obvious disadvantage is green-ness of green-screen only gets sampled at quarter-resolution. Not a show-stopper, given my target deliverable is standard definition, but anyhow, towards perfectionism, is there any way to up-sample to 4:4:4 i.e. full definition colour?
It does occur to me that something more sophisticated than chroma blur ought to be possible, broadly along the lines of edge-following methods employed in resizing. What’s out there?
- Simplest method, that most people seem to use, is chroma-blur. That’s only the chroma, not the luma.
- Searching around, Graham Nattress has analysed the problem and seems to have produced a more mathematical approach. But it’s only available (at time of writing) for Final Cut (which of course is Mac-only at present).
Some tools that “promise” upsampling, but I wonder by what methods:
- GoPro-CineForm intermediate. The codec settings include an option to up-sample to 4:4:4
- Adobe Premiere, but only if a Color Corrector effect employed.
- But the crucial thing here, regarding the usefulness of this, is whether it uses any better method than chroma blur.
Some questions:
- Does Adobe have anything built-in to do something Nattress-like nowadays?
- DaVinci Resolve?
- Boris?
(more…)
Posted in Adobe, After Effects, artefacts, chroma, chromakey, enhance, FCP7, Final Cut, Premiere, Uncategorized | No Comments »
Thursday, July 5th, 2012
If I had a 10-bit video recording such as from the PIX 240, would I know what to do with it, in order to make full use of the 10-bit information? This question is important, because it cannot be assumed that this is simply a case of inputting it into any arbitrary nonlinear editing system (NLE) – not all NLEs preserve the extra information – and even for those that do, the workflow and configuration must be set up appropriately. And even having got that right, how can we verify all is working as expected? Can the NLE’s own effects and waveform monitors etc. be trusted to preserve the extra bits?
Having discovered some sample 10-bit footage at http://www.sounddevices.com/products/pix240/sample_files/ (as reported at http://blog.davidesp.com/archives/570), I was prompted to do some experiments in a few NLEs. I based the experiments on the following two DNxHD files, as recorded by a PIX 240, both 1920x1080p29.97 and around half a minute in duration.
- dnxhd220mb_8_29.97.mov = 8-bit
- dnxhd220mb_10_29.97.mov = 10-bit
The comparison was based on an area of sky at the top-left of frame (in each case), with its (limited) levels-range mapped to full video range, so as to make 8-bit quantization-banding appear.
Conclusions (as far as I can tell from experiments):
- Adobe Premiere:
- Propagates the 10-bit footage’s information, achieving better image quality than for the 8-bit footage.
- However this only happens when correctly configured and then only for certain effects.
- The Fast Color Corrector levels-mapping appears to introduce some kind of dithering.
- Hence while the expected banding is visible for 8-bit footage, it is slightly “blurred” on the Waveform Monitor and the resulting image looks more ragged than banded.
- Nevertheless, the 10-bit footage through this same process has no such banding at all, and resulting the image looks obviously better.
- None of the cases at http://blogs.adobe.com/VideoRoad/2010/06/understanding_color_processing.html apply here since no blur effect was used.
- The result of Fast Color Corrector levels-mapping on 10-bit footage result also looks slightly brighter than that on 8-bit footage – presumably a mapping-inconsistency in Premiere?
- Some other non-obvious pitfalls exist when making such comparisons:
- Sony Vegas 10
- Ignores the extra information in the 10-bit footage, evem for Project Settings of 32-bit.
- Avid Symphony 6
- AMA appears to truncate to 8-bit, at least it seems so based on what appears in Avid’s Waveform monitor.
- Import of the given DNxHD-220 to Avid-Import-DNxHD-220 appears to give same result.
- I assume I am missing something here, some knowledge and/or step and/or monitoring method…
The configurations I used within each application:
- Sony Vegas 10:
- Project Properties
- 1920x1080p29.97. Not automatically readable by Vegas from the DNxHD format.
- Pixel Format: 32-bit floating point (video levels)
- Waveform Monitor via: Video Scopes > Waveform
- Sky-range mapped to full range via: Sony Levels FX
- Adobe Premiere CS 5.5:
- Computer had a non Mercury Engine compatible GPU hence software-only graphics / effects processing.
- Waveform Monitor via: Reference Monitor > YC Waveform
- Sky-range mapped to full range via: Fast Color Corrector > Input Levels
- (Prior to that tried various “Levels” effects but they did not work properly in this context)
- Sequence Setting: Maximum Bit Depth (else levels-resolution was truncated to 8-bit)
- Avid Symphony (hence presumably also Media Composer) 6
- Web-Research
- Experience:
- Project Properties: At Project-Creation stage, define as 1920x1080p29.97
- At Import-stage (in the Import-dialog), define Video Resolution to be to DNx220
- On my system, the default Video Resolution was DNx145, and indeed an initial import attempt caused a transcode to that.
- When I retried with Import setting for Video Resolution of DNx220, even though the PIX 240 recording is already in DNx220, it appeared to get transcoded, not simply rewrapped.
- Waveform Monitor via:
- Windows > Workspaces > Color Correction
- In right-hand monitor, at top-selector, select Y Waveform
- Sky-range mapped to full range via: BCC Levels-Gamma.
- Adjust Input Black and Input White
Posted in 10-bit depth, Adobe, DNxHD, Premiere, Sony Vegas, Uncategorized | No Comments »
Thursday, June 21st, 2012
I currently use Mac equipment, but most of what I do is Windows-based. Although Macs can run Windows under Boot Camp, but there are some shortcomings in practice, the main ones being poor Boot Camp support for FireWire and ExpressCard:
- On a Mac Pro bought in 2008:
- FW800 port works OK with an external FW800 hard disk unit, but is unable to drive specialist audio/video equipment.
- On a MacBook bought at the beginning of 2010:
- The FW port is unusable, even for an external hard disk unit. If I try to use it, it works initially then (e.g. after a GB or two) the FW driver crashes and remains offline.
- The ExpressCard port does not function.
- Interestingly, placing a Sony SxS video-recording card in the ExpressCard slot causes the operating system (Windows) to search for a matching driver. However the card never appears in Windows Explorer. Frustratingly “almost there but not quite”…
So Boot Camp is really limitated as regards Windows-based video editing!
As an alternative to Boot Camp, I tried running windows as a virtual machine under the Mac OS application Parallels. Rendering is surprisingly efficient under this regime, almost 100% of Boot Camp speed, but I found that:
- FireWire is not supported (at least not in the version I tried)
- Crashes were not too frequent, but they were more frequent, than under Boot Camp.
So maybe I should try it the other way round! It is possible to run Mac OS on a Windows PC via an “umbrella scheme” called Hackintosh, whereby various softwares (not called Hackintosh) make the PC look sufficiently like a Mac to allow Mac OS to be installed and booted.
So what kind of PC?
- Ideally I’d like a “luggable”, say with 24 inch screen and 8 cores.
- But it can be a fraught business choosing equipment that is compatible with the major NLEs etc.
- So I took a look at a renowned expert-seller of such equipment, namely DVC. They offer the HP EliteBook 17″ HP8760W with Quadro 3000 graphic card (suitable for Avid & Adobe Premiere Pro):
Examining the potential of that laptop:
- CPU: It is an i7 with 4 cores, 2.3GHz with turbo up to 3.4 GHz
- GPU: The Quadro 3000, which has 240 pipelines, 2GB memory, and consumes 75W.
- It can run Hackintosh > Mac OS
- Hackintosh: How-To: http://nofilmschool.com/build-a-hackintosh/
- Google: [HP 8760w hackintosh]
- http://www.youtube.com/watch?v=Sf7rCFCzsPs
- Hp Elitebook 8740w with Mac OSX Lion 10.7.1 installed
- Very smooth performance, no display glitches
- With Lion, unlike Snow Leopard, the USB ports work.
- Also the FireWire, Webcam, BlueTooth work.
- {Though from experience I’d want to test that FireWire}
- However the following do not work: Track-pad, Fingerprint-reader, Card reader, WiFi.
- WiFi is partially fixable by using a USB adaptor, but its bandwidth would then be constrained (?)
So that laptop is a definite contender…
Googling further on that model, it becomes apparent that it is available in a variety of customizations:
- GPU as DVC mention
- Display – “ordinaire” or DreamColor (highly accurate, broad range)
- Ports
If I do go for that model, I shall most likely purchase it from DVC, even if I can find it cheaper elsewhere. I’d rather not take the risk of some subtle error and want to help keep them in business for the future!
Posted in Mac, Uncategorized, Video Computer Technology, Windows | No Comments »
Tuesday, June 12th, 2012
The Sony VAIO 3D, an all-in-one (motherboard is in the screen enclosure) computer, very broadly similar in concept to an iMac, and not to be confused with laptop VAIOs.
Pros (the attraction of it to me):
- My Dad has one, for his 3D video editing.
- I’m looking for a luggable system for my multi-locational video editing.
- Though currently I only edit 2D material, I’m interested in connecting to 3D, including to help my Dad.
Cons:
- One of the main negative arguments is that the graphic card can’t be upgraded. And graphic cards are now “evolving” rapidly. On the other hand its the kind of product where youalmost leave it shrink-wrapped, hopefully very eBay-able when the time comes.
- It only has four cores.
- From practical experience, I need 8 cores to complete certain kinds of (recurring) job in a reasonable time like overnight, so as not to hold-up projects another working-day.
- It sounds like the GPU is not as powerful as I would like, e.g. for encoding video.
(more…)
Posted in Uncategorized | No Comments »
Tuesday, June 12th, 2012
I’m considering getting a decent CUDA card for my existing Mac-based system. Currently its GPU is a GeForce 8800 GT, having 112 CUDA cores and 512 MB RAM. In contrast, for example, the Quadro 4000 has 256 cores, 2GB RAM, memory bandwidth just under 90GB/s. Clock speeds are harder to compare in a meaningful way, there is processor clock speed and cores clock speeds, and of course we are dealing here with multicore.
From my research, it seems that:
- The NVIDIA Quadro 4000 is compatible with a Mac (tower) both under Mac OS and Boot Camp Windows 7 64-bit (as well as some other versions I don’t care about).
- It is possible to install more than one such card, doubling the number of cores, and benefitting dual-monitor-related performance if the two monitors are each connected to separate cards.
(more…)
Posted in Boot Camp, CUDA, GPU, graphic card, Mac, Uncategorized | No Comments »
Wednesday, June 6th, 2012
What is it? Not the “ubiquitous computing” I first imagined. Marginally handy in some ways, possibly more risky in others, e.g. if forget to exit on one machine (e.g. at work) then will it be accessible on another machine (e.g. at home or remote location)? An in any case, how sustainable will it be? My recent experience with Adobe CS Review makes me slightly wary…
What I expected was something more like the Kindle model, where I could install apps on as many devices as I wished, albeit with reduced functionality on weaker devices, and to have only one project open at a time, identically visible (apart from synch-delay) on all of those devices (maybe auto-branching where synch failed, with expectation of future manual pruning/re-synching).
Then there’s rendering – I’d expect that not to be counted as “usage”, instead usage should be actual user-interaction. The technical model could be a thin client for user interface, sending commands to processing engines (wherever, even on another machine, e.g. to run a muti-core / CUDA desktop from ipad or iphone) and at the same time “approval requests” to Adobe Central, but with some degree of “benefit of the doubt” time-window so as not to delay responsiveness of the application. They could then even respond to attempted beyond-licence actions with piecemeal license-extension options, e.g. “Provided you pay in next working day or two for temporary additional subscription” option (defaulters get credit score reduced). Why let inflexibility get in the way of capitalism?
Unfortunately, in the words of REM, “that was just a dream”. Instead activation is restricted virtually to the same degree as the non-cloud variety, that is to two computers (main & backup or work & home etc). The only extra freedom is that the two computers need not be the same operating system – e.g. can be mac and windows – a nuisance restriction of the traditional non-cloud model. And rendering counts as usage.
It is possible to deactivate one of these computers and reactivate on another but if this happens “too frequently” then a call to Adobe’s support office is required. It’s slightly more complicated in practice but that’s the essence of it.
Might give it a try though. Like I said, it could be marginally handy, and marginal is better than nothing.
(more…)
Posted in Adobe, cloud computing, Uncategorized | No Comments »
Friday, May 18th, 2012
Steps Taken:
- Old Experimental Disk > Boot Camp
- Identified existing version as 2.1 (that came with Mac OS Leopard).
- Discovered I needed it to be Version >3.1 to handle Windows 7.
- Attempted to update it automatically, via existing-installed Mac and Windows (XP), but neither worked.
- Cloned Current Mac OS > Snow Leopard system to experimental disk, over-writing (only) the existing Mac OS installation there.
- Used SuperDuper in free (gratuite) mode.
- On clone, updated relevant software:
- Mac OS > Boot Camp Assistant
- Download Windows Support Software.
- I assued that would give me the latest version…
- But Boot Camp failed to update – it said “The Windows support software is not available”
- Wasted time retrying a few times…
- Discussion at https://discussions.apple.com/thread/2793568?start=0&tstart=0 indicated this was a known issue, and the work-around was to go for the second option, “I have the Mac OS S installation disk”.
- Located Mac Pro (desktop) install-disk for Snow Leopard (it was in a thin cardboard box, along with iLife etc).
Posted in Uncategorized | No Comments »
Friday, May 18th, 2012
Web-Research:
- http://www.mac-forums.com/forums/running-windows-anything-else-your-mac/179571-upgrade-windows-7-without-going-through-bootcamp-again.html
- ID:
- Updating Boot Camp and installing Windows 7 on your Mac
- by Topher Kessler January 20, 2010
- Best to install drivers first:
- Boot Camp Software Update 3.1 64-bit: The full Boot Camp driver package for 64-bit versions of Windows, including Windows 7.
- Boot Camp Software Update 3.1 32-bit: The full Boot Camp driver package for 32-bit versions of Windows, including Windows 7.
- Graphics Firmware Update 1.0: This provides graphics updates for iMacs and MacPros with Geforce 7300GT, 7600GT, and Quadro FX4500 graphics processors. It is only required if you are installing Windows 7.
- {BUT are they not included as standard nowadays (2012) with latest version of Boot Camp ? }
- http://www.mac-forums.com/forums/running-windows-anything-else-your-mac/179571-upgrade-windows-7-without-going-through-bootcamp-again.htm
- ID:
- upgrade to Windows 7 without going through bootcamp again?
- Question by “brockga”, Feb. 2009
- “should be” no need to destroy & re-create existing Boot Camp partition, just install W7 over the top of it.
- Further advantage of this method: W7 “Custom Install” option able to save existing Documents
- << The Windows 7 install process will then copy all of your data in “My Documents” over to a Windows.old folder within Windows 7 itself. All applications and documents stored in other locations will have to be reinstalled / transferred manually. >>
- x
- http://forums.macworld.com/index.php?/topic/139815-successful-setup-os-x-lion-bootcamp-win7-data-partition/
- ID:
- Successful setup: OS X Lion + Bootcamp Win7 + Data Partition
- ernopena_nyc, 28 August 2011
- The key to this working is creating your extra partitions AFTER you make the Bootcamp partition but BEFORE you install Windows. And once Windows is installed, you CAN NOT shrink, resize, delete, create, or modify any partition.
- <<<
- I have my internal 500GB hard drive partitioned the following way:
- 120GB OS X Lion (system and apps)
- 316GB workspace partition (user files, projects)
- 64GB Bootcamp Windows 7 Ultimate
- To make this work, I started with the standard procedure of installing OS X Lion on a single Mac OS Ext partition and using Bootcamp Assistant to build the Bootcamp partition for Windows. Then I did 2 key things:
- 1. Before installing Windows on the Bootcamp partition, I first went back to Disk Utility, shrunk the OS X Lion partition, and inserted a 3rd partition Workspace_HD for all my user files. Then I restarted and installed Windows 7.
- 2. After Win 7 Ultimate, the Bootcamp drivers and Office 2010 were installed and activated, I DID NOT make any changes to any partitions. I can put whatever I want on any partition, but I CAN NOT shrink, resize, delete, create, or modify any partition. Any change to the partition tables after Windows is installed will BREAK the Bootcamp partition.
- I went thru 3 broken installs of Bootcamp/Win7 to figure this out
- >>>
- http://www.zdnet.com/blog/bott/windows-7-on-a-mac-my-boot-camp-survival-guide/3446
- Miscellaneous related tips and discussions…
Posted in Boot Camp, Mac, Uncategorized, Windows 7 | No Comments »
Tuesday, February 14th, 2012
How about an After Effects plugin for automatically grading any footage featuring a Gretag Macbeth color chart in-shot (e.g. at the beginning and/or end of shot)? Matt Roberts’ new plugin, still “steaming off the press”, works in Premiere as well as After Effects, and has been tested in CS5 and CS5.5. You simply pause on a frame featuring a color chart in-shot, place corner locators to identify that chart, and ‘Go”. It not only fixes white balance but also adjusts for saturation and compensates for certain kinds of “color twisting” defects such as can occur in cameras. Subsequent “expert tweaks” can then be made if preferred, e.g. 20% saturation reduction for “film look”. The free version works in 8 bits, the paid (£50) one (in the process of being made available on ShareIt.com) works in 32 bits, multithreaded etc. To find out more and to download it: http://www.mattroberts.org/MBR_Color_Corrector/.
Example: Canon 7D Video Footage:


So what’s the point of this plugin? Greater quality, reliability and productivity, as compared to traditional color correctors, as explained below.
Those with an eye for accurate color reproduction from video footage will be familiar with traditional tools such as 3-way color correctors and meters such as waveform monitors and vectorscopes. All proper Non Linear Editing systems (NLE’s) have these. Generally-speaking such tools work well, but sometimes in practice the situation can become confused when for example a subject’s “white”(assumed) shirt is in fact off-white, or when tinted light mirror-reflects off skin or results from camera filters. Easy to understand in retrospect, but initially can cause “running round in circles” of interative adjustment and re-checking. Furthermore, some cameras have peaks, pits, twists and ambiguities (e.g. infra-red) in their colour response that many such correctors cannot correct in a straightforward manner. Not only can time be wasted but it is quite possible to end up with an image that “looks” right to most people but which in fact has done something inexcusable such as altering the very precise color of a corporate logo.
One way to reduce the potential fo such confusion is to incorporate a color chart in shot. Various types exist, including Gretag Macbeth (GM) and Chroma Du Monde (CDM). The GM card, while primarily targeted at photography, is also in widespread use for video. That chart consists of a matrix of colored squares, one row of which represents (steps on) a grey-scale. It also includes some near-primary colours and some approximate skin colours of a few types. The simplest use of such a chart would be to use the grey-scale row for white balancing and the other colours for “by eye” grading/tweaking. The more experienced will probably make use of vectorscopes etc. but that can still be a nuisanceful if not cumbersome process.
Enter Matt Roberts’ Automatic Color Corrector. We tried it out on some footage from his own Canon 7D and from my Sony EX3, the latter fitted with a slightly green-tinted infra-red filter, on a snowy day. We even tried it on an image (featuring such a chart, as well as a model with lots of fleshtones) on Canon’s website ?URL? for their C300 camcorder. In all cases, the correction was achieved in seconds. We were particularly confused as to why Canon’s web-image image was so off-colour, but it certainly was, and the Corrector fixed it.
Once again, the link: http://www.mattroberts.org/MBR_Color_Corrector/
Posted in 35mm, Adobe, After Effects, grading, Premiere, Uncategorized | No Comments »
Sunday, January 29th, 2012
Given an iPhoto library on a Mac, how could/should it be used in combination with external storage such as a NAS?
- How copy files between them, e.g. where does iPhoto store / reference its content?
- Is there any way to set up iPhoto to automate/simplify backups or synchronisations?
Answers (I found / discovered by experiment):
- iPhoto stores photos in a specialised iPhoto Library object, kind of like a zipfile you can’t open or expand.
- The full path is [/Users/xxxxxx/Pictures/iPhoto Library]
- But the only practical use of that knowledge is that, via [Finder > Get Info], you can see the iPhoto Library object size change as you import etc. photos.
- e.g. I tried it and initial size was “4.5 GB on disk (4,493,054,358 bytes)”, then after adding a few photos it increased to “4.51 GB on disk (5,501,769,018 bytes)”
- To import photos to iPhoto library:
- iPhoto: [File > Import to Library]
- It’s OK to select a folder
- e.g. NAS had folder [20017_01_27], among others, under a[photos] folder.
- But the imported photos were not grouped into Events.
- Tried importing again and it highlighted that some were already in the library, gave option to skip them.
- backing-up the iPhoto library:
- iPhoto Help
- Use Time Machine
- Use an iDisk
- A “virtual disk” that is part of a MobileMe account.
- Burn to DVD etc.
- {Nothing about external drives}
- {I guess then there is nothing in iPhoto specially suited to my wishes, so I just backup as I would any other stuff}
Posted in Uncategorized | No Comments »
Saturday, January 21st, 2012
There is a wealth of information and advice at the following, e.g. covering basic camera alignment and calibration, camera-matching and green screens.
http://www.dsclabs.com/tech_tips.htm
- Using a DSC Chart
- “Real World Use of DSC’s Fairburn 3-D Chart”
- “Exposure for Sony S-Log with New DSC Chart”
- “Selecting Production Parameters to Ensure that Picture Quality Accommodates the Intended and Possible Future Imaging Systems”
- Methodical approach to configuring the camera’s matrix.
- “Establishing a repeatable baseline reference”
- “Matching Multiple Cameras”
- “Skin tone Waveform Levels”
- “Compromise between Color Accuracy and Signal Noise”
- While full saturation on all colors results in the most accurate color reproduction, it can introduce more noise than is acceptable for our purposes.
- We have found that a reduction of about 20% in green and cyan saturation (moving the green and cyan signals 1/5 of the distance towards the center of the vectorscope) is a good compromise between color accuracy and signal noise.
- “Do You Waveform Monitor the Lutted Image or the S-Log?”
- I waveform the S-Log, the LUTs on set can wack out the waveform … and …. are … for comfort viewing only.
- The S-Log is my neg
- “Matching the Sony EX-1 with more costly Broadcast Camera’s”
- Unless you have a calibrated monitor, calibrated chart that is correctly lit and so forth, you can tweak all you want and not come up with the result you would like.
- One thing that is a must with HD is avoiding washed out high-lights
- “Continuous Light Sources”
- There is a growing trend to use fluorescent, LED and discharge light sources for film and video production.
- One of the problems faced by these light sources is the lack of continuous spectrum activity
- “Red One and CMOS Static”
- Every time you change a lens on a digital camera such as the Red One, be sure to check the sensor for dust. The single CMOS sensor has a static charge that attracts dust (just like DSLRs).
- When dust is left on the sensor it appears as a soft grey blob in the image. This is not always visible on small displays and might not be noticed unless you see your work on a large display or projector.
- Use a loop {loup?} to magnify the sensor before blowing gently with a blower bulb or compressed air. If blowing won’t remove the dust, then use a brush designed to clean DSLR sensors, but use it with great care.
- “BackFocus”
- when performing a “flange-back” adjustment (as Back Focus is sometimes called) the Iris should be FULLY OPEN (so that) the depth of field is minimized
- “Are Six Colors Enough?”
- “Varicam Detail”
- “Noise, Green, Cyan, and Saturation”
- “Tips on HD”
- “Motion Artifacts”
- “Green Screen Technique”
- I light the screen to 55-60 units on the scope and then use the vectorscope to check and make sure I’ve got lots of saturation. I’ve always had success that way.
- It’s really more about making sure there’s more green (by 30 or 40 units) in the screen than anywhere else in the image.
- “Creating a Look”
- “Aberration”
- “Color Bar Symmetry”
Posted in Uncategorized | No Comments »
Saturday, January 14th, 2012
I have a project shot on a Sony EX3. SO I have XDCAM-EX footage.
Opened an Adobe Premiere project, set its Sequence settings to XDCAM EX HQ 1080i50
- Wondered immediately what that implied. Like OK the source is XDCAM-EX which is Mpeg2 encoding inside a MP4 container, but why does the Sequence care how the source is stored? Surely it only needs to know things like the format is 1080i50 then it can store any intermediate files in DNxHD or Cineform or whatever Adobe prefers. I am very confused by this kind of thing, just as I was in FCP. Maybe it’s obvious or maybe “I think to much”.
- Adobe has a thing called Import and it can (I discovered) accept MP4 files from XDCAM-EX’s BPAV folder-structures (deep down within the CLIPR subfolder). But I know that is a stupid way to go. The MP4 files are but the “essence” that is “stitched together” (mixed metaphors or what?) by the likes of SMIL and XML files. It’s only at the latter level that smooth continuum happens.
- Enter Adobe Premiere’s Media Browser. I “knew” there had to be something like that. I discovered it via http://wwwimages.adobe.com/www.adobe.com/content/dam/Adobe/en/products/premiere/pdfs/cs5-premiere-pro-sonyxdcam-wfg.pdf which itself I discovered via Bing search on [sony xdcam-ex adobe premiere cs5.5 workflow]. OK to get XDCAM-EX footage into an Adobe Premiere project you do [WIndow >Media Browser] or else Shift-8, then don’t expect some window popping-up or anything, just instect the [Media Browser] tab at the lower-left of the GUI screen. Drill-down to the required recording and double-click. The media appears in a Source Preview window (I wonder but don’t mightily care what Adobe calls it).
- OK I do care a bit really, and according to an Adobe video tutorial, it’s called a Source Monitor.
- Initially it was too zoomed-in, presumably displayig at 1:1 (pixel). “Zoom to Fit” was but a right-click away…
- You can drag from Source Monitor to the Timeline or to other places.
- I tried that with some EX3 footage where I pan across the front of the famous Wembley Stadium, UK. In Sony Vegas (my erstwhile “comfortable old shoe”) it snatches and drags. In Adobe Premiere, as in Sony Clip Browser, it pans smoothly. Guess where I’m heading…
Posted in Adobe, Premiere, Uncategorized, XDCAM EX | No Comments »
Tuesday, January 10th, 2012
Want a mobile “suitcase” editing system, something more (and more expandable) than a laptop but not too expensive. Primarily to be used for Adobe CS5.5 for media enhancement / editing / compositing etc.
Nearest I found was NextDimension’s range around $7000 I think (but just guesswork – could be way off – would need to get a quote). That would (if true) be around £4500 at current rates. Plus import… NextDimension call such machines “flextops” (Maybe they coined the term? Google searches on it mostly come up with them.)
Apart from the (mil/broadcast-lite but me-heavy) price, it might possibly be undesirably heavy to lug around much. If so (just guessing, not assuming), it would make more sense to go for a modular quick-setup system. So, starting to “think different” in this direction:
- Standard tower, capable of taking new CUDA etc. graphics cards etc. as they emerge, but no need for more than say a couple of disks, maybe if SSD could even get away with just a single disk? (For system and media – inadvisable for traditional disks of course, what about for SSD’s? I have much to learn about SSD’s though).
- “Laptop-Lite” to talk to it. With robust shuttered-stereoscopic HD monitor.
- Gigabit network to NAS fast storage (SSD and/or RAID ?).
Maybe in that case it would be far more logical/affordable to use an existing laptop as a client working together with a luggable tower server, sufficiently light and robust for frequent dis/re -connection and travel. And remote access of course (no heavy data to be exchanged, assume that’s already sync’d). And some means to easily swap/sync applications and projects (data) between laptop and tower, giving the option to use just the (old) laptop on its own if needed. All such options are handy for the travelling dude (working on train, social visits etc.) who also occasionally has to do heavy processing. Then would just need a protective suitcase for the tower, plus another one for a decent monitor for grading etc.
I certainly won’t be spending anything just yet, but it’s good to have at least some kind of “radar”.
(more…)
Posted in Adobe, Avid, backup, building, collaboration, Encoding, file mgt, gigabit, GPU, graphic card, MacBook Pro, near-line, network, Networking, offline, Premiere, ProRes, QuickTime, RAID, remote access, Setup, Uncategorized, Video Computer Technology | No Comments »
Thursday, January 5th, 2012
DebugMode FrameServer (DMFS) can be made to work with Sony Vegas 8-10 on a Windows 7 64-bit system:
Posted in Uncategorized | No Comments »
Thursday, January 5th, 2012
Can the Canon D500 be connected to an external monitor?
Not tried it yet – need to purchase a HDMI Type C cable – but it sounds like one way or another it could be coaxed into doing so. My web-research leading to this view (right or wrong) is below.
(more…)
Posted in Canon, D500, DSLR, monitor, Uncategorized | No Comments »
Thursday, January 5th, 2012
I have a Vodafone USB Modem Stick (cell broadband dongle) which was obsolete even when I received it (free/gratuit). Its design intention was you plugged it into a computer and, like some storage devices (e.g. memory sticks) the computer installed its driver software and you were ready to go. In practice however it does not work either under Windows 7 or Mac OS Snow Leopard. Some things report failure to install and/or the machine crashes if yoy try to boot up with the dongle already plugged in, or if plugged in after restart, a message requests further restart. There is no way out into a state where it can perform its main function.
The dongle is a Vodafone K3765, which I have heard is actually an Icon 411 made by Option . It will allegedly run on Windows 7 but not pay-as-you-go.
I wonder if a newer version of the dongle (and any associated application software or drivers) is available. Then again, what’s the point if I can use the phone, especially as it’s less hassle all round (fewer technical complexities and hence possible issues, simpler purchasing all-in-one contract including data). Maybe I should just get it crushed?
(more…)
Posted in cellphone, iPhone, network, Uncategorized | No Comments »
Monday, January 2nd, 2012
While discussing trailers and caravans etc. with my father, he mentioned that the legendary comedian/presenter Ade Edmonson had been on TV with a series where he travelled britain with a small caravan towed behind his car. So I thought I’d look into it (the type of caravan that is…). Here are the links I found helpful:
About Ade Edmonson and his particular caravan:
Caravan Introductory Elements:
Purchase:
Posted in Uncategorized | No Comments »
Tuesday, December 27th, 2011
Started a new project
- Decided to make it a real project – [2011-12-12 (NG) Carol Singing]
- Prompted for a project path and file name:
- Path:
- (scratch area etc. are then, by default, set relative to (within?) this – much nicer than FCP7 )
- Chose: [I:\_Media\_Projects\2011-12-12 (NG) Carol Singing\030 Projects\Adobe\Premiere]
- FileName: [Carols 001]
- This created project-file [Carols 001.prproj]
- Dialog [New Sequence] then prompted for sequence settings:
- Choose Sequence preset – to match the recorded footage, namely 720p25
- Chose XDCAM-EX > 720p > XDCAM EX 720p25
- Change the [Sequence Name] from default ([Sequence 01]) to [010 Assemblage 001]
- The main Premiere timeline etc. GUI appeared.
- At its lower-left was [Media Browser]
- In this I browsed to the source files, being MXF versions of my EX3 footage, selected those files and [Import]
- The files then immediately appeared at the upper-left pane.
- However for 5-10 minutes afterwards, the hard drive light flashed, indicating data-transfer.
- How come? What was it doing? Surely it’s already in the right format?
- In the upper-left pane, I double-clicked one of the source files.
- It appeared in the Source preview-window (akin to FCP and Avid)
- In Source pane:
- Played intuitively.
- SpaceBar for Play/Pause
- Arrow keys for frame-at-a-time
- Shift-Arrow for a few frames at a time
- Control-Arrow for Beginning and End.
- Easy-to-see*grab&slide timeline cursor (blue blob)
- Tried dragging source (pane) media to Timeline
- Not as I expected
- I expected the video and audio to “want” to go in the existing video and audio tracks. Instead, while I could drag the video component anywhere (including the existing video tracks), the audio component only went to new tracks (that it automatically created).
- Four audio tracks were created, not the two that I was expecting (given it was only a stereo recording).
- No audio waveforms displayed (I expect there is a setting somewhere)
- Found an [Info] tab in the pane at the lower-left of the app.
- It showed that file [929_3798_01.mxf] contained 3 video channels, of which only vchannel 1 was populated, and 7 audio channels, of which the last four (4-7) achannels were populated.
- Found [Preferences] under [Edit > Preferences]
- Discovered cache location was at [C:\Users\David\AppData\Roaming\Adobe\Common]
- There was also an option <<Save Media Cache files next to originals when possible
- Possibly inappropriate when using straight XDCAM-EX source-files?
- Don’t want to corrupt the BPAV file structure with “foreign” additions.
- Should be OK though when using MXF format though I guess.
- Can [Clean] the cache, under same [Preferences] window.
- Audio Waveform display
- In each audio track-header, Twirl the Disclosure-Triangle. Independently for each audio track.
- Having done so, it was apparent that two of the audio elements (hence two of the four audio tracks) contained no audio – their waveform displays were simply flat-lines.
- Effects
- Extremely intuitive.
- [Effects] tab in lower-left pane of app GUI
- Tried e.g. [Effects > Video Effects > Auto Color]
- Dragged it to item on timeline
- Saw its effect in the main Timeline preview pane
- Provided the cursor was somewhere on that item in the timeline.
- In [Source] preview-pane, selected [Effect Controls] tab
- [Video Effects] included [Auto Color]
- Clicking the [fx] button toggles the effect on/off
- Cuts & Transitions
- Snapping on/off Toggle-button (looks a bit like [C], meant to be a horseshoe-magnet), left of timeline top-ruler
- Transitions
- Basics
- Ensure handles are present and that the clips are abutted (e.g. have snap enabled)
- In Effects palette (tab in lower-left pane, [Video Transitions > Dissolve > Cross Dissolve]
- Iris Transition
- I fairly frequently use this in another NLE, but with feathered edges. The settings for this transition in Premiere do not appear to include feathering. Nothing obvious came up in Google or Help searches.
- One suggestion, from July 2009, was to instead use Gradient Wipe, which has a Softness control, together with a suitable image for the required shape (e.g. circle).
- Text
Posted in Adobe, Premiere, Uncategorized | No Comments »
Saturday, December 10th, 2011
I have a Sony XDCAM-EX clip at 1280x720p25 to be transcoded to ProRes, so it can be used as source for iMovie (for another user on another machine).
In principle it should be very simple: go on Mac, use Compressor to transcode the XDCAM footage to ProRes. But as usual, things are pernickety…
Sequence:
- First tried dragging the XDCAM [.mp4] file into compressor.
- Not recognised.
- Likewise the BPAV folder.
- Next, I transcoded the XDCAM footage to “MXF for NLEs” format, using the Mac version of Sony Clip Browser
- Next, opened the XDCAM Transfer app.
- In this app, open the XDCAM’s BPAV folder.
- The footage displays OK but how do I export it to a QuickTime [MOV] file?
- Looks like I can’t. It only offers to export to an [MP4] file.
- Instead, I guess I’ll have to open it from FCP.
- FCP
- I opened a random existing FCP project.
- The footage is 720p but the project/sequence settings are arbitrary (unknown to me)
- FCP: File > Import > Sony XDCAM…
- It imported to somewhere … but where?
- FCP Browser: file > RightClick > Reveal in Finder
- It was at [/Volumes/GRm HFS+/_Media/_Projects/2010-05-30 (Esp) Alison Doggies/020 Source/Sony XDCAM Transfer/SxS_01]
- File System:
- In other words, at whatever destination was last used by some app – presumably XDCAM Transfer or possibly FCP
- The destination path was in fact specified in XDCAM Transfer, under its Menu: [XDCAM Transfer > Preferences > Import]
- Moved the file instead to [/Volumes/GRm HFS+/_Media/_Projects/2009-11-22 (JRM) Lady of the Silver Wheel]
- Compressor:
- Open it in Compressor
- Drag it to the “job-strip” (my term) in Compresor.
- Compressor displays data about that clip (e.g. 1280×720, 25 fps)
- Select jobstrip settings:
- Select Setting
- Settings: Apple > Formats > QuickTime > Apple Pro
- Name: Apple ProRes 422
- Description: Apple ProRes 422 with audio pass-through. Settings based off the source resolution and frame rate
- Apply (Drag) Setting to Jobstrip
- Destination
- Leave destination unspecified. Then it will be the same folder as Source.
- Processing (transcoding) of this footage (1280x720p25) took about 3 minutes (on MacBook Pro 2009).
- Result was not that much bigger than the original:
- Originally recorded [.MP4] file: 1.19 GB
- Rewrapped [.MOV] from XDCAM Transfer: 1.14 GB
- ProRes [.MOV] from Compressor: 1.97 GB
Posted in Compressor, FCP7, file mgt, Final Cut, Formats, iMovie, Mac, MacBook Pro, mp4, ProRes, QuickTime, Sony EX XDCAM, transcode, Uncategorized, XDCAM EX | No Comments »
Thursday, December 8th, 2011
I am told that this slightly dark-comic-like movie features classically composed scenes, nearly every scene, making it good film-techniques study material. I have yet to see it but from the trailer it seems like a cross between a real movie and watching a computer game.
Links:
Posted in Uncategorized | No Comments »
Monday, November 28th, 2011
I have a friend/colleague with a Canon 7D and girlfriend with 500D. Also I am aware of “Super” (reduced size) “35mm” sensor video cameras. I’m keeping an eye on all the options, as currently I have no 35mm etc. capability and hence limited shallow DOF and low-light capability. And to share / compare info with those mentioned people.
Starting with Looking at Philip Bloom’s site to (routine check see what’s new there), I came across these useful links (even though they’re not all new). I’m attracted to getting a Magic Lantern-ed second-hand 5D Mk.II for creative purposes, especially since my typical work-pattern is not that time-critical and I am reasonably fluent with frame-rate conversion where necessary. I’ll try it out on the 500D first. The 500D can only do 30 fps at 720p (drops to 20 fps at 1080p) but its sensor is almost an inch across i.e. about double that of my existing EX3.
Incidentally, I previously covered sensor sizes and their names at http://blog.davidesp.com/archives/433 and there’s Canon’s take on it at http://learn.usa.canon.com/resources/articles/2011/c300_for_cinematographers.shtml which (oh yes) is about their new C300 camera (will cover that in a separate blog-post).
Here are the links:
- http://philipbloom.net/2009/10/01/5dmkii-or-the-7d/
- In a nutshell, 5D has (fairly uniquely) a full “35mm” sensor, giving the ability to achieve correspondingly uniquely shallow depth of field. But it shoots at a non-standard frame-rate of exactly 30 fps (not 29.97 fps). This can matter e.g. when intercutting with standard 29.97 material. On the other hand when using the camera on its own (and I guess with possible allowance for the time duration change and audio pitch change if you fiddle the metadata) it need not matter.
- Magic Lantern firmware is available for the {original} 5D but not the 7D.
- Meanwhile the 7D has less shallow DOF capability and slightly more noise but slightly less rolling-shutter effect and, crucially, a number of standard frame-rates.
- Magic Lantern – unofficial extended firmware for Canon cameras like 5D
- Magic Lantern gives many improvements to modes, metering displays (e.g. zebra & peaking) and quality (e.g. more shutter-speed choices and greater recording bitrate). However it does not (yet?) provide additional frame-rates.
- http://magiclantern.wikia.com/wiki/Magic_Lantern_Firmware_Wiki
- As of today (2011-11-28) it is reported that Magic Lantern is still not available for the 7D, though progress towards this is being made (slowly).
- There are limitations to shooting movies on a 5D Mark II, notably the limited 12 minute recording time.
- (An image illustrates a 5D “tooled-up” with rods, mattebox, audio box etc. to serve as an outside rig)
- http://magiclantern.wikia.com/wiki/Todo_list
- Altering frame-rates is still on the to-do list. Hence not yet done!
- http://philipbloom.net/2011/10/18/1dx/
- FINALLY the full frame Canon 1DX DSLR featuring improved video.
- STandard frame-rates: 24,25, 30p in full HD and 50 and 60p in 720p mode
- Intra-frame and Inter-frame compression (H264), easing editing.
- Single clip length of up to maximum of 29 minutes and 59 seconds (reflecting an EU tax rule {on what constitutes a stills – as opposed to video – camera} )
- will retail body-only for around $7000!
- {Not as cheap as the 5D Mk.II then…}
- Canon 500D
- http://www.cameralabs.com/reviews/Canon_EOS_500D_Digital_Rebel_T1i/lens.shtml
- {Great site, reviewing it and breaking-down the tech-specs.}
- Thanks to its APS-C sensor size, all lenses effectively have their field of view reduced by 1.6 times.
- {This is smaller than the 5D’s full-frame but still not bad at almost an inch wide, which I take to be about double that of my EX3’s “Half-Inch” sensor}
Posted in 35mm, Canon, rolling shutter, sensor, Sony EX XDCAM, Uncategorized | No Comments »
Sunday, November 27th, 2011
Decades ago I was an avid DX (e.g.shortwave) radio listener / band-scanner / radio ham. At that time, of the “cold war”, tining around the short waves revealed strong German language stations on unusual frequencies starting with four rising notes on a slightly violin-sounding crude electronic synthesizer. This was followed by a woman (dubbed by some as “Magdeburg Annie”) reading five-figure number groups, apparently to spies. Intriguingly, the german numbers were read in some kind of non-standard form, which my german teachers at school could not recognize. To me they sounded like “zvo” (zwie/two), “fun-ef” (funf/five) and “noi-hen” (noin/nine), and maybe another one “trinnif” that I never figured out. I wondered if these were nautical german pronunciations, but now it seems they were East German spy number-pronunciations. So guess that puts my German teachers in the clear!
Anyhow, in a burst of nostalgia, I now want audio copies to use as ringtones on my phone. Google [numbers stations] revealed the following sites linking to downloadable audio recordings (mp3 and wma files):
Posted in dx, Uncategorized | No Comments »
Tuesday, November 22nd, 2011
I have access to a Canon DLSR and am considering getting a 35mm adaptor for my existing EX3 camera.
A colleague recommended the following lenses:
- Canon 16-35mm f/2.8 L USM
- 24-70mm f/2.8 L USM (~£1K)
- 70-200mm f/2.8 L IS USM (~£1.7K)
- 24-105mm f/4 L IS USM (~£900)
- 50mm (fixed) f/1.8 (~£70)
Posted in 35mm, lens, Uncategorized | No Comments »
Friday, November 11th, 2011
I bought a discount copy of Adobe CS5.5 Production Premium, because (after much discussion with others) its feature-set seems to match my typical and forseeable production requirements more than those of other NLEs, including my current mainstay, Sony Vegas 9 (which I am still trying to wean myself off, but when any proper job comes along, I tend to fall back on the familiar and trusted, for low risk including avoidance of learning-delay).
Being (so far) a one-man-band who is traditional Windows user, I purchased the Windows version. But, confirming what I had heard, it does seem that most media people I have met use Macs. So should I have purchased the Mac version? Are the versions exactly the same or have they different functionalities? Is there an option for the license to cover installing the same product on both Windows and Mac OS provided only one of them is run at a time? (e.g. when on the same physical machine). Ideally at zero or negligible cost of course. For example Avid Media Composer does have this flexibility. While the uncertainty remains, I will not open the box (in case it turns out that I need to exchange it).
Here is what I have learnt so far (mainly from web-searching, unverified information):
Differences between the OS-Specific variants:
- It appears that for CS5.5 Production Premium (at least), the Windows variant has slightly greater functionality.
- However it remains to be seen what will be the case for CS6, when it becomes available.
Some options are:
- Volume licensing.
- Intended not only for businesses but also for individuals. If the “volume”is for two licenses, they can be for each of the OS’s.
- Crossgrade.
- But as far as I can tell it’s intended only for one-off (or infrequent) crossgrades, requiring “destruction of the software” on the old machine each time. Shame it isn’t simply happy with repeatable deactivation/reactivation on each machine / OS.
(more…)
Posted in activation, Adobe, After Effects, Boot Camp, Mac, MacBook Pro, Premiere, Uncategorized, Windows, Windows 7 | No Comments »
Wednesday, November 9th, 2011
Some Accomodation Options:
- Bed & Breakfast
- Independent Hotel
- Best Western
- Express by Holiday Inn
- Hilton
- Holiday Inn
- Ibis
- Marriott
- Ramada
- Travelodge
Posted in Uncategorized | No Comments »
Thursday, October 27th, 2011
This is a problem I encountered some time ago, when I was running Boot Camp v3.1 on my MacBook Pro. Since then I upgraded to v3.2. I know there’s a v3.3 around but before upgrading I thought it worthwhile to see whether v3.2 had fixed that problem (especially since I couldn’t rule out the possibility of v3.3 reintroducing it). Only one thing to do: prevaricate test.
- Copy file from GRaid Mini (GRm) to Desktop:
- 2GB fine
- 12GB appears ok initially but then fails (to zero b/s transfer rate, then the Grm device “no longer exists”, at least until reboot)
- Reverse: 2GB fails (same way) almost immediately.
OK not good thus far…
Next tried an alternative approach: run W7 as a Virtual Machine on Mac Os via Parallel. I have Parallels v6. Forum search revealed that there is no FW support in either v6 or v7, though the developers seem interested in knowing why people want it.
- 2GB GRm to W7 Desktop: ok
- The reverse: ok.
Had to stop there due to other work – and a very full W7 disk.
The next workaround to consider is attaching a NAS. Ethernet bandwidths can be 1Gbps, hence more than FW800’s 0.8 Gbps, though I wonder if there could be any issues of lag / latency in this approach. I’ll do some research and put up another post about this idea.
Posted in building, file mgt, FireWire, gigabit, MacBook Pro, Networking, Parallels, Setup, storage, test, Uncategorized, Video Computer Technology | No Comments »
Thursday, October 27th, 2011
Oops, this is one post I left in “Draft” too long. It was about the weekend before last…
Spurred on by Den Lennie’s tutorials on shooting B-Roll, I grabbed the camera (EX3) and filters etc. to have a “play” in the garden, shooting stuff to edit together into a pleasant sequence of some sort.
The intention was to present the floral aspects of the property in an elegant easy-going fashion with occasional quirks like my girlfriend. While shooting, the dog (a toy poodle) kept pestering me for attention, because obviously the only important thing in the world is playing ball. It seemed best to “go with the flow”, so I assigned said canine a principal role.
This turned out to be a 4-hour shoot (with interruptions) of about 150 clips total duration about an hour. It took another 4 hours at least (with interruptions) to ingest, catalogue and convert the clips (into MXF, for Sony Vegas) and probably about 8 hours of editing, plus a little further shooting etc. In an ideal world there’d be no need to grade, but in reality some tweaks were necessary for continuity, especially since the lighting (sun/cloud) conditions were very changeable.
Hopefully I’ll get it finished soon,along with the rest of my backlog, which now includes a Diwali corporate event and wrangling / editing my own version of a music video in good old faithful Final Cut Pro 7.
Posted in moviemaking, Uncategorized | No Comments »
Sunday, October 16th, 2011
A misty sunrise into a clear sky today, here from my girlfriend’s eastwards-facing rural location. Didn’t actually point at the sun as the main thing of interest was the mist, which I wanted to see swirling and evaporating and glowing orange etc. as the sun came up. Shot time-lapse for about 2.5 hours, this being about 1 hour 20 mins (rounded figures) before and after sunrise.
The result is at http://vimeo.com/30602784
Chose to use manual exposure, partly to emphasize magnitude of the change in lighting (auto exposure would have reduced this impression) and partly because in any case the pre-dawn shots required frame acumulation mode, hence a discontinuity when I inevitably came to switch out of that (to avoid the camera being dazzled).
In the edit (in Sony Vegas), initially straight-cut the differently-exposed clips together (in sequence). But the result, when played, jolted uncomfortably at each cut. Tried smoothing the levels-change, via Levels FX, but didn’t look that great. Imagined an “Iris” effect. Ended-up with the “Iris” transition,which gives the appearance/hint of stopping-dow, exactly as needed here. The next “candy” item was the vignette. Added in post (Sony Vegas) via feathered Mask. Also some video de-noising and finally some text dissapearing into its own “mist”.
It played too quickly – all over in about 30 seconds. I wish I’d shot it one frame every second instead of every 10 seconds. Then again I need copyright-free music of sufficient duration as background music. I found some free 30-second-ish music slips that are free for non-profit use at http://www.royaltyfreemusic.com. Might try stretching this (interlaced) video to (motion-compensated) double-framerate, then half-speed, some other time. Note that Vimeo has its own Music Store for soundracks etc., some of which are free (Creative Commons license).
Rendered to H264 for uploading to Vimeo, using settings advised at http://vimeo.com/help/compression .
Camera settings:
- Time:
- Started filming at about 6am
- Sunrise officially at 7:24
- Completed filming at about 09:00
- Constant settings:
- Gamma STD3
- No particular reason, just looked ok for the extremely dark pre-dawn shots.
- HQ 1080/50i
- Timelapse: 1 frame per 10 seconds
- Too fast – wish I’d used 1 fps
- WB: 6100 K
- Gain -3dB
- Shutter 1/60 sec
- Exposure (manual, varied in steps)
- For pre-dawn darkness at 06:00: f1.9, standard gamma, frame accumulation (64 frames)
- For dawn: no frame accumulation
- At 5 mins before sunrise: ND1 filter (1/8)
- At 10 mins post sunrise: f3.4
- At 25 mins post sunries: f5.1
- At 40 mins post sunrise: ND2 filter (1/64), f3.1
- Subsequently, searched on web to see what other people did:
- Google: [sunrise time lapse]
- http://www.digitaljuice.com/community_forums/tm.asp?m=121804
- Title: “Tips on how to shoot sunrise time lapse”
- Q: I need to shoot a sun rise time lapse. I’m trying to figure out the best way to go about it. Do I use a ND filter from the start? Do I leave in auto iris or do I have to stay by the camera making constant adjustments as the sun rises?
- A1: Depends how long you want the shot to last. I did one the other month that went from 2 hours before sunrise to 3 hours after, no ND, auto iris. Mind you, my camera ranges from F1.9 to f16, so it managed it fairly well. Obviously the sun blew out, but not much else in the scene did, when I ended the shot, everything was exposed correctly.
- A2: I’ve shot probably a hundred sunrises/sets. I generally shot 10-30 minutes and then shortened it to 1 frame a second. Autoexposure will work (I almost always shot this way), but you can get a nice effect going from blackness to light with a locked exposure too.
Posted in Sony EX XDCAM, sunrise, timelapse, Uncategorized | No Comments »
Sunday, September 25th, 2011
To open the iPhone’s “Task Manager”:
- From “Home” screen, double-tap the Home button. This brings up a mini dock / task manager at bottom of screen. It is a slidable band of icons, only four of which can be fitted on screen. Slide left to see other icons. Slide right to see media player transport controls and volume level slider. Press-hold any icon to get them all wiggling and with a red “X” on them. In each case, the “X” force-quits the task associated with the icon.
If an app is misbehaving or is exhibiting unusually sluggish performance, you could try quitting tasks for apps not currently in use as they each tie up some portion of memory, even while in a suspended state. If that does not work, try a power-off/on reboot. After that there is Hard Reset (though when I tried it, it didn’t reset everything). To Hard Reset, press and hold both the Sleep/Wake button and the Home button for about ten seconds, then you should see the Apple logo indicating reboot.
(more…)
Posted in iPhone, tidy, Uncategorized | No Comments »
Friday, September 23rd, 2011
There exist various HD-SDI device to record 10-Bit 422 video data. 10 bits is useful for shallow gradients especially when expanded (steeper contrast curve) by grading, while 422 gives better detail, that can matter when pixels are big (e.g. when close to a big screen or when digital zoom employed in post). In any case, such recorders tend to compress less than on-board camera systems, or in some cases not at all, improving the quality. But to what extent can the various NLEs cope with this? From my web searches it seems that the answer is “sometimes”. For example some NLEs will accept 10-bit only in their own favourite formats, otherwise they discard two bits, interpreting the footage as 8-bit. One might (naively) have thought the way to be sure was to experiment – but there is plenty of room for confusion when doing experiments, for example Avid’s color correction tool allegedly only displays to 8-bit resolution even when it is importing/processing/exporting at 10-bit. Other “loopholes” may exist, like it seems (if I understand it correctly) that if you AMA or import 10-bit ProRes then Avid only sees 8-bit, implying one needs instead to transcode ProRes->DNxHD externally (e.g. via MPEG StreamClip?) and import that. But even that might not be possible, as one post suggested DNxHD 10-bit encoding could only work from Avid, not external apps. Furthermore, whereas all ProRes formats handle 10-bit, for DNxHD, only formats with an “x” suffix do; the only one I know of is DNxHD 220x. There exist further subtleties/loopholes/pitfalls, hence more research to be done on this… and I’ll tread very carefully…
(more…)
Posted in 10-bit depth, Apple, Avid, DNxHD, Final Cut, NLE, ProRes, QuickTime, transcode, Uncategorized | No Comments »
Thursday, September 8th, 2011
When you purchase Avid Media Composer, you also get a set of other applications, whose purpose (at least to the newbie) is not immediately obvious. So I did some investigation and produced a summary of them, as below. I have no experience of actually using them, I just trawled ReadMe files and (mostly) the web. Here are my (interim) conclusions:
- Avid TransferManager – Is e.g. for uploading to a Playback Server [http://blog.davidesp.com/archives/274]
- AMA – the camera-specific AMA Plugins (e.g. for Sony XDCAM) are no longer bundled with MC, you have to download and install them separately. [http://blog.davidesp.com/archives/316]
- Avid MetaSync automates the inclusion of metadata (expressed in suitable XML formats) into Avid editing systems, including synchronisation with video and audio. The metadata can be anything from subtitles / closed captioning to synchronized entertainments such as lightshows or simulator rides. [http://blog.davidesp.com/archives/334]
- Avid MetaFuzes primary, if not only purpose is to prep files for Media Composer use – an outboard importer. Avid’s article at http://www.avid.com/US/industries/workflow/MetaFuze summarises it nicely. Though bundled with Media Composer, it is also available free. That means for example that preprocessing work (e.g. generation of burnt-timecode proxies and online files) can be generated (e.g. in DNxHD) by anyone whether or not they have an Avid system. Potentially then a great option for breaking up work into collaborative / parallel workflows. [http://blog.davidesp.com/archives/335]
- Sorenson Squeeze – a well-known compressor/encoder, bundled as part of Avid Media Composer (MC) but also an independent product in its own right. Avid MC5.5 specifies version v6.04 but further updates are available from Sorenson itself. There is a free-to-Avid-users update from v6.x to v6.5. The latest version is v7.0 (with CUDA). Presumably these later versions are officially unsupported by Avid (but how much does that matter in practice?). [http://blog.davidesp.com/archives/337]
- Avid EDL Manager imports and exports EDL (in various flavours) – from/to a bin (e.g. thumbnails storyboard layout?) (or a Sequence or MXF file?). It can be run stand-alone or from within Avid. EDLs are somewhat of a hangover from the past, so it’s unlikely to be of much use in my case, but worth knowing about as an option, and as such still features in other people’s current workflows. [http://blog.davidesp.com/archives/350]
- Avid Film Scribe generates Cut Lists and Change Lists (used in transfer from video edit to film edit) in more contemporary formats than EDL, e.g. XML formats involved in VFX / DPX workflows (? I am on very unfamiliar ground here ?). It can generate such formats from a Sequence and also it can be used to translate between some formats.[http://blog.davidesp.com/archives/352]
- Avid Log Exchange (ALE) is an Avid log file format that has become a de facto standard in the post industry. It is a text-based metadata exchange format used in applications from telecine to standalone logging applications, and is supported by many NLEs. The ALE format is based on a Comma or Tab -delimited file format. [http://blog.davidesp.com/archives/353]
- Avid After Effects EMP is (not a disruptive elctronic weapon but) an Avid-supplied plugin for Adobe After Effects allowing that application to use a DNA family video output box such as Mojo (“ordinaire”) or Nitris to provide External Monitor Preview (EMP) on a monitor. Helpful in order to make use of that Avid box for the Adobe After Effects application, both for convenience and consistency. Unfortunately it does not work with the more recent DX family, such as the Mojo DX box. [http://blog.davidesp.com/archives/354]
- The Avid DNA Diags application is for diagnostics on DNA family e.g. Mojo “ordinaire” (not DX) [http://blog.davidesp.com/archives/355]
- The Avid Quicktime Codecs extend QuickTime for encoding and decoding to/from Avid codecs such as DNxHD. Essentially they add such formats to QuickTime on your system. The LE codecs are Light Edition – only needed on systems where Avid is not already installed. [http://blog.davidesp.com/archives/356]
- Avid Media Log is a standalone app supplied with Avid systems enabling assistants on non-Avid machines to select and log raw (as opposed to RAW) footage in a manner that can easily be transferred into an Avid session/system elsewhere, where the result appears as an Avid Project. Apparently, Media Log is much like the digitize tool on Media Composer. But Ive never used that either
It can output e.g. to ALE (explained below) and hence e.g to other NLEs. [http://blog.davidesp.com/archives/357]
- Misc “Avid Downloads” (?) Looking at my Avid Downloads page, there is a much larger list of items than I expected, and suspect that many of them are not relevant. For example, what is Avid Deko? Its listed on my Avid Downloads page, though I dont know if I would be able to activate it, or whether it would be worth the trouble. Its listed as Deko 2200. So I googled and YouTubed about it
Impression: that version (2200) is very obsolete. [http://blog.davidesp.com/archives/332]
- On my web “travels”, I discovered a great article entitled “The Avid Ecosystem” at [http://digitalfilms.wordpress.com/the-avid-ecosystem/], listing many of the resources for the Avid world: links, tutorials, filters, applications, training
- It’s helpful to see some of the above items in the context of illustrative workflows, e.g.:
Posted in AAF, ALE, Avid, conform, consolidate, CUDA, Deko, DNxHD, EDL, logging, Media Composer, MetaFuze, MetaSync, MXF, NLE, PhraseFind, QuickTime, Sorenson Squeeze, transcode, Uncategorized, XML | No Comments »
Thursday, September 1st, 2011
I am interested in a new PHU-60 hard disk for my Sony XDCAM-EX video camera. So what’s around, and what’s the cost? While I’m at it, what other options are there, e.g. for recording off HD-SDI ? From my web-research today, the answers seem to be:
- PHU-60 is no longer supplied or supported by Sony, or hence their authorised service centres.
- PHU-120 is however available, at just under £1K.
- At that price I’m willing to consider alternatives… Depending on price and capacity of course.
- Mend it?
- Record to a standard hard disk?
- Go instead for SxS etc., e.g. the cheaper alternatives.
- Think bigger – go for a HD-SDI recorder, get better quality and more gradeable recordings! But at what price?
- (To be completed)
(more…)
Posted in DNxHD, ProRes, recording, SDI, Uncategorized, XDCAM EX | No Comments »
Sunday, August 21st, 2011
These are standalone tools I have seen (on web) others using to transcode from various formats into Avid formats such as DNxHD. Of course, that’s also achievable from within Media Composer (e.g. by its Consolidate/Transcode feature), but a stand-alone tool encourages parallel, and hence possibly collaborative, workflows in post-production.
- Metafuze – Avid’s own such program
- TMPGEnc Xpress
- MPEG StreamClip ?
Posted in Avid, DNxHD, Encoding, Media Composer, Mpeg StreamClip, transcode, Uncategorized | No Comments »
Wednesday, August 17th, 2011
I want to synch my iPhone with Outlook, but the standard way, via iTunes, …well…, involves iTunes (that I don’t want). Is there an alternative? The answer seems to be that you can synch but it has to be via another server, be it Google Mail or a specialised third-party product. The simplest way to synch Outlook to Google Calendar is by using a downloadable app from Google. Further details and options are given below (under “More” or whatever).
(more…)
Posted in iPhone, iTunes, self-organization, Uncategorized | No Comments »
Wednesday, August 17th, 2011
Sony Vegas allows chains of effects (“FX”) to be built up, which can optionally be exported or imported as FX Presets. Some generous people on the web have offered their own FX Presets to achieve “Movie Looks” (dramatic looks) of various kinds. These are more about emphasizing different kinds of mood than achieving clinically pure or film-grainy image quality. Further details below…
(more…)
Posted in Cineform, FirstLight, grading, Sony Vegas, tutorials, Uncategorized | No Comments »
Tuesday, August 16th, 2011
Installed SmartSound Sonicfire (“The Music Score for Your Vision”). Wanted to install version 5.5.2, from Avid MC 5.0 install disk (it is unchanged in MC 5.5), but the installation hung (problem with disk or at least incompatible with my MBP’s reader?). No download was available for this product on my Avid Download account, while on the SmartSound website, only the latest version (update), namely 5.7.0 (on Windows, else 5.7.1 for Mac) could be downloaded. However that downloaded and installed fine. The Sonicfire app also pulled in some additions to its sound library, initially from the web and subsequently from SmartSound’s Core Sessions disk (which was fully readable); spontaneously once I inserted it.
(more…)
Posted in audio, Avid, Media Composer, Music, Sonicfire, Uncategorized | No Comments »
Monday, August 15th, 2011
Avid Log Exchange (ALE) is an Avid log file format that has become a de facto standard in the post industry. It is a text-based metadata exchange format used in applications from telecine to standalone logging applications, and is supported by many NLEs. The ALE format is based on a Comma or Tab -delimited file format.
(more…)
Posted in ALE, Avid, logging, Uncategorized | No Comments »
Saturday, August 13th, 2011
Sorenson Squeeze – a well-known compressor/encoder, bundled as part of Avid Media Composer (MC) but also an independent product in its own right.
- Avid specify a specific version but also it is available from Sorenson itself in various updates.
- The MC 5.5.2 manifest specifies a specific version of Squeeze, namely 6.0.4.
- I choose instead Sorenson’s own update for Avid users, namely v6.5.
- The reasoning is below (under “More…”).
- Also activated the “free MP3 Codec” bundled with Squeeze.
(more…)
Posted in Avid, Media Composer, Sorenson Squeeze, Uncategorized | 1 Comment »
Saturday, August 13th, 2011
Avid MetaSync automates the inclusion of metadata (expressed in suitable XML formats) into Avid editing systems, including synchronisation with video and audio. The metadata can be anything from subtitles / closed captioning to synchronized entertainments such as lightshows or simulator rides. For closed captioning, it works particularly well with Final Draft and Evertz ProCap (both sold separately). Thinks: can it be made to work with CeltX or some home-grown VBA-based XML-generator from Access or Excel ?
- http://www.avid.com/us/partners/AvidMetaSync
- Avid MetaSync
- Avid MetaSync allows users to synchronize virtually any kind of metadata with video and audio content during the postproduction process. The MetaSync feature is now standard within Windows-based versions of Media Composer and NewsCutter products.
- Avid’s MetaSync technology enables postproduction professionals to tap into new revenue streams such as closed captioning, subtitle text insertion, digital rights management, and interactive TV content as well as “converging media” such as motion simulation rides, movie theatre effects, internet devices, and interactive toys. All of these applications can be made to react to triggers embedded within standard film, video and TV content.
- As long as a file type or process can be represented in the appropriate XML format, it can now be imported into Avid editing systems using the MetaSync feature and synchronized with video and audio. In the timeline, pointers to the original file can be positioned, trimmed and edited just like video and audio clips. The file can then be launched in its original format from directly within the Avid system to be viewed or updated, and any changes made are instantly reflected in the timeline and bin.
- Avid MetaSync Workflow
- In today’s typical scenario, one team will work on a show’s narrative content while a separate team works on the metadata elements of a program in a remote location, often at a different time altogether. Using the MetaSync feature, the Avid Editor, linked to a LAN or WAN, can edit metadata directly into the program while it’s under development. This allows the Editor to provide real-time feedback to the metadata content developers during the postproduction process.
- Using the MetaSync refresh capabilities, the Avid Editor can update the metadata content within a show as it’s being refined. This allows the Editor to suggest changes based on how well this data is working within the actual video and audio elements of the program. The end result is higher quality programming with metadata elements more finely integrated with standard video and audio content.
- http://www.camcorderinfo.co.uk/content/avid_metasync_automates_creation_04_18_03.htm?redirected=www.CamcorderInfo.com%2Fcontent%2Favid_metasync_automates_creation_04_18_03.htm
- The Avid MetaSync technology will work in conjunction with scriptwriting software provided by Final Draft, and ProCap authoring systems from Evertz, to create closed captioning and subtitling directly in the Avid timeline during the editing process. This practice will eliminate the separate step of incorporating this type of information into programs after finalized broadcast masters have been created.
- In their press release they say the captioning and subtitling creation process for editors using Avid systems, is a simple as, importing the script dialogue directly from Final Draft and aligning it with the appropriate video content on the Avid timeline. Once editing is complete, both the video and the captioning information are fed through the Evertz ProCap system and caption-encoder, which insert the captions and subtitles into the final broadcast format, according to industry standards and specifications.
- Governments worldwide are mandating the adoption of closed captioning, and broadcasters have been looking for easier ways to streamline what has traditionally been a labor-intensive and time-consuming process, said Ray Gilmartin, senior product marketing manager for Avid Technology. “Avid offers the perfect solution to meet their needs. Not only do MetaSync, Final Draft and Evertz ProCap make creating closed-captioning and subtitling almost effortless, but the process can now begin before the program is finished, saving producers valuable time as they strive to make tight broadcast deadlines.”
- Avid MetaSync comes standard with all current versions of the Symphony, Media Composer, Avid Xpress and NewsCutter, systems, as well as the new Media Composer Adrenaline, NewsCutter Adrenaline FX, Avid Xpress Pro and NewsCutter XP systems announced today. Final Draft and Evertz ProCap are sold separately and are expected to work with Avid MetaSync to create the automated closed captioning and subtitling workflow in the second quarter. For more information about Avid MetaSync or Avid’s other products and services, please visit www.avid.com.
Posted in Avid, Media Composer, MetaSync, Uncategorized, XML | No Comments »
Friday, August 12th, 2011
Updating Avid Media Composer (MC) to v5.5.2:
- I purchased an update from Avid Media Composer (MC) v5.0 to v5.5.
- Actually I purchased PhraseFind, with which the MC 5.5 upgrade was bundled for free.
- Following the purchase, I received an email with dowload links for PhraseFind and for MC 5.5.1.
- I subsequently became aware that MC 5.5.1 had been superseded by an update to MC 5.5.2.
- Two routes to this latest version were possible: update-patch or stanalone-install.
- Advice from a “guru” on an Avid forum confirmed my instince: go for the standalone install.
- I chose to follow that advice.
- I downloaded a combined installer forMC 5.5.2 and PhraseFind.
- Installation procedure:
- First I uninstalled all Avid-associated software and started from scratch.
- No need to deactivate before uninstall since I am using a dongle, not activation.
- Installed the new MC version (with PhraseFind) with no problems.
- Went about installing the Avid Production Suite applications, such as Boris, Sorenson Squeeze, Sonic DVD.
- See separate posts on each of these items.
(more…)
Posted in Avid, Boris, Media Composer, Sorenson Squeeze, Uncategorized | No Comments »
Friday, August 12th, 2011
Some software requires user-config to define whether OpenGL etc. are available. What has my MBP got in terms of graphic card, and what aspects of it are available under BootCamp>Windows? Below are some answers:
Posted in graphic card, MacBook Pro, test, Uncategorized | No Comments »
Saturday, July 16th, 2011
Topics:
- How to choose an appropriate UPS
- What “Added-Value” features are contemporary
Google: [“uninterruptible power supply” uk]
Posted in Uncategorized | No Comments »
Saturday, July 16th, 2011
General & Surveys:
- Google: [storyboard lighting camera blocking animation software]
- Previzualization (general subject & software review)
- 3D Animation Software (general review)
- CeltX and StoryBoards
Specific Applications:
- MovieStorm
- (From Google: [storyboard lighting camera blocking] )
- http://en.wikipedia.org/wiki/Moviestorm
- http://www.youtube.com/user/Moviestorm
- MovieStorm’s YouTube Channel – Instructional videos and demo productions
- http://www.moviestorm.co.uk/
- Virtual studio, cameras, blocking….
- Like a mini NLE: tracks, video, audio (library), used by some to produce films for YouTube.
- Mainly prefab hence easy to use (but therefore restricted) – though can expand on props.
- Modders Workshop (tool) allows creation of ‘props’ and a wizard allows the direct import of models from Google SketchUp version 6.
- FrameForge:
- http://www.frameforge3d.com/watch-demo/
- http://www.frameforge3d.com/Products/
- FrameForge Previz Studio comes in three versions: Core, Pro, and Stereographic 3D
- Create a virtual 3D set in your computer with the freedom to place any number of virtual cameras in any placement, angle or height desired. Each camera features full Pan/Tilt, Dolly, Zoom, Roll and Crane control with the options to limit focal length to a specific zoom range or set of prime lenses, limit minimum and maximum heights (due to equipment limitations or physical ceilings) to accurately portray the actual range of your equipment.
- FrameForge is not about your mastery of the pencil but more how you can explore and see what your actual equipment will see.
- Blender
- Virtual Light Lab
- DAZ 3D
Posted in 3d animation, Blender, Daz 3D, moviemaking, storyboard, Uncategorized | 1 Comment »
Friday, July 15th, 2011
Backup & Restore via Disk Utility (DU) – on Mac OS install-disk – to a fresh hard-drive:
- Routine: http://support.apple.com/kb/ht1553
- Complication: Backed-up not the whole disk but aMac OS partition alongside a Boot Camp partition.
- DON’T: Naive use of Disk Utility (DU) to restore straight away the partition (as a sole partition) from backup doesn’t work – it won’t boot.
- You may see a grey Mac OS screen with “No Entry/Parking” sign, or error messages about ACPI drivers not present.
- Attempts to install (fresh or archive i.e. user file preserving mode) from install disk fail since disk is not bootable.
- Error message: “Mac OS cannot start up from this disk”
- DO: Try install fresh OS X from install-dvd, then use it to create Boot Camp partition (and presumably boot-selection menu) then restore (with erase) to the OS X partition (only). To save time (hopefully), didn’t actually install Windows.
- Both the fresh-install and the restoration of OS X took about an hour.
- Yes it worked! Booted into Mac OS just fine.
- Left it to “settle” a bit – e.g. until CPU level down around zero.
- Restart in Shift-Boot mode (to refresh OS’s tables etc.) and log-in as “DefaultEverything” (dummy user created as per advice – I think from Larry Jordan). Maybe should have done that the first time…
- Restarted in normal user account, again left awhile.
- Boot Camp Assistant:
- Create a partition (e.g. divide disks space equally between the two partitions)
- (takes a minute or two – progress bar is initially misleadingly stationary)
- Select [Quit and install later]
- All we wanted was the partition, to restore into.
- Started WinClone (App, started from MacOS)
- It appeared to first scan the backup then began to install it. Not quick, maybe an hour for each of these (two) tasks.
- Source partition was 232.57 GB – as compared to the destination partition of around 250 GB.
- Alt-Booted into W7 just fine.
- Being on the internet, it began downloading numerous system updates – furiously (like it was hard to web-browse even on another computer on the network.
- Correspondingly, on ShutDown, W7 installed numerous (61) updates. Took ages – so if ever repeating such a recovery, allow for this…
- Also on subsequent start-up, updating & registering stuff – took a few minutes – wish I’d run it straight (boot camp) not within Parallels. But it seemed “happy”.
- (to be continued…)
(more…)
Posted in backup, Boot Camp, disk, Mac, MacBook Pro, Snow Leopard, Uncategorized | No Comments »
Wednesday, June 8th, 2011
- London Underground (“Tube”) http://www.tfl.gov.uk/tfl/corporate/media/lufilmoffice
- Student/Non-professional permit:
- Crew max Five; Lightweight, handheld equipment only.
- Fee £40 (inc VAT) – Valid one month from issue
- “We generally need 2-3 weeks notice to process applications, but dependent on the request we can some times turn these around more quickly”
- Great video of film-making on the Tube, at http://www.tfl.gov.uk/tfl/corporate/media/lufilmoffice
- River Thames
- Filming and photography on the River Thames requires the prior written permission of the Port of London Authority, http://www.portoflondon.co.uk
- http://www.pla.co.uk/display_fixedpage.cfm/id/4051/site/pla
- The Port of London Authority (PLA) owns and operates Richmond Footbridge, Lock and Weir, situated between Teddington and Richmond, which offers a wonderful location for any type of film and television productions as well as still photography.
- permission to film on or by the Thames requires a filming license issued by the PLAs Corporate Affairs department.
- Location “scouting”: Some on-line film clips: http://www.pla.co.uk/films.cfm
- Buses
- http://www.tfl.gov.uk/corporate/media/4933.aspx
- “We don’t usually allow filming on buses that are actually in service. However, outside peak commuter hours you can hire a bus that will look like the bus on the route you wish to film, complete with driver.”
- “In most cases you will need to give at least seven days’ notice.”
Posted in moviemaking, Uncategorized | No Comments »
Wednesday, June 8th, 2011
Avid’s AMA allows direct use of media files in proprietary formats such as XDCAM-EX (BPAV folders etc.) , no need to import, just link. However there are limitations, according to the Sony XDCAM and XDCAM EX AMA Plug-in Guide (as of 2011-06-08, relates to Media Composer 5.0):
- No automatic relinking:
- If the path to the AMA media changes (e.g. when files moved or a drive’s letter gets accidentally changed) then error message complains “Offline”.
- Windows UNC (Universal Naming Convention) paths are not supported with AMA media.
- To link AMA media, map it to the drive.
- The Dynamic Relink option is not supported with AMA clips.
- Avid does not support MultiCamera editing with AMA clips.
- When the AMA setting is activated (default), the traditional import options [File > Import P2 (and Import XDCAM Proxy)] do not appear in the File menu. Deactivate the AMA setting and restart Avid to display those option.
- But only AMA mode preserves the XDCAM metadata e.g. from camera settings and (presumably) any user/clip/log information entered via Sony’s Clip Browser.
- You should not mix workflows. Either use the AMA method or use the traditional import/batch import method.
- Some suggested workflows:
- The following gives a great practical guide, based on a range of shoot-types (news, doc etc) and also explains aboutRELINKing from AMA to media that has been copied to Avid storage.
Posted in Avid, Media Composer, Uncategorized | No Comments »
Monday, May 23rd, 2011
Here, I set up a home network. <<Actually this happened about a year ago but only just publishing it now>>. Already I have a small bunch of machines (of various ages) linked either physically (ethernet cable) or wirelessly (WiFi) to a WiFi router-modem onto ADSL. Currently these machines simply use that arrangeent for their own individual internet access. What I want to do is enable some resource-sharing, in particular onto a WiFi hub to be connected to a printer and a hard disk, but also to allow (temporary) access between machines for occasional ad hoc file transfers.
- First, ensure all PCs have easily identifiable names and belong to the same Workgroup (the typical method is to leave this at default i.e. “WORKGROUP” but note that XP’s Network Wizard defaults instead to “MSHOME”).
- For XP:
- From [http://windows.microsoft.com/en-US/windows7/Add-a-device-or-computer-to-a-network]
- Log on to the computer as an administrator.
- Click Start, right-click My Computer, and then click Properties.
- Click the Computer Name tab, and then click Change.
- If the workgroup name is not WORKGROUP, change the name to WORKGROUP, and then click OK. Otherwise, click Cancel to close the Computer Name Changes dialog box.
- If you have to change the workgroup name, you will be prompted to restart your computer.
- Next, established whether TCP/IP communication was working OK:
- Gathered a small bunch of computers together for testing.
- From CMD, obtain IP numbers of each computer.
- From each computer, try pinging each of the others.
- Initially had some problems here:
- None of the Windows computers were pingable from any other computer, but that the non-work Windows computers could ping the MacBook Pro.
- The work Windows computer was unable to ping anything.
- On the other hand, they could all ping certain external internet sites e.g. www.grc.com. Some others, such as CNN, reject pings (as possible attacks).
- The problem was in the Firewalls.
- Initially tried the crude solution of disabling the software firewalls.
- Still protected by router firewall. A grc.com test showed all was still well.
- Nevertheless, looked for a more finely-tuned solution…
- Old Compaq: Disabled Windows Firewall. Now it was pingable. Re-Enabled Windows Firewall. It was still pingable. Maybe I succeede in unblocking something?
- Newer desktop with Kapersky: [Firewall > Filtration System > Zones > Settings]
- Now the pings worked OK.
- On PCs, in Windows Explorer, check out My Network Places to see if the other machine showed up.
- Desktop: My Network Places > SharedDocs on OldCompaq
- OldCompaq: My Network Places > Entire Network > Microsoft Windows Network > Workgroup
- It could see itself and the other machine.
- However the other machine required a password. What password?
- Solution: re-run the Network Wizard on the Desktop, this time (unlike before), enable File & Printer Sharing. Now it worked fine.
- Also the PCs were visible on a Mac.
- Now to make the Mac share to the PCs:
- Enable Windows Sharing on macintosh.
- http://articles.techrepublic.com.com/5100-10878_11-6127492.html
- Finally, looking at Windows 7 as a Virtual Machine under Parallels 5 on a Mac:
- Its default WorkGroup name is WORKGROUP, hence it sees the other machines OK. And it can access their shared folders. But those machines cannot see its files. Solving this problem does not seem so trivial, so I will work on it later and post its solution separately.
Posted in Networking, Setup, Uncategorized | No Comments »
Sunday, May 8th, 2011
- http://www.avid.com/static/resources/common/documents/mxf.pdf?featureID=997&marketID=1
- My Interpretation:
- OMF is Avid’s ancient container-format, now superseded by MXF.
- MXF is container format, it can contain both media and metadata.
- AAF is a metadata representation that can be used within MXF.
- Furthermore, the AAF metadata in an MXF file can be mapped into an AAF file [.aaf].
- AAF defines arrangements of pieces of media and also effects. I guess it’s kind-of like a timeline then (?)
- For XDCAM-EX, does the AAF Export process essentially make [.aaf] files that glue together the (content of the) [.mp4] files recorded by the camera?
Posted in Uncategorized | No Comments »
Sunday, May 8th, 2011
Issues:
- In this blog, I never moved beyond novice newbie level of WordPress use. I’m using the WordPress service that comes as part of OneAndOne’s hosting. I edit via their web-based editor, which I now realise is a widely used one, called TinyMCE. That editor is frustrating to use, not only because it is fragile and clunky but in particular if I try to break text into paragraphs then it removes the break, producing a single block of text. Surely there is a better way, but I have little time to invest in looking into this.
- The main workaround I have been using is to employ bullet-point lists. Each paragraph goes under its own bullet-point. The result doesn’t look too great but at least it’s better than monolithic blocks of text.
But there are other ways.
The simplest, I just discovered right now (by making a fortunate mistake) is to click the Indent button, even when there are no bullet points. This seems to put the text into a paragraph-respecting mode.
I wish I had found this a long time ago! Though it’s still a bit clunky/fragile, e.g. how come this very line didn’t get spaced only one line below the previous paragraph…
There is also another approach:
Can I upgrade the version of WordPress on my OneAndOne package?
Posted in blog, Uncategorized, Wordpress | No Comments »
Monday, February 21st, 2011
In principle, increasing the gamma primarily has the effect of boosting the mids. But that simple explanation does not cover everything:
- My experiences:
- In cameras, selecting different gamma curves also affects the general levels, typically reducing them (not simply boosting the mids).
- Doubtless because in a camera, the “focus” is on extending the latitude of the overall recording, to avoid blown-out highlights, as opposed to increasing the brightness of scene shadows etc.
- In Sony XDCAM EX, the precise behaviour of the gamma has been empirically determined.
- In Sony Vegas (version 9 at least), the 8-bits levels-space used is 0..255, as opposed to the broadcast-legal range of 16..235 adopted by most other Non Linear Editor (NLE) applications. Thus, the lowest level generated by a typical camera, namely 16, constitutes a “mid” and as such does indeed get boosted by Vegas’s own Gamma effect.
- A workaround might be, in Vegas, to apply Media FX to expand the levels range of the footage to 0..255, do all editing at that range then for the final delivery render, compress (linearly) down to 16..235.
In a linear space, a typical camera response curve is an S-curve where the bottom curve of the “S” is relatively short and the top curve of the “S” is long and drawn-out. So the camera is sensitive to low-light and then saturates early-on in high light. Presumably, if all we did was to alter gamma, then the bottom-part of the “S” would shorten (the response would “pick-up” earlier) and the top part of the S-curve would draw-out even more to the left, becoming even longer, tending to saturate earlier-on (with respect to light levels). However in practice a typical camera will at the same time reduce levels prior to the gamma curve. ???GET FORUM OPINIONS ON XDCAM EX DATA FLOW???. The overall result is a reduced gradient. This essentially extends the levels-range recorded while at the same time reduces the contrast range, giving a washed-out appearance. Meanwhile, in log-space, which is meaningful because that’s how the eye perceives brightness, the overall effect of such gamma is to make the (log) curve more linear. Presumably then the ultimate gamma curve would be logarithmic. I found something called S-log, which sounds a bit like that, at http://www.xdcam-user.com/tag/s-log/:
- <<Its Sony’s version of shooting RAW>>
- <<S-Log isn’t a very aggressive log curve. … most colorists just work with it as is without applying a LUT … (which can be done) with levels and gamma filters in any NLE. A true Log encoded file, like a log DPX, or LogC from an Alexa is a bit more extreme and you’re probably better off finding a LUT to decode.>>
- << if/when you shoot S-Log 8-bit, and you need to make it look normal or high-contrast … Then you’d be in trouble stretching that flat 8-bit image out.>>
Then at http://www.xdcam-user.com/?s=s-log
- <<the uncorrected image is so flat and washed out that it can make judging the optimum exposure difficult and crews using S-Log will often use traditional light meters to set the exposure rather than a monitor or rely on zebras and known references such as grey cards. For on set monitoring with S-Log you need to apply a LUT (look Up Table) to the cameras output. A LUT is in effect a reverse gamma curve that cancels out the S-Log curve so that the image you see on the monitor is closer to a standard gamma image or your desired final pictures. The problem with this though is that the monitor is now no longer showing the full contrast range being captured and recorded so accurate exposure assessment can be tricky as you may want to bias your exposure range towards light or dark depending on how you will grade the final production. >>
- <<In addition because you absolutely must adjust the image in post production quite heavily to get an acceptable and pleasing image it is vital that the recording method is up to the job. Highly compressed 8 bit codecs are not good enough for S-Log. Thats why S-Log is normally recorded using 10 bit 4:4:4 with very low compression ratios. Any compression artefacts can become exaggerated when the image is manipulated and pushed and pulled in the grade to give a pleasing image. You could use 4:2:2 10 bit at a push, but the chroma sub sampling may lead to banding in highly saturated areas, really Hypergammas and Cinegammas are better suited to 4:2:2 and S-Log is best reserved for 4:4:4.4. >>
http://www.abelcine.com/articles/index.php?option=com_content&view=article&id=574:an-introduction-to-log-and-its-uses&catid=52:digital-cinema&Itemid=100003
- << The LOG mode … captures what the camera is capable of discerning. Because the maximum range of sensor data is being recorded at all times, there is more range to create the desired look in post. In a REC709 video gamma (in contrast), an image may have a bright light source overexpose to white and dark shadow areas record as black. The same image recorded in LOG may have considerable detail on both ends of the exposure range, which in later color correction can be exploited, if so desired. >>
- << When footage is transferred with video gamma, it is meant for display (perhaps with minor adjustment applied later). When footage is transferred using the LOG CINEON curve, no artistic interpretation of the footage happens during the transfer the goal is to preserve the full range of possibilities for later adjustment. This footage will look very flat and dull when displayed directly on a monitor. >>
- << Most Digital Cinema cameras have a mode of recording or transcoding to a LOG curve. For example, Sony has S-Log (in the F35, F23, SRW-9000 and the PMW-F3), ARRI has LOG-C, RED has REDLOG, and Panasonic has FILMREC (which, while not technically a LOG curve, serves the same purpose). >>
http://www.xdcam-user.com/2011/01/when-should-i-use-a-cinegamma-or-hypergamma
- << In a perfect world you would control your lighting so that you could use standard gamma 3 (ITU 709 standard HD gamma) with no knee. Everything would be linear and nothing blown out. This would equate to a roughly 7 stop range. This nice linear signal would grade very well and give you a fantastic result. Careful use of graduated filters or studio lighting might still allow you to do this, but the real world is rarely restricted to a 7 stop brightness range. So we must use the knee or Cinegamma to prevent our highlights from looking ugly. >>
- << If you are committed to a workflow that will include grading, then Cinegammas are best. If you use them be very careful with your exposure, you dont want to overexpose, especially where faces are involved. getting the exposure just right with cinegammas is harder than with standard gammas. If anything err on the side of caution and come down 1/2 a stop. >>
- << If your workflow might not include grading then stick to the standard gammas. They are a little more tolerant of slight over exposure because skin and foliage wont get compressed until it gets up to the 80% mark (depending on your knee setting). Plus the image looks nicer straight out of the camera as the cameras gamma should be a close match to the monitors gamma. >>
- http://www.xdcam-user.com/2010/03/brewing-up-a-scene-file-gamma-and-knee/
- Great practical advice including the need to avoid fleshtones getting into the flesh region of the response curve
Misc:
Posted in gamma, Uncategorized | No Comments »
Sunday, February 20th, 2011
To obtain/maintain/increase/verify an intuitive feel and hence greater confidence for the appropriate use of gamma in camera settings, I did some thinking & research. The basic idea is as follows:
- A typical consumer camcorder produces crisp images
- “Film Look” use of a professional camera may employ non-standard gamma settings in the camera settings.
- The straight results of this are images of “washed-out” appearance. To obtain a pleasing result requires grading (levels & gamma, saturation, color curves etc.). Example: http://reduser.net/forum/showpost.php?p=687243
Regarding the second, more professional approach:
- The immediate result is “scary” because it looks washed-out
- The goal is not to produce an immediately-pleasing image but to capture “as much information as possible” (an often-quoted phrase) from a scene, with the intention and indeed requirement for grading. One has to see it “through the eyes of a grader”. A naive person (e.g. a newbie or a client) will of course not immediately see it that way.
- Example references to this:
- http://www.dvxuser.com/V6/showthread.php?232389-The-Red-quot-LOOK-quot
- <<The RED RAW look, the washed out, flat, low contrast, incredibly versatile form in which the footage originates … screams possibility in our faces. Low contrast can, to the DP, imply power … being precious with the RED footage, and trying hard to save every bit of detail we started with.>>
- <<I can see how the washed out look can become something in and of itself, and have people like it, and others not.>>
- What does this mean? In general, possibly:
- The complete levels and color space of that scene, un-clipped (clipping destroys information).
- Any subtle light/shade within shadows of the scene.
- Questionable aspects:
- Grading takes time (bad for quick-turnaround jobs) and if written to intermediate files (e.g. prior to editing) then it can also eat disk space.
- There is a trade-off between generality and specificness.
- Capturing maximum information provides the grader with greatest freedom.
- On the other hand if it is known in advance that crushed shadows are required, e.g. to obtain silhouettes / film noir effects, then it is a waste of effort / bits if not counter-productive to boost them in the camera.
- The degree to which grading can be applied in practice depends on the levels and color space resolution of the camera.
- Prosumer cameras such as Z1 or XDCAM-EX record to 8-bit levels resolution. And then only a sub-part of that levels-space (typically 16..255 or 16..235, depending on camera and settings).
- For cameras whose sensors work at greater resolution (and can output this information) there is the option to record to external devices at that greater resolution (e.g. 10 bits 4:2:2).
- While it is possible to apply effects like levels, gamma or color-curves (S-curves) to “professional” washed-out imagery, beyond a certain degree, the image will appear ragged or flesh-tones will appear sunburn etc., as the gaps between successive values of the bit-space get stretched too big. One can actually see the gaps (between striations) in a Waveform Monitor (applied to the result of grading).
- In that case we have in fact lost information, defeating the original goal…
- If the results of grading are pretty-much identical (or, from the previous point, possibly inferior) to what would have been obtained in-camera using a more standard setting, then what was the point?
- Reassessment:
- Due to the trade-off issues, the real goal should be to record the maximum relevant information. In other words, to be a little bit specialised.
- This is the logic behind employing physical filters on a camera, such as grad filters (“sunglasses” e.g. for the upper – sky – part of the image).
- Even on feature movie sets I have come across formal instructions for film cameras to be deliberately “pushed a stop or two”. Committing at record-time to something that could, presumably, have been achieved equally-well in post, which itself can be done almost immediately based on HD footage recorded simultaneously from HD cameras attached to the main camera. I have seen directors receive rushes and quick cuts from such cameras within seconds…
- The degree of commitment/specialization may depend on the type or uncertainty of the scene and on the consequence of making a mistake. Feature films are very planned and their shooting is very iterative. On the other hand there can be one-offs such as special-effects or VIP moments. At the other extreme may be live events where anything can happen – subjects, lighting, over-bright/over-dark etc.
- The missing factors in the “maximum information” principle are then:
- Relevance – what kinds of information are relevant?
- Resolution limitations.
- If we only have 8 bits, then what is the practical limit of grading?
- Conversely, if we need to maintain maximum latitude etc., when do we need more than 8 bits (in practice mostly 10 bits)?
Posted in gamma, grading, Uncategorized | No Comments »
Tuesday, December 28th, 2010
On Windows 7 / Boot Camp 3.1 on a MacBook Pro (MBP) of January 2010 vintage, I installed the Canon printer software for their Pixma MG5200 printer (as supplied with my MG5250 printer). Installation was unexpectedly lengthy (one or two hours) due to a USB issue, a one-way-only Setup application (and consequent need to do a System Restore and fix knock-on effects of that) and finally an unexpected confusion over paper source. The latter was explained by popup dialogs but these were not noticed at first as they were hidden under the document being printed (a user-interface issue – application or windows?). The solutions I immediately found to these issues were:
- Unplug all other USBs from the machine – which in this case was a cheap Microsoft wireless mouse.
- Set the paper source specification to Manual, then manually specify it to be the rear tray.
- But there is a better solution – read on.
Having subsequently read the manual, and indeed having looked at the setup dialogs more attentively:
- Rear tray is intended for speciality paper such as photo paper.
- Plain paper should normally be loaded into the Cassette
- This is a paper tray located low-down on the front of the printer.
- To open it, don’t try to pull via fingernails through thin gap, instead use purpose-made “gripper” on underside of “Cassette”.
- Note: The multi-lingual nature of the Manual’s pages is hard on the eye…
This is better really, as it reduces the printer’s “visual clutter” and “space invasion”. It worked fine, for duplex too. It is also possible to configure the printer to use the rear tray as an additional source of plain paper e.g. if the Cassette runs out:
- In Windows System Tray:
- Canon My Printer >RtClk> Open My Printer > Paper Source Settings
- (Not recommended though)
(more…)
Posted in Canon, printer, Uncategorized | No Comments »
Tuesday, December 28th, 2010
NO! …Not at the very least until such time as I have no pressures and fancy an experiment (everything backed-up of course). On my Jan 2010 MacBook Pro (unibody), most things “ain’t broke” at present, the only issues are that the FW800 port and ExpressCard ports work only in Mac OS, not Windows 7, but I’ve found no explicit mention of these issues having been fixed. Shame, quite a few Windows people are put off Macs for that kind of reason. On the other hand while some people report no problems, others do report issues (sometimes due to old/unhandled existing nVidia drivers on their systems), as follows.
- nVidia driver problems affecting install, display (and possibly keyboard).
- Installation may hang or fail or appear to succeed but not completely in practice.
- Screen may appear at low-resolution (e.g.VGA) or may black-out
- Sleep (power management) may give a BSOD.
(more…)
Posted in Boot Camp, Mac, MacBook Pro, Uncategorized | No Comments »
Friday, December 17th, 2010
On an EX3, what’s best for indoor shots of lectures etc?
- Normally film runs at 24fps, with a 180° shutter – which is 1/48th second.
- Hence for 25 fps, ideally use 1/50 second, or nearest available match to this.
- Uncertainty: For 50i, each field is at 25fps, so presumably still use 1/50 second ? Depends on how camera works?
- For a shot of someone talking, it would be hard to see the difference between a 1/48th shutter time and a 1/60th shutter time.
- To avoid (conventional) light flicker, frame rate should divide by integer into twice the power frequency.
- EX3 has no 1/50 shutter speed, at least when specified by Time – nearest equivalent is 1/60. This may risk some degree of light-flickering in 50Hz mains countries.
- For 1080i50
- Initially, used “No Shutter”, to maximize exposure with least Gain. But gave noticeable motion-blur.
- For 50p or 25p
- 1/50 or nearest equivalent (on EX3 is 1/60)
- For 50i, opinions vary:
- UseEX3’s nearest equivalent time-based shutter time of 1/60
- Use 180 degrees (assumes this angle relates to frames-per-second, namely 25fps for each frame – but is this valid when interlaced)
- Use No-Shutter (assumes 50i shoots each field alternately, at 50fps, hence no-shutter is inherently 1/50 – but is that assumption true?)
(more…)
Posted in camera technique, lighting, shutter, Uncategorized | No Comments »
Saturday, November 20th, 2010
http://www.sonycreativesoftware.com/forums/ShowMessage.asp?MessageID=736849&Replies=34
- Avid updated/fixed the DNxHD Codec Configuration Window with their Oct (2010) release…
- http://avid.custkb.com/avid/app/selfservice/search.jsp?DocId=372311
- The Avid codec can only exist in a .mov Quicktime wrapper. A big deal on a lower powered computer like my Core2Duo but pretty much a non-issue on any quad core.
- Not true. However, the FREE version only exists inside an .MOV. And yes, this is a problem for Vegas.
- (For) a Quicktime codec … you need QT installed.
- I noticed there is no 1080p in 29.97 frame rate with DNxHD. Damn.
- Sure there is 1080/30p. The things on the list for you to select are SUGGESTIONS. Use 1080/24p. It will work just fine, and won’t change your video to 24p.
- If you need a tool to convert to DNxHD you can tryout Avid’s Metafuze
- Is there a primer of which of the CODEC selections are which? There are 6 formats and each has slightly different setting available.
Posted in DNxHD, Formats, Uncategorized | No Comments »
Monday, August 30th, 2010
I worried about and noticed in practice an effect where if I was using CINE gammas on the XDCAM-EX and exposed for faces at 70% (by zebras) then the gamma rolloff would result in “pasty-face” appearance. It does …and did… The solution for good looking faces is one of the following:
- Under-expose in shoot, raise in post.
- proper-expose in shoot, use standard gamma (not cine gamma), be careful not to let the face hit the knee (?) e.g. set knee to 90% or 95%.
- take a given gamma curve (or even a flat standard one) and tweak it using gamma level & black-stretch adjustments etc. until it fits the scene.
(more…)
Posted in gamma, grading, Sony EX XDCAM, Uncategorized, XDCAM EX | No Comments »
Sunday, July 25th, 2010
Some issues:
- Had a serious system-disk issue, where CHKDISK deleted corrupt unknown system-related stuff. Windows still worked afterwards as far as I could tell but it was cause for concern…
- Later, the Mac OS function keys became unresponsive.
- The FW800 port only worked in Mac mode, not Boot Camp / Windows 7.
Some fixes:
- As a potential fix to both issues, was advised by machine supplier to reinstall Boot Camp
- Method:
- Mac (machine): Run [Boot Camp > Windows]
- Windows:
- Use [Remove Programs] to remove Boot Camp
- Use Mac OS system disk (from Windows) to reinstall BootCamp (was 3.0).
- Check for any Boot Camp updates – get the latestone (was 3.1).
- Result:
- Function-keys fixed, FW800 issue remained.
- As potential fix for FW800 issue:
- A Sony Vegas forum post advised disabling Aero.
- Web-searching and Vegas forum advised installing the free FW800 driver from UniBrain, allegedly better than the Boot Camp one.
- Prior to the BootCamp reinstall, this was not possible – installation aborted.
- Following the BootCamp reinstall, installation worked but FW800 drive not visible in Windows Explorer.
- Tried a Windows Repair, in case it was not just the BootCamp that had been damaged (possibly by the serious system disk issue mentioned at the start).
- Windows Repair & successive steps:
- Boot Camp: Repair the windows system (Windows 7).
- Check whether System Restore works now.
- Yes, when I set a restore-point, wait a few mins and restore to it. But what if I reboot then try to restore?
- Seems hit-and-miss: sometimes Restore works, sometimes not. Rebooting doesn’t affect that but system crashes/freezes e.g. as caused by FW800 failing, do appear to. Uncertain, just rough observations.
Posted in FireWire, MacBook Pro, Uncategorized, Windows 7 | No Comments »
Saturday, July 24th, 2010
Gamma-shift issue:
- http://forums.creativecow.net/thread/8/1028870
- “QuickTime movie, created with Avid on a PC, using the DNxHD codec. When I open it in QuickTime Player on a PC, the colours are fine, but when I import it into Final Cut on a Mac, the colours are a lot brighter- gamma shift”.
- “I have ProRes and DNxHD clips of the same thing on the timeline. When I switch from a frame in one clip to the same frame in the other clip, there is a very visible difference between the two. The DNxHD version is brighter and ‘milky’. I’ve tried exporting DNxHD from Final Cut and it has the same problem as the DNxHD sourced from the Avid.”
- “It’s the codec. DNxHD reports RGB values to FCP not Y’CbCr. Therefore FCP applies its internal RGB interpretation which causes the gamma shift you see.”
- “Any non native codecs to final cut pro should be transcoded first through compressor; best way to check if the gamma has shifted is take an image with tonal ranges which vary over a gradient e.g. sky; look at the scopes in avid for the dnx file; look at the scopes in final cut pro for the dnx file; no guess work”
- x
Posted in DNxHD, gamma, Mac, Uncategorized, Windows | No Comments »
Tuesday, July 20th, 2010
Using Boris RED 4.3.3.1502 on Windows, mostly as standalone (Red Engine). Today, wanted to apply it as a stabilizer. Have done this a long time in the past, for AVI files etc., but this is the first time I have seriously tried to apply it to to XDCAM-EX footage, of 720p50 (intended for a PAL DVD 576i50 deliverable). Summary:
- Warnings:
- Boris can’t be used in Sony Vegas for other than static effects, hence not for stabilization (a dynamic effect).
- At least, not without a workaround of debatable overall advantage (explained under “More”).
- Boris doesn’t recognize Sony XDCAM ClipBrowser’s “MXF for NLEs” format, but does recognize Cineform AVI (no need to be QT).
- When altering any settings, Boris defaults to keyframing them. Right-click the funny symbol and change it to Constant.
- Have to double-check the compression settings, including the codec’s own dialog (their defaults are not always good and they can change “automatically”).
- Boris can export 720p50 as QT-CFHD but, as far as I can tell, Sony Vegas cannot (it can only export such CFHD as AVI, though thankfully Boris can read that).
- Boris doesn’t use multiple CPUs it seems. Unlike DeShaker – of great advantage for such lengthy (CPU-heavy) processes.
- Instructions (in Boris):
- Delete existing tracks, drag-in the source file, de-select its tracks (audio & video), Menu: [Filters > Time > BCC Optical Stabilizer], select the Stabilizer track.
- In Controls change Mode from default [Setup region] to wanted [Smooth], twirl-open the Stabilizer track, drag video track onto its Input Layer. Also increase Smoothing Range from default (30 frames) to 1 or 2 seconds-worth (in my case 100 since footage was 50 fps).
- Click Preview’s [ >>| ] “Go To End” button. This causes motion analysis to begin. Takes ages… Likewise, don’t bother playing it…
- [Menu: File > Export > Movie File].
- Initially generate a quick draft to check the stabilization is as required:
- Temporarily set 25fps, choose [Fast]
- Select a limited region (I/O) for export.
- Regardless, in compression dialog, if Cineform is used then select Quality = Medium (not Best or High which are overkill).
- Links:
(more…)
Posted in Boris, Cineform, Sony Vegas, Uncategorized | No Comments »
Friday, June 25th, 2010
WHen using Windows under BootCamp, I had been getting some serious problems when using an external drive via FW800.
- …like the device disappearing (from the visibility of the OS, Windows 7).
As advised by suppliers, removed and reinstalled BootCamp, as follows:
- Windows 7: [Control Panel >> Remove Programs: BootCamp Services]
- Rebooted
- Inserted Mac OS Disk that came with the MacBook
- It is MacBook-specific. Must use that one, not any other.
- From root folder, as seen by W7, ran [setup.exe].
- Kapersky complained a few times.
- Rebooted. Mostly OK but no keyboard lights or control thereof.
- Rebooted again. Now the keyboard lights are on and controllable.
- Check the BootCamp version: It is 3.0.
- Need update to 3.1.
- Go to Apple support page for BootCamp:
- [www.apple.com/support/bootcamp]
- ..and click [Downloads]
- Taken to [http://support.apple.com/downloads/#macoscomponents]
- There are several items.
- There are several Boot Camp 3.1 downloads (these are upgrades not installs). Which one (if any) is appropriate? Examples:
- Boot Camp Update for MacBook Pro (13-inch, Mid 2010) (Windows 64 bit)
- Any good for 17-inch ?
- Various articles around May 2010 say nothing about the 17-inch, so maybe not then.
- Boot Camp Software Update 3.1 for Windows 64 bit
- Any good for MacBook Pro?
- Searched web for any clues:
- Finally: Downloaded the one at http://support.apple.com/kb/DL979
- Broadly applicable installation instructions are at http://support.apple.com/kb/HT4177
- …even though they’re for the 13-incher.
Not necessarily related, but interesting to note:
- Controller Saturation:
- USB port speeds differ (and why):
- USB & FW Benchmark Tests (SpeedTools suite):
Posted in Mac, MacBook Pro, Uncategorized | No Comments »
Wednesday, May 26th, 2010
Some further tips found online:
- [http://www.sonycreativesoftware.com/forums/ShowMessage.asp?ForumID=4&MessageID=704856]
- You have more than a dozen choices in the DNxHD codec… (but you might not see them) because of the little display bug. When you select the Avid DNxHD codec, a window pops up. At the bottom of that window is just a little sliver of a pulldown menu. Click that and all should become clear.
- [http://www.sonycreativesoftware.com/forums/ShowMessage.asp?ForumID=4&MessageID=701760]
- DNxHD is a broadcast codec. And types that are not broadcast standards are not included.
- …in the “Custom Settings” you can … set the Frame rate and the Field order to suit your … footage.
- [http://www.sonycreativesoftware.com/forums/ShowMessage.asp?MessageID=712102&Replies=1]
- Settings for HD interlaced:
- Color levels should be RGB
- Size should be 1920×1080
- Pixel aspect 1:1
- Field order Upper
- DNxHD-TR 175 8-bit template
- Be sure to click OK (the dialog may fail to display it)
- Variation for HDV:
- Thin Raster is supposed to be better for stretched pixels like 1440×1080
- [http://www.sonycreativesoftware.com/forums/ShowMessage.asp?ForumID=4&MessageID=710761]
- You will be able to preserve aspect and gamma with DNxHD. Be sure to select the right bit depth and color levels for your originals. (For a) 1440×1080 source, (i.e.) HDV, … you will want 8-bit, 4:2:0 RGB output to match the originals.
- One user’s experience (not mine):
- Here’s the file settings for … m2t files (as provided by MediaInfo):
- 25Mbps, 1440×1080 (16:9), at 29.97fps, MPEG video component version 2,(Main (high @1440)) BVOP
- Here’s what it reports for the .mov generated by DNxHD:
- 220Mbps, 1920×1080 (4:3) at 29.97fps, VC-3, DNxHD
- I’m not sure where it got the 1920×1080 frame setting from, though. In the frame size box, I had custom frame settings of 1440 x 1080 with a PAR of 1.333.
- Reply:
- 1440 X 1.333 = 1919.52 which rounds up to 1920.
- Your render frame size should be set to 1920×1080 to preserve the aspect. As gets mentioned a lot in these forums, MOV does not respect PAR.
- [http://www.sonycreativesoftware.com/forums/ShowMessage.asp?ForumID=4&MessageID=709379]
- Best way to export timeline to FCP for CC:
- Change your color space to RGB. Click the little pulldown window at the bottom, select 1080i/59.94 DNxHD 220x. And when you say OK to this window, change the slider from the current 50% quality to 100%. Then render out. The file will be slightly less than 2 minutes per gig.
- Avid 1:1 is an uncompressed codec designed for SD video. DNxHD is an HD codec and the only one Avid uses.
Posted in Avid, DNxHD, Uncategorized | No Comments »
Saturday, May 15th, 2010
When to use each variant?
- [http://www.avid.com/US/about-avid/customer-stories/Taking-Woodstock-Small-Family-Drama-Precise-HD-Editing]
- Footage was telecined to HDCAM and digitized to
- DNxHD 36 format, which offers compact storage of crisp HD images and was essential for laptop-based HD editing.
- DNxHD 115 was used occasionally for detailed wide shots, often for crowd scenes.
- [http://www.studiodaily.com/blog/?p=97]
- The Avid codecs allow you to select the color space (709 or RGB) and I believe that is why the RGB-YUV conversions are apparently handled better by the Avid codecs.
- Something to keep in mind when embarking on projects that may require material to meander into the RGB space.
- The big surprise for me was the performance of Avids DNxHD 36 codec. (Only) 3.5% of the original file size
and look at how amazing it did.
- Since its a progressive-only codec, I couldnt run it on my second set of tests.
- [http://community.avid.com/forums/p/44088/248040.aspx#248040]
- DNxHD 185 X is a 10-bit version of DNxHD 185.
- [http://community.avid.com/forums/p/17160/96889.aspx#96889]
- 1080i/50 HDV is 1440 x 1080, as is DNxHD-TR 120.
- TR means “Thin Raster” reflecting the fact that if viewed on the assumption of square pixels, the subjects would look thin, since really the pixels are “fat”.
- 1080i/50 is 1920 x 1080, as is DNxHD 185 and DNxHD 120
- Throughput: 185Mb/sec for DNX185 = 23MB/sec.
- [http://community.avid.com/forums/p/50032/280966.aspx#280966]
- DNxHD 36 is great..BUT (as of 2007) only works in 1080p/23.98. Why not 720p/59.94 or 1080i/59.94 ?? Answer: The format was created for the film-offline-HD crowd, thus the limited 1080p support.
Posted in Uncategorized | 1 Comment »
Saturday, May 1st, 2010
[http://www.dvinfo.net/forum/sony-xdcam-ex-cinealta/235167-vegas-9-imports-native-xdcam-ex-files-2.html]
- as of May 2009:
- Technically, you can edit the .mp4 files right from the card. Youd need to drill down through the directories via the standard Vegas Explorer tool (not the new Device Explorer), find your .mp4 clip, and bring it into your project.
- “We do not currently support shot markers from EX in the Vegas Pro 9 Device Explorer, but it is on our radar.”
- Spanning clips does not work properly for everybody (could in principle be due to their circumstances as much as the app). Recommended to join these together using ClipBrowser thenexport as MXF for NLEs. … It is really the same concept as (FCP’s) XDCAM Transfer except instead of re-wrapping as [.mov] it re-wraps as [.mxf].
- (In the case of FCP) … the metadata is part of the MOV after … re-wrapping the file for FCP. (Possibly) Vegas had a problem with managing the metadata and their solution was just to (import the) native (essence/mp4) files.
My own experiences:
- A long shoot gets listed as a sequence of smaller clips, corresponding to the separate [.mp4] files recorded by the camera. This is known as a spanned clip. Each of the smaller clips is of size no more than around 3.5 GB.
- Device Explorer import results:
- Clips with names like [929_1332_01_20100318_191600] i.e. having datetimes.
- These clips consist of the following files, with main file name as per the clip:
- XDCAM-EX: [.mp4], [.xml]
- AVCHD: [.mts] (but no clip info files).
Posted in AVCHD, Sony EX XDCAM, Sony Vegas, Uncategorized, XML | No Comments »
Wednesday, April 21st, 2010
For Mac OS:
For Windows:
They are both pretty similar, in each case displaying filespace usage via a tree map looking like a patchwork of multicoloured PVC, each colour representing a different type of file (audio, video, application, document etc.). Their advantage over traditional browser trees is you can see all the largest files and folders simultaneously (as a plan-view). Tree maps (treemaps) are explained at http://w3.win.tue.nl/nl/onderzoek/onderzoek_informatica/visualization/sequoiaview/about_treemaps/ – they are formed by subdividing in alternate dimensions (horizontal/vertical), each time in proportion to relative size of item, be it folder or file. A variation on this, employed by the above tools, is a cushion treemap [http://www.win.tue.nl/~vanwijk/ctm.pdf], where shading reveals the directory structure. A further variation is the squarified treemap [http://www.win.tue.nl/~vanwijk/stm.pdf], where subdivision and grouping attempt (no guarantee of success) to make the rectangles as square as possible. (more…)
Posted in file mgt, linux, Mac, microsoft, Snow Leopard, Uncategorized, Video Computer Technology, Windows | No Comments »
